How to Integrate Snowflake with Fireflies
Last updated: September 24, 2026
The Snowflake + Fireflies integration lets you send your Fireflies meeting data directly to your own Snowflake account. Each completed meeting can be stored with its metadata, participants, notes, and transcript, along with ready-made views that make it easier to query meeting and transcript data.
Let’s get started 🚀
🔍 What does the Snowflake Integration do?
The integration delivers your Fireflies meeting data directly to your Snowflake account, giving you a central place to store and query your meeting information.
It helps you:
Push meeting data to Snowflake → Send meeting metadata, notes, summaries, and transcripts to your Snowflake account.
Store raw meeting data → Keep completed meeting data in an append-only table for querying and analysis.
Query meeting insights easily → Use ready-made Snowflake views to work with meetings, transcript sentences, and summary sections without having to unpack the raw JSON data.
Choose what to send → Configure transcript and summary output independently.
🔑 Prerequisites
Before connecting Snowflake to Fireflies, make sure you have:
Access to the Snowflake account you want to connect.
Your Snowflake account identifier.
Permission to run the setup script provided by Fireflies in Snowflake.
Access to generate a Programmatic Access Token (PAT) in Snowflake.
Once you have these ready, you can connect Snowflake to Fireflies.
🔗 Connect Snowflake to Fireflies
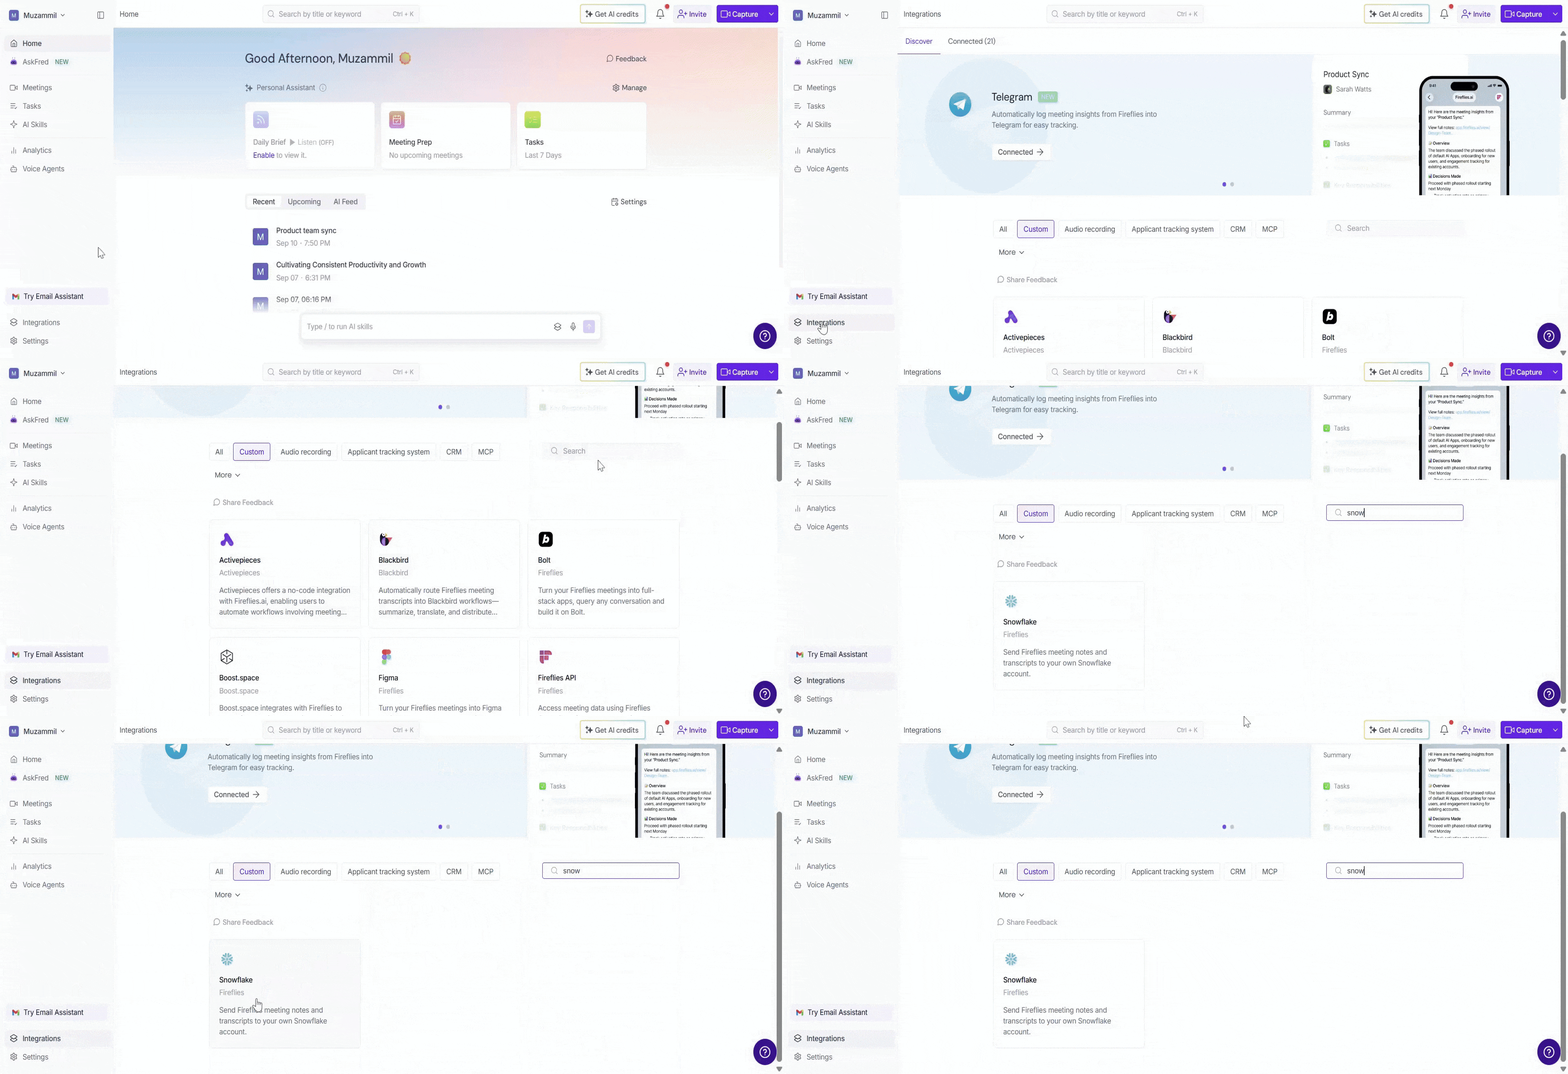
Step 1: Log in to your Fireflies account, click on the Integrations tab, and search for Snowflake. Click on it to get started.
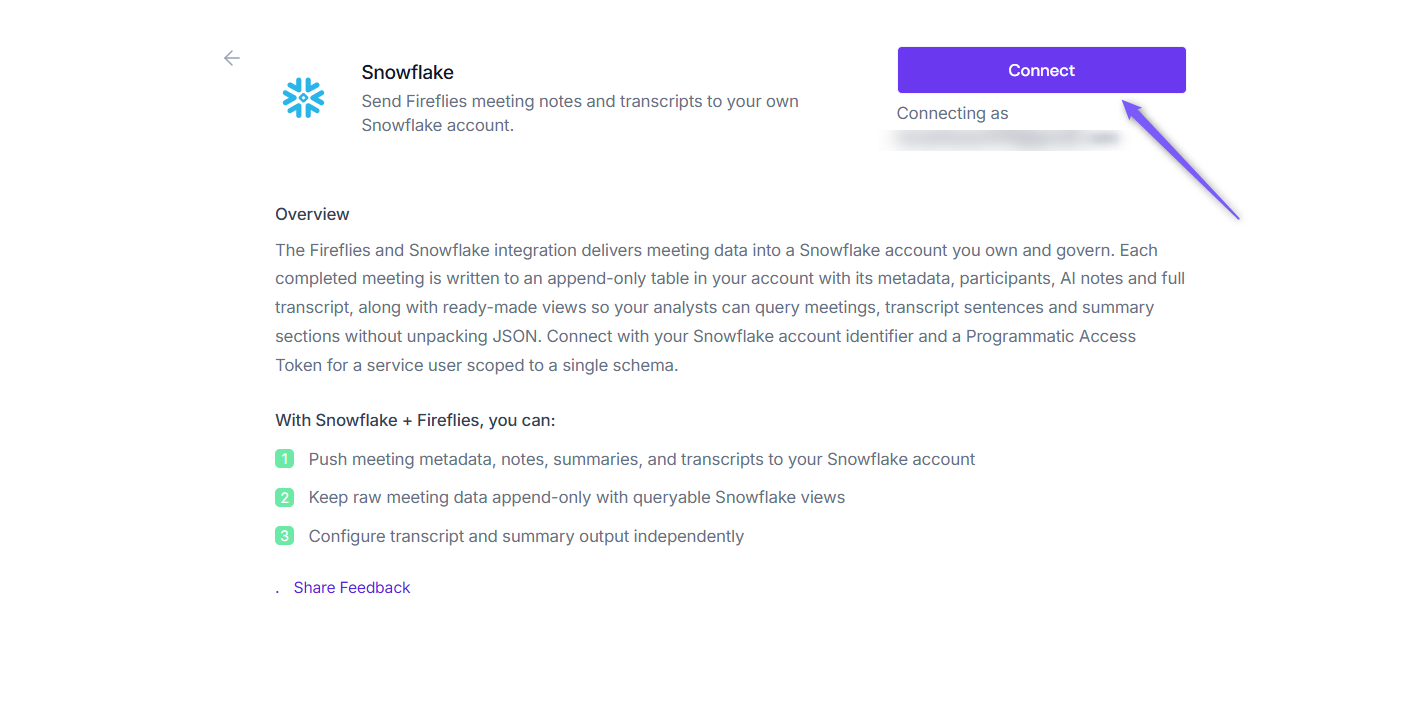
Step 2: Click Connect.
Step 3: In the Authorize Snowflake window, enter your Snowflake account identifier.
To find your account identifier in Snowflake:
Open your Snowflake account.
Click your account name in the top-left corner.
Select Account.
Click View Account Details.
Copy the
Account identifiershown under the Account tab.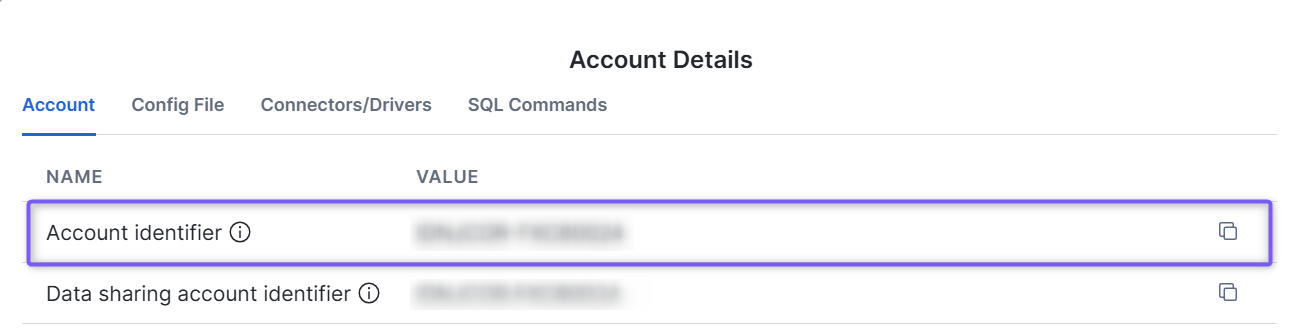
Paste the account identifier into Fireflies.
Note: Enter the account identifier used in your Snowflake URL.
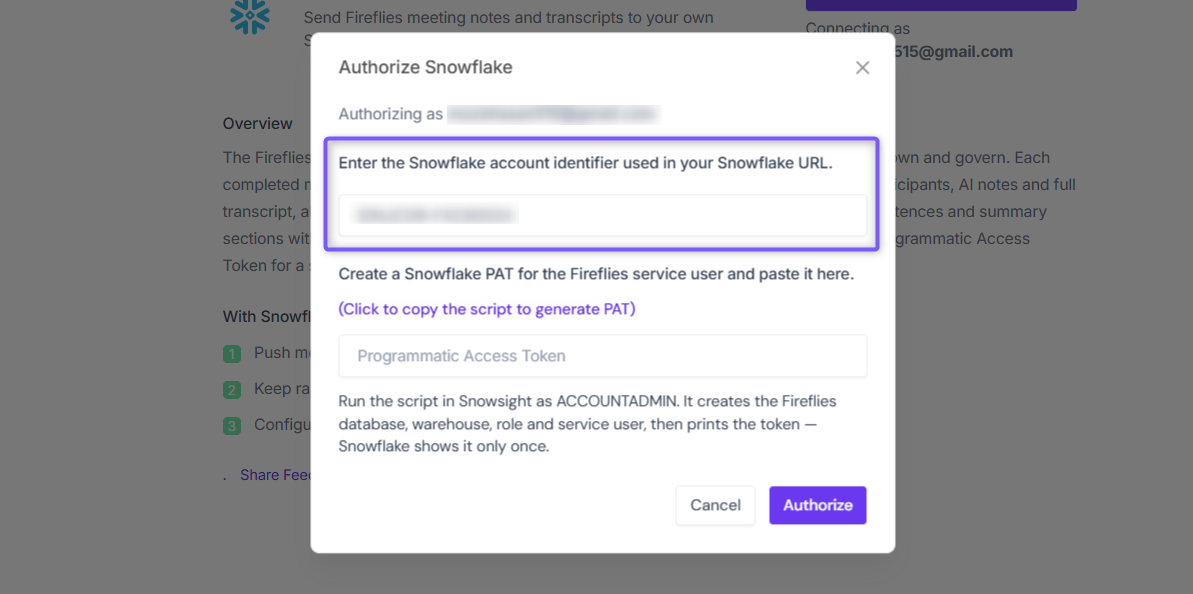
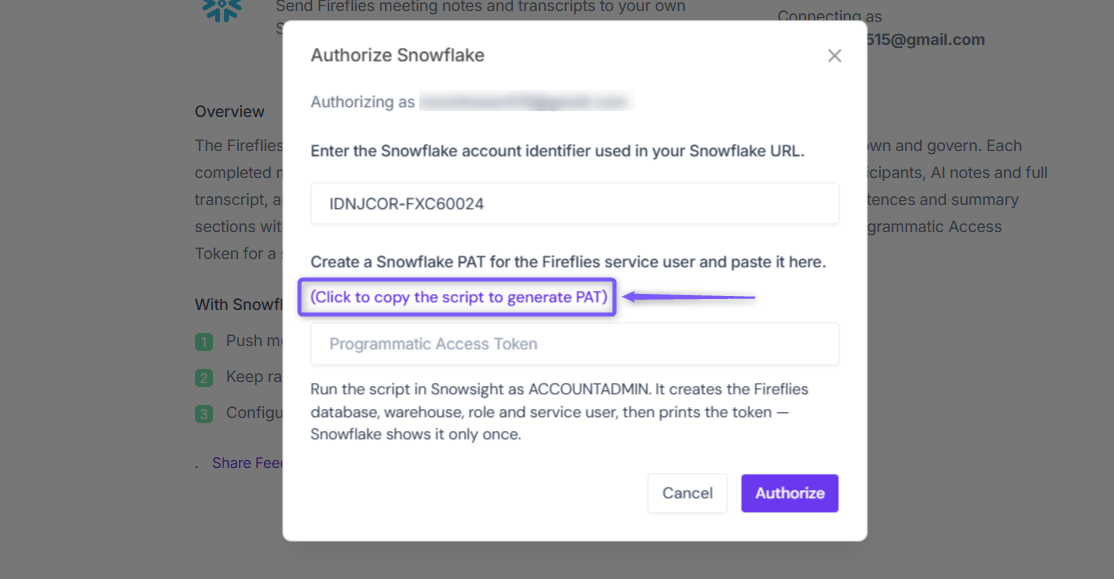
Step 4: In the Authorize Snowflake window, click Click to copy the script to generate PAT.
The script creates the Fireflies resources required to connect to Snowflake and generates a Programmatic Access Token (PAT).
Step 5: Open Snowsight in Snowflake, paste the copied script into a worksheet, and click Run.
💡 Make sure you're using the
ACCOUNTADMINrole before running the script.
Note: If this is your first time connecting Snowflake to Fireflies, run the script as provided. If you're reconnecting or your existing token has expired, uncomment the following line in the script before running it:
ALTER USER FIREFLIES_SVC ROTATE PAT FIREFLIES_TOKEN;
This generates a new Programmatic Access Token. Copy the PAT returned by Snowflake.
Important: Snowflake displays the token only once. Copy it before leaving the result.
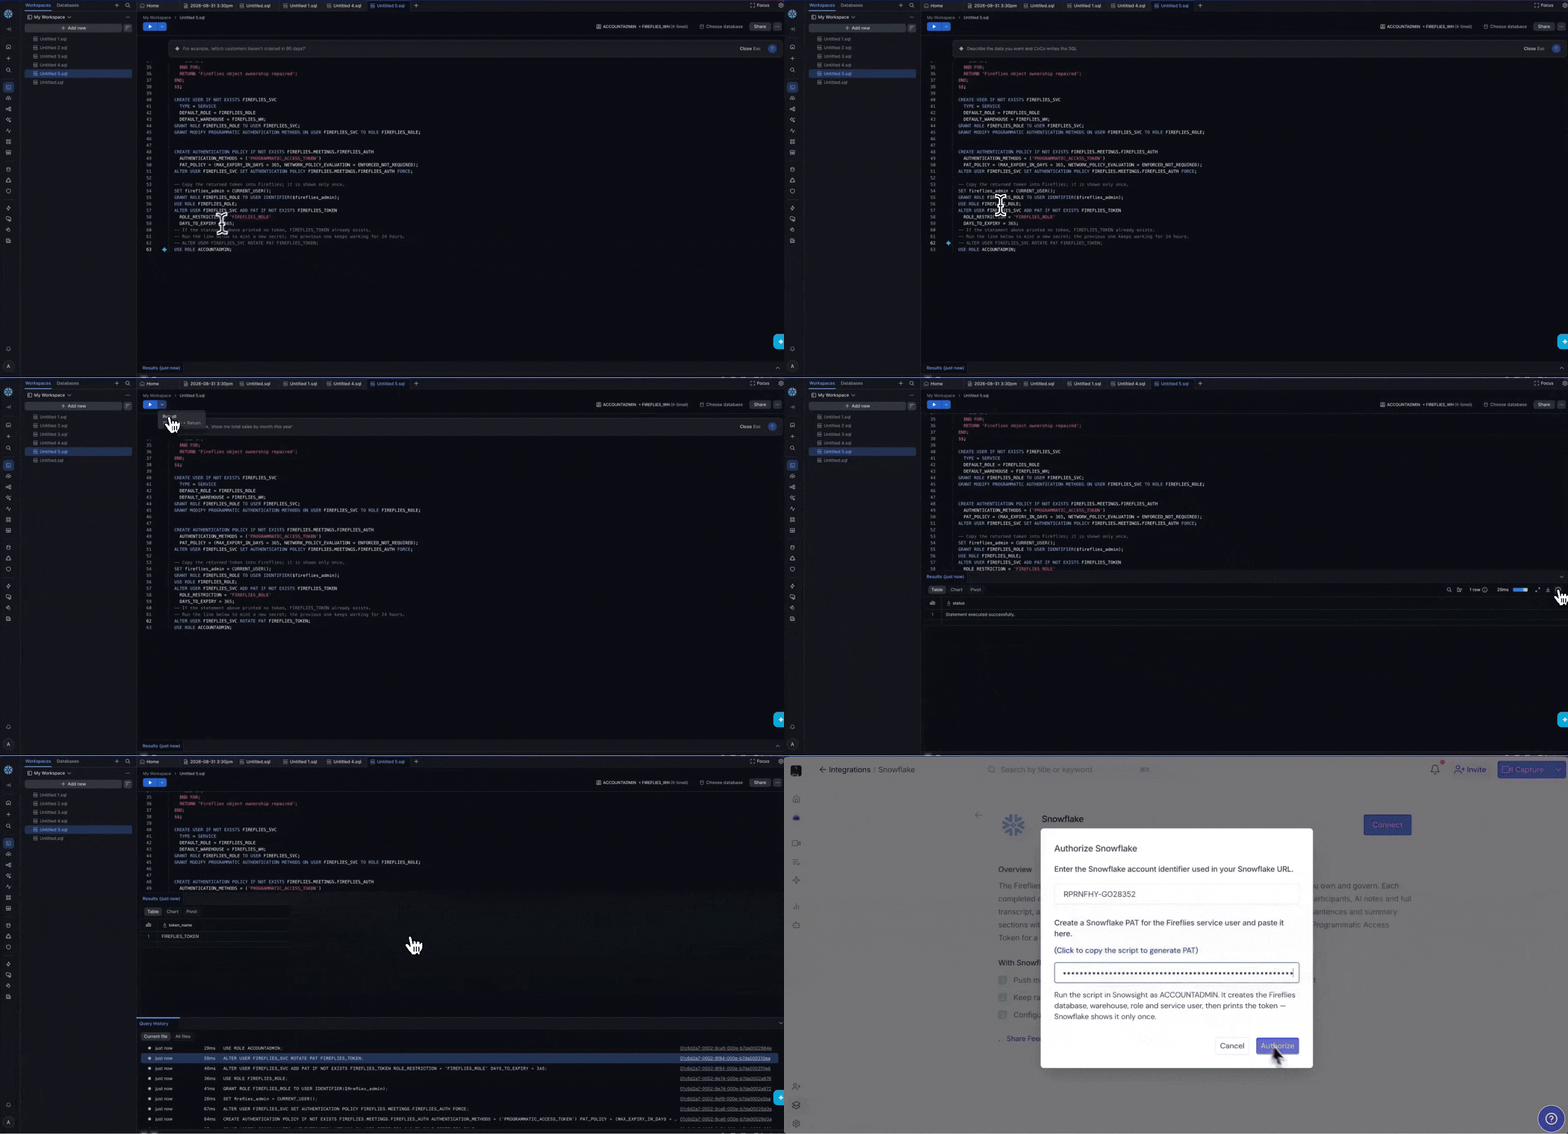
Step 6: Return to Fireflies and paste the token into the Programmatic Access Token field.
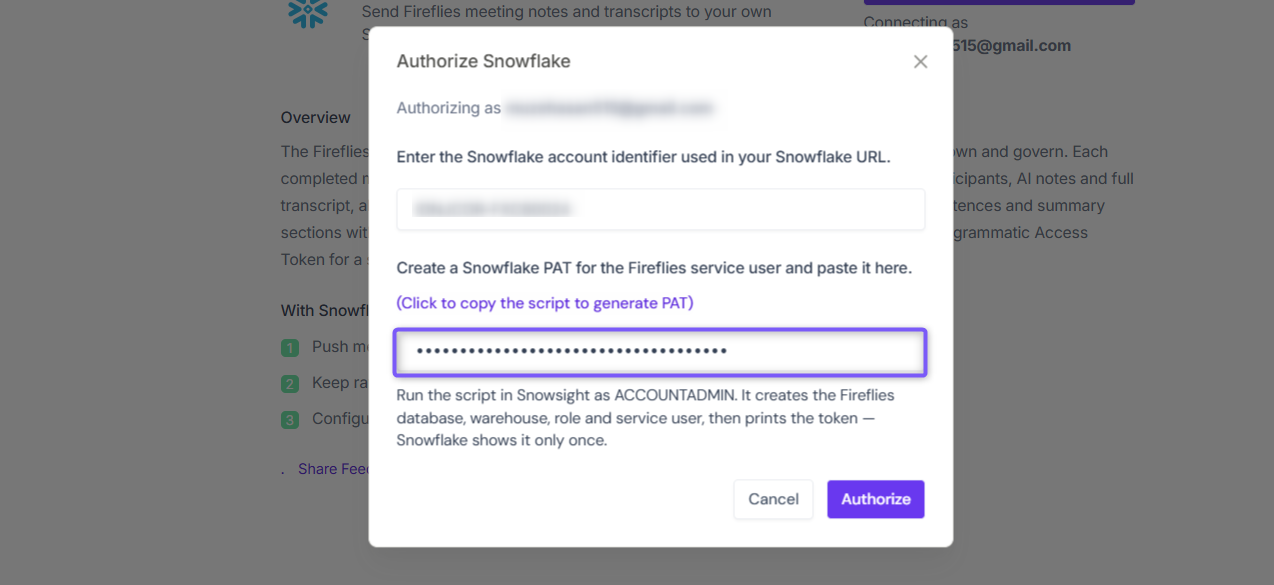
Step 7: Click Authorize.
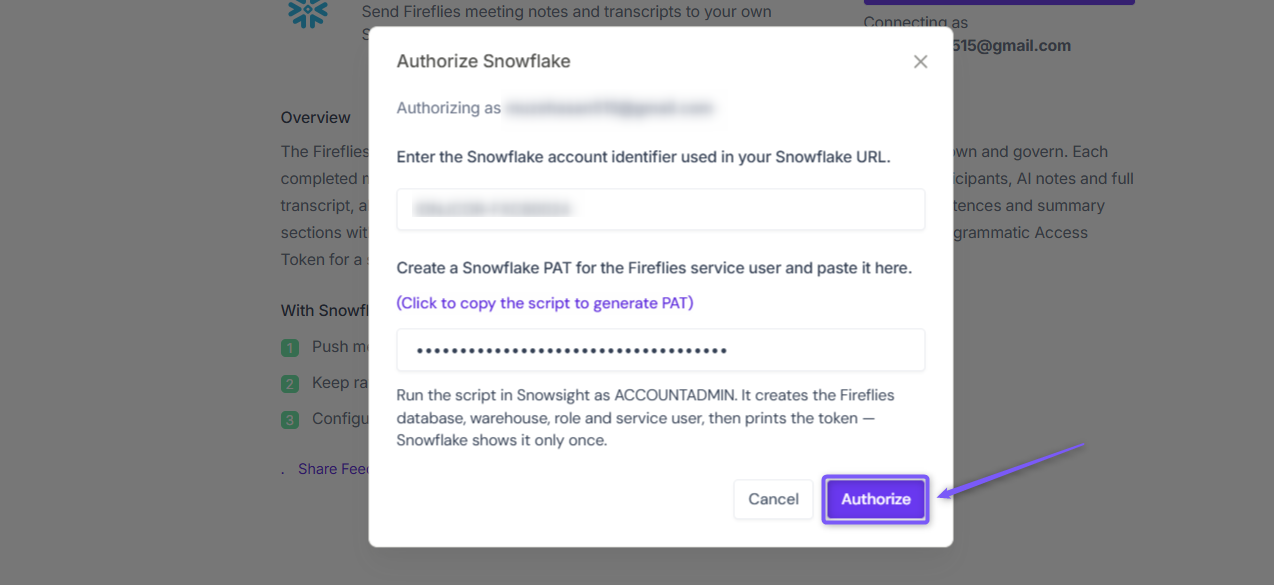
Once authorization is successful, you’ll be redirected back to Fireflies to configure your Snowflake integration.
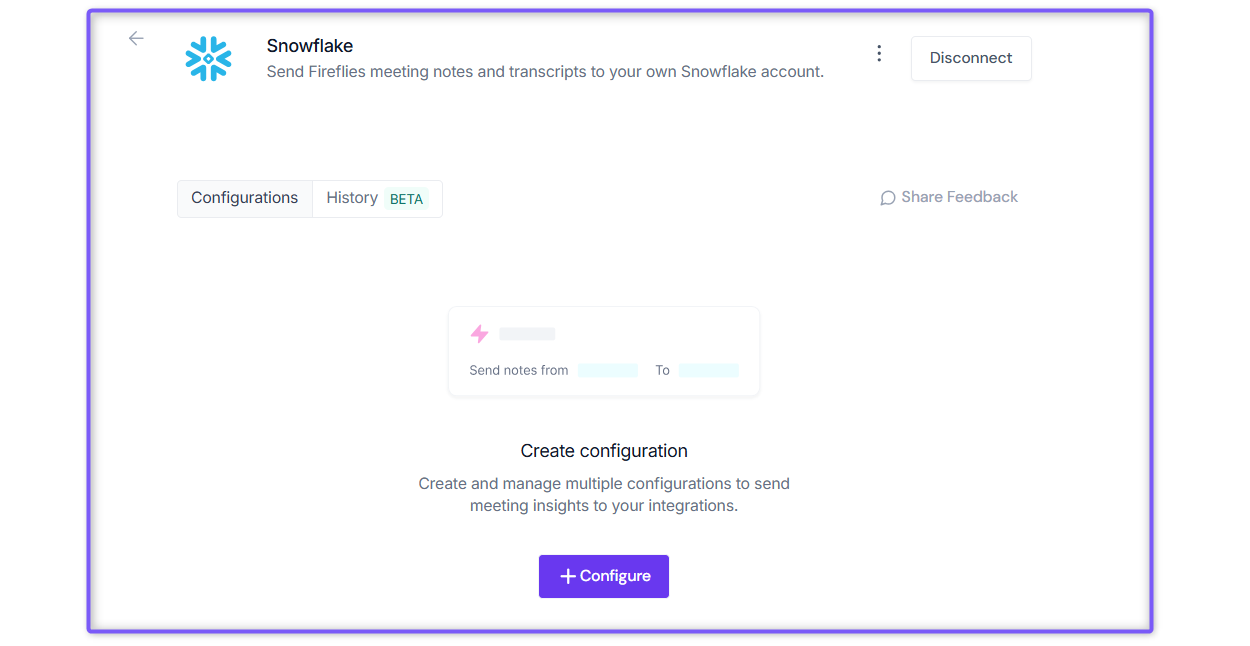
⚙ Setting Up Your Configuration
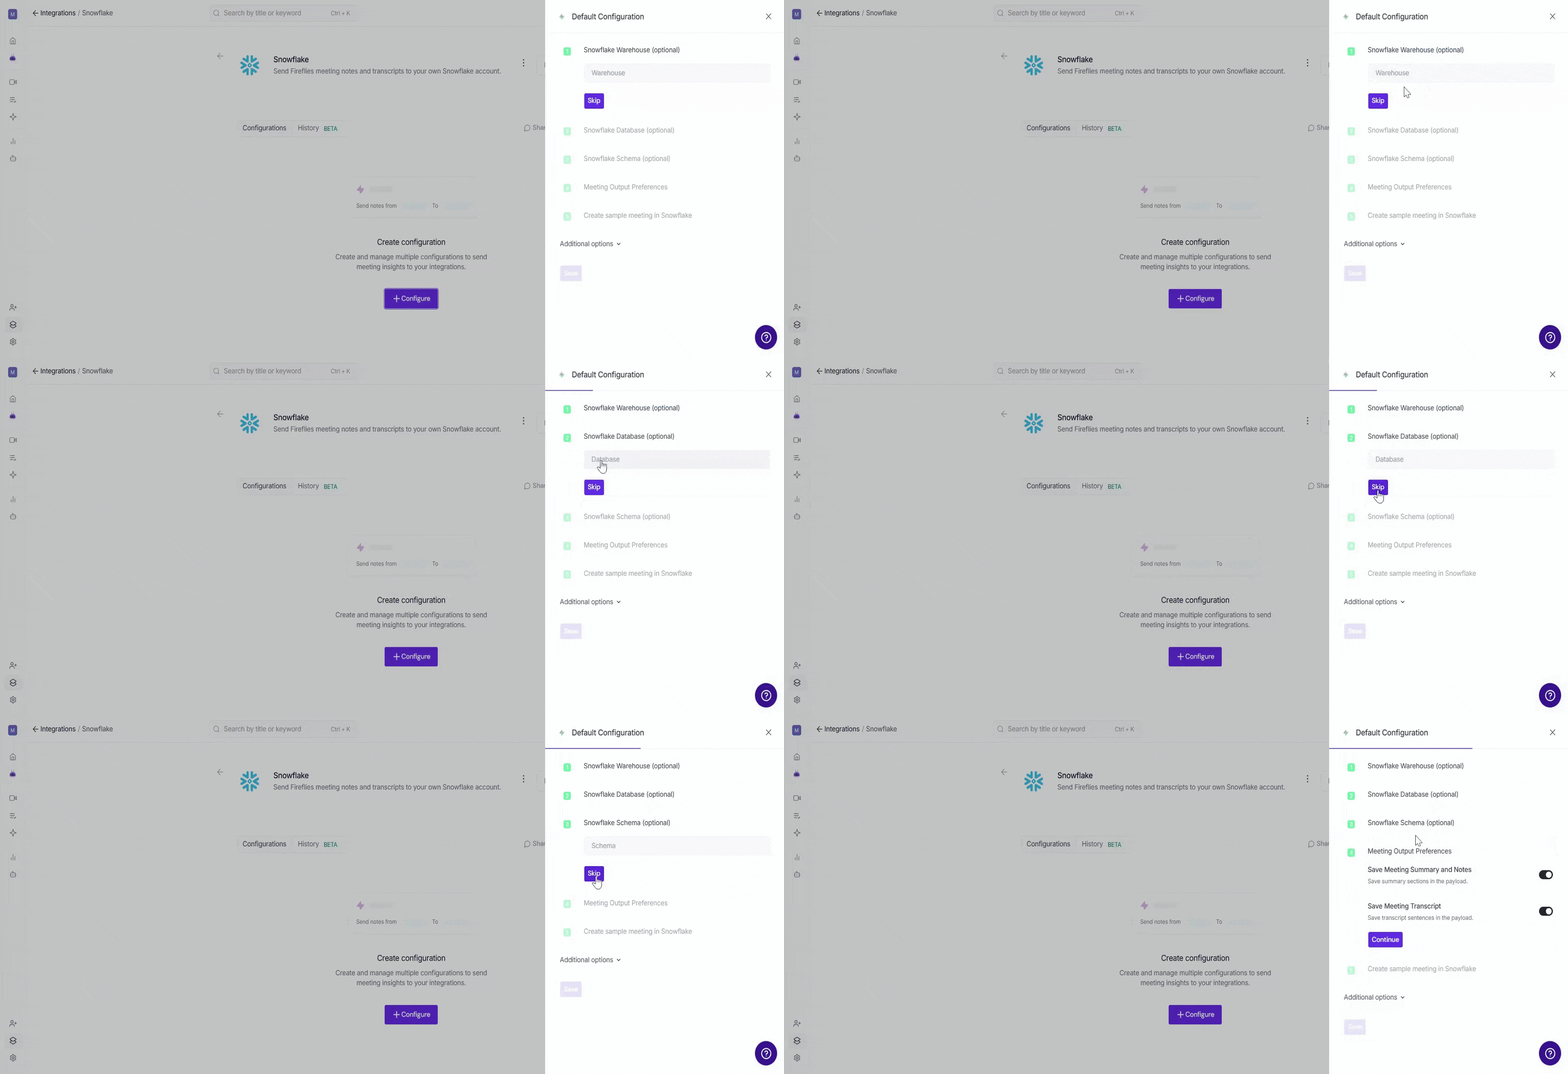
Step 1: Choose Where to Store Your Meeting Data
Choose where Fireflies should store your meeting data in Snowflake. You can either let Fireflies create the required database for you or use an existing Snowflake setup.
Use Fireflies' setup: Let Fireflies automatically create a database for storing your meetings, transcripts, and other meeting data.
Use your own setup: Select your existing Snowflake Warehouse, Database, and Schema where you want Fireflies to store the data.
If you want Fireflies to manage the database setup, click Skip for the Warehouse, Database, and Schema fields.
Note: The Warehouse, Database, and Schema fields are optional. You can skip all three and let Fireflies create the database automatically.
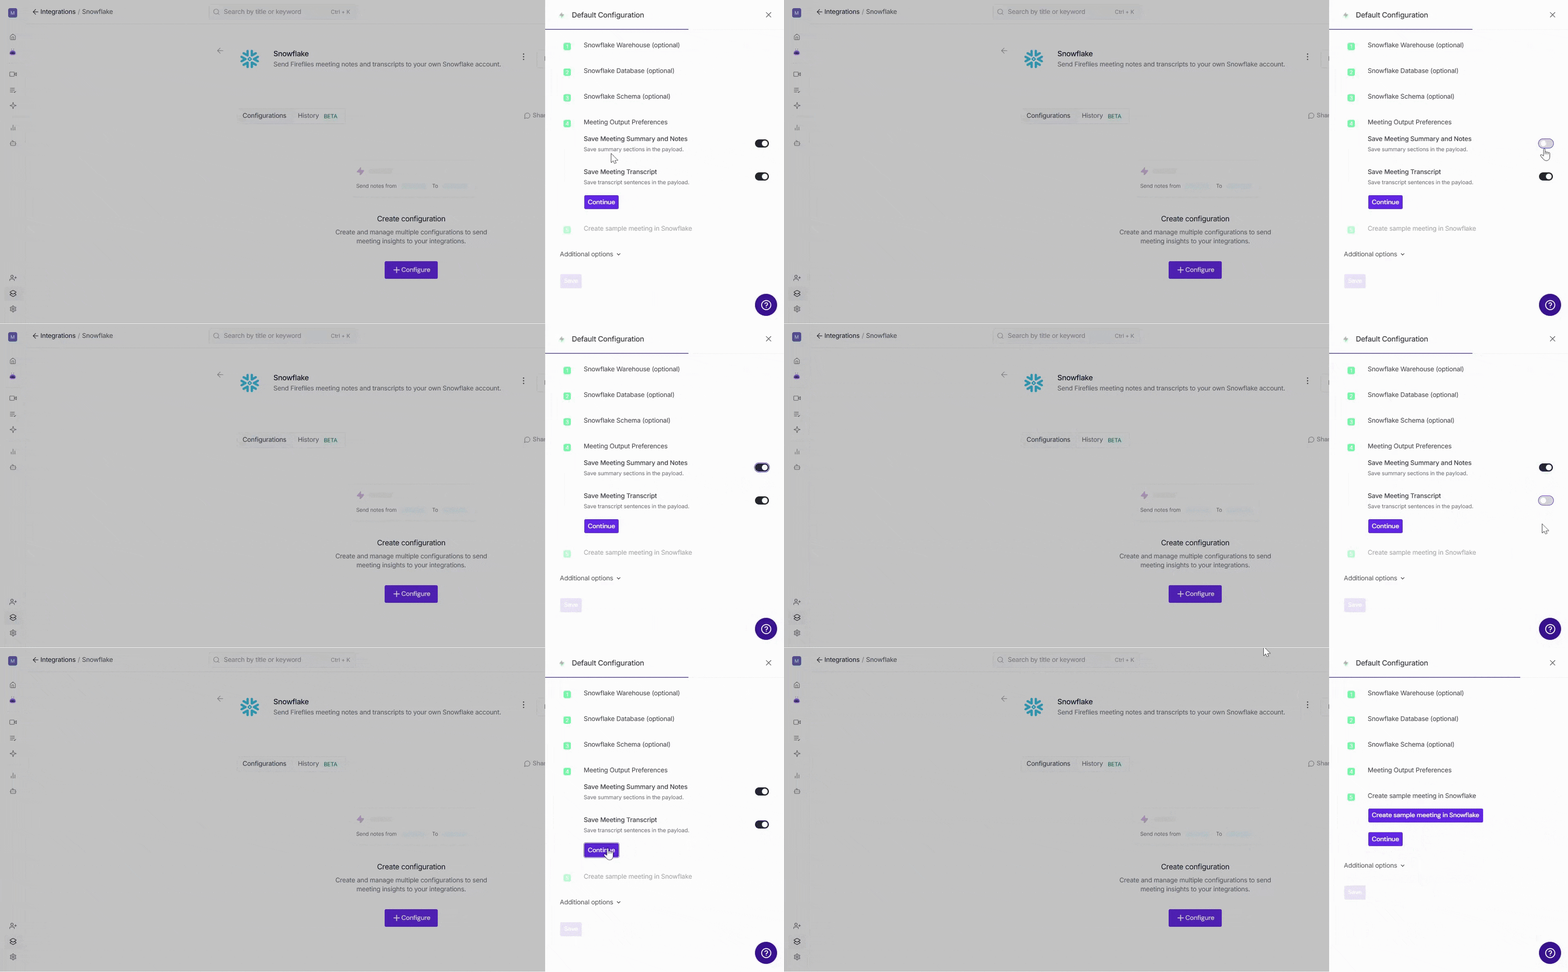
Step 2: Select your Meeting Output Preferences
Choose which meeting data you want Fireflies to send to Snowflake.
Save Meeting Summary and Notes: Turn this on to send your meeting summary and notes to Snowflake.
Save Meeting Transcript: Turn this on to send your meeting transcript to Snowflake.
You can enable either option or turn on both to send summaries, notes, and transcripts.
📌 Note: Transcript syncing is available on Business and Enterprise plans.
Once you've selected your preferences, click Continue.
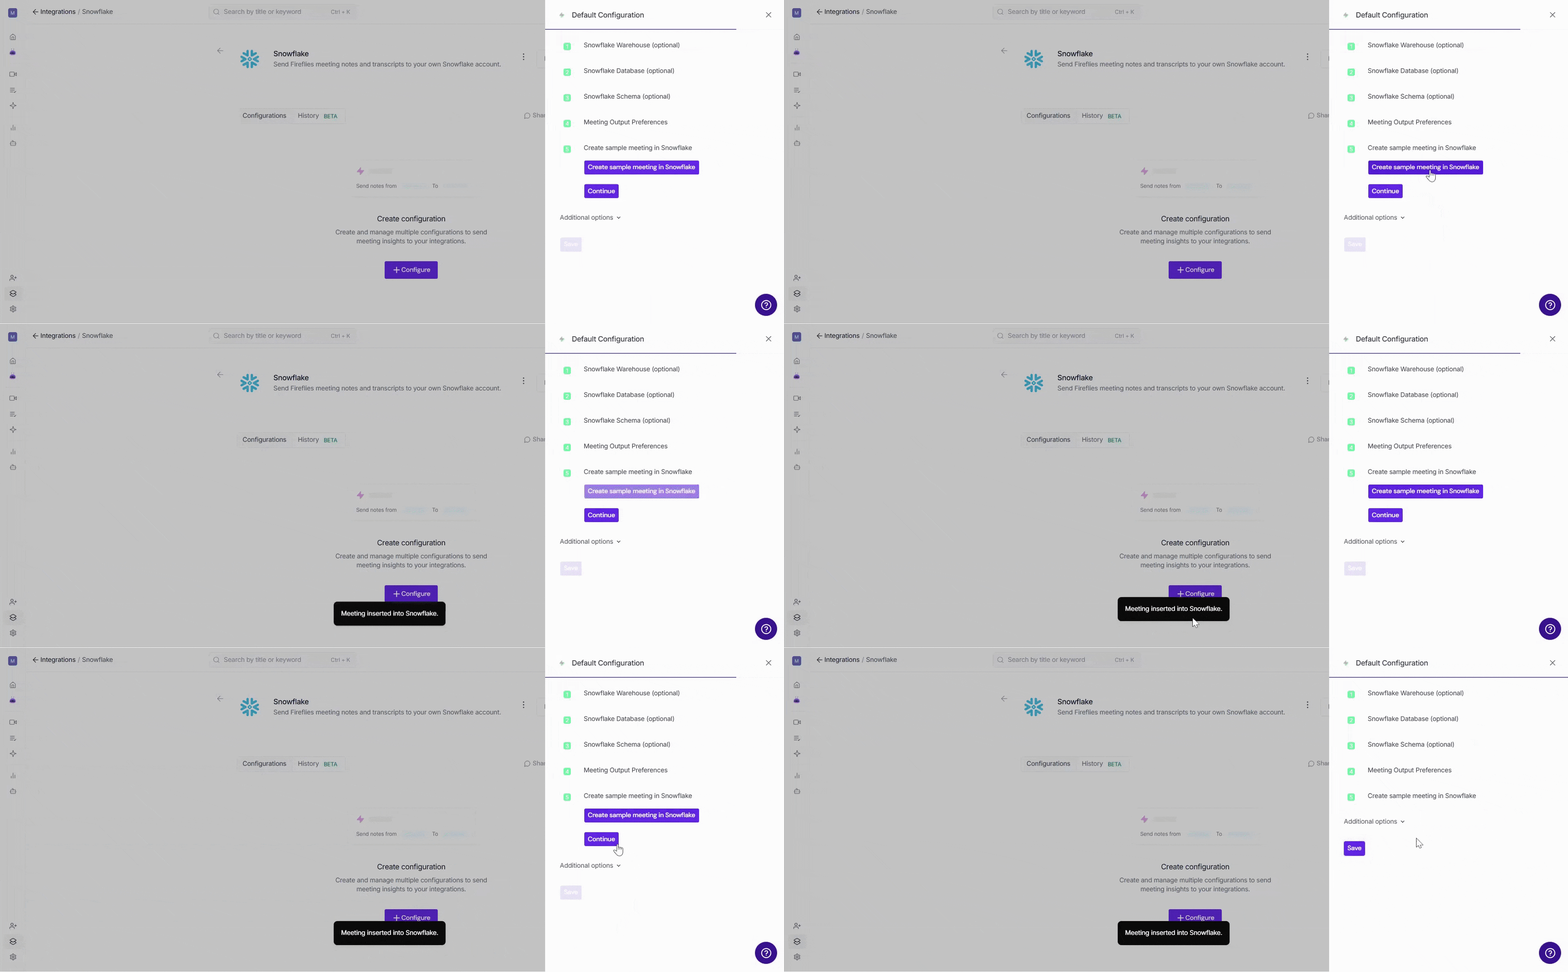
Step 3: Create a Sample Meeting
Before finishing the setup, you can create a sample meeting to confirm that the Snowflake connection is working correctly.
Click Create sample meeting in Snowflake. Fireflies will send a sample meeting to your Snowflake account.
Open Snowflake to verify that the sample meeting data appears successfully.
Once verified, click Continue to proceed with the setup.
The sample meeting is only used to verify the Snowflake connection and does not affect your real meetings or meeting data.
🧩 Additional Options – Integration Rules
By default, Fireflies applies the configuration to All Eligible Meetings. If you don't want every eligible meeting to send data to Snowflake, you can use Integration Rules to control which meetings are included.
Integration Rules are available on Business or higher plans.
💡 Learn more about our different pricing plans and how to get started.
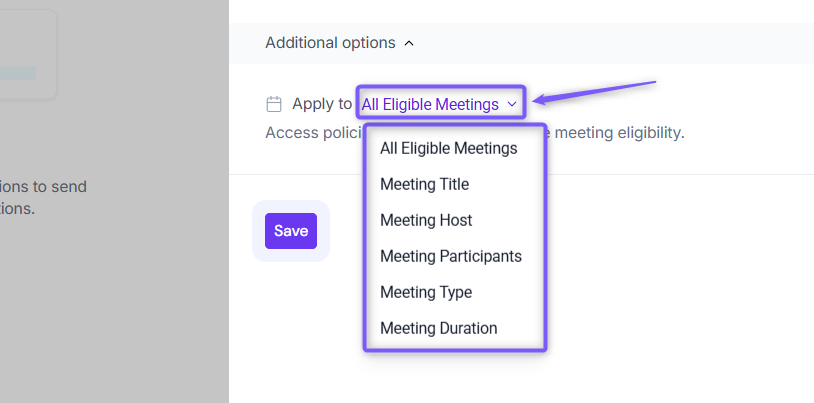
🗂 All Eligible Meetings
Send meeting data to Snowflake from every meeting that meets your workspace's access policies, with no additional filters applied.
📝 Meeting Title
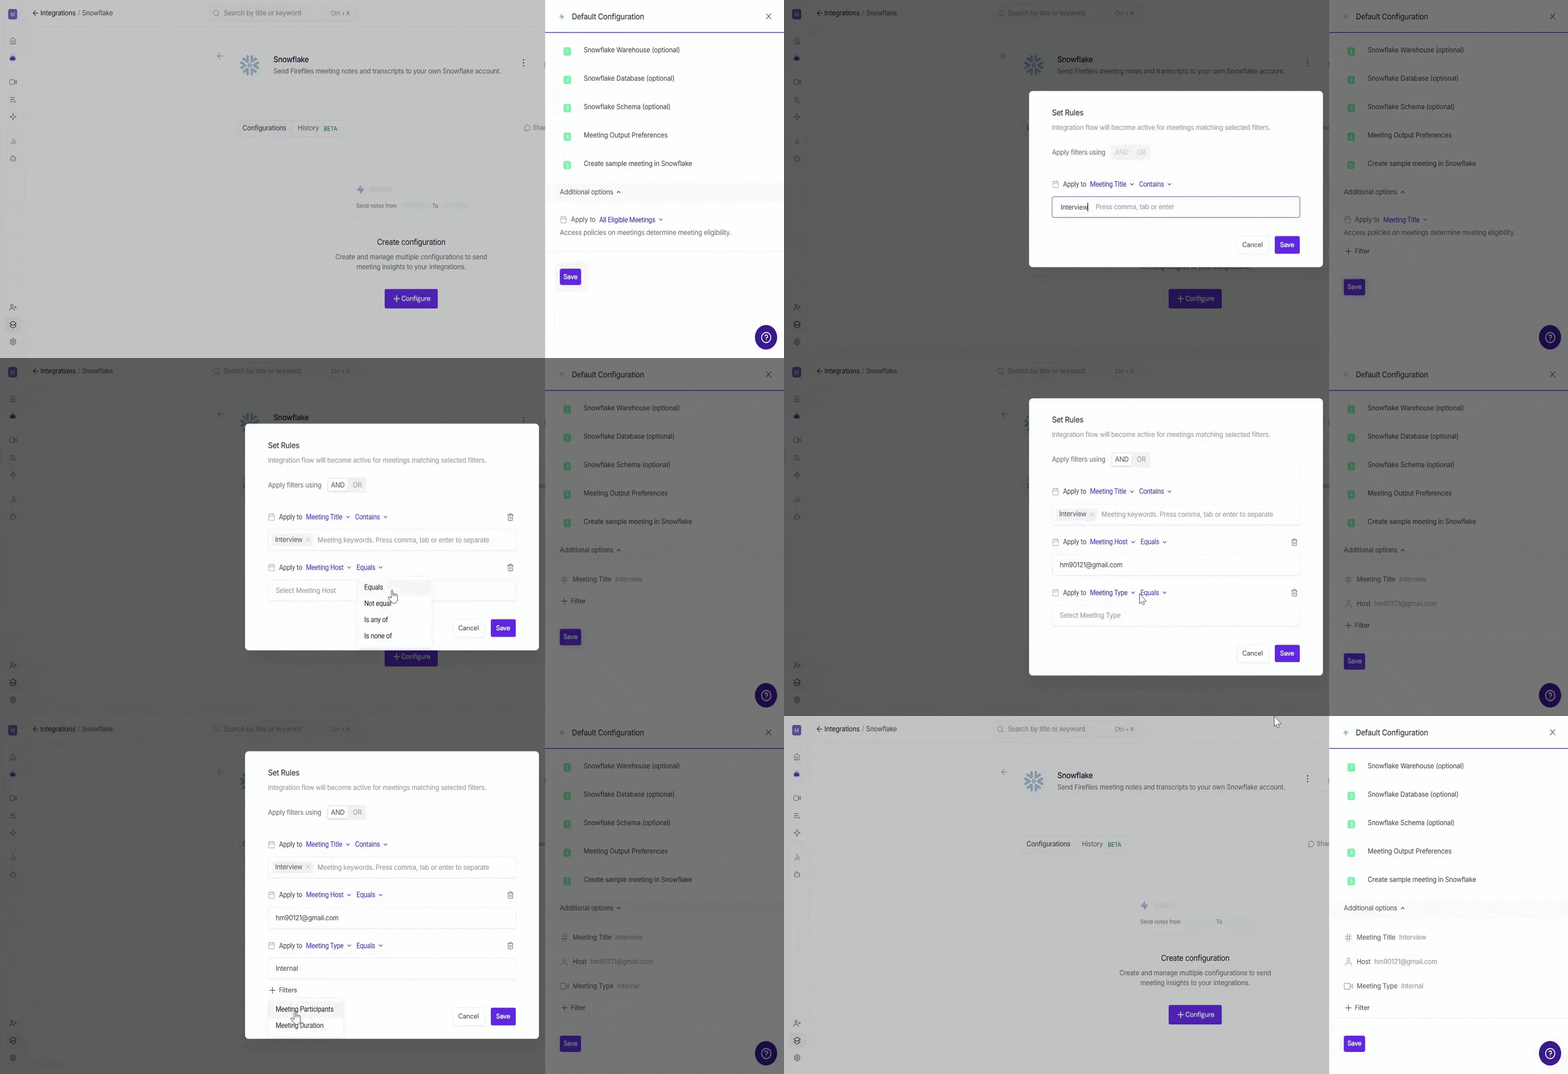
Send meeting data to Snowflake only when the meeting title matches the rules you set.
Example: Select Meeting Title → Contains and enter Interview to send data only for meetings with Interview in the title.
👤 Meeting Host
Filter meetings based on who hosted the meeting.
Example: Select Meeting Host → Equals and choose a specific host to send only meetings hosted by that person to Snowflake.
👥 Meeting Participants
Filter meetings based on who attended the meeting.
Example: Select Meeting Participants → Contains and choose a participant to send only meetings where that person attended.
🎦 Meeting Type
Filter meetings based on the type of meeting.
Example: Select Meeting Type → Equals → External to send only external meetings to Snowflake.
⏱ Meeting Duration
Filter meetings based on how long the meeting lasted.
Example: Set a duration condition to send only meetings that meet your specified duration.
🔀 Apply Multiple Filters
Combine multiple filters to create more specific rules for which meetings send data to Snowflake.
✅ Example: Meeting title contains Interview AND meeting type equals External. Only meetings that meet both conditions will send data to Snowflake.
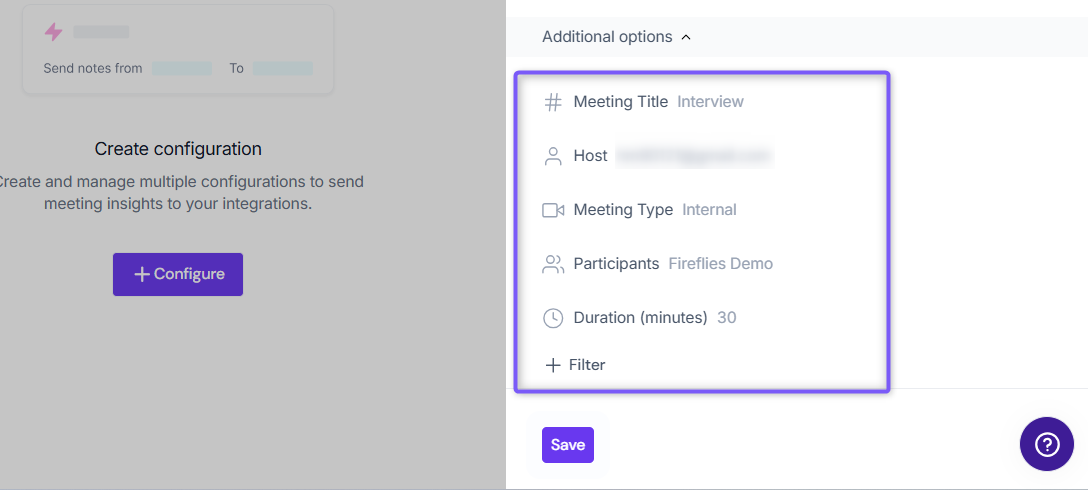
You can review all the filters applied to your configuration before saving.
💾 Save Your Configuration
Click Save to activate the integration — a flash message will confirm that your configuration has been successfully added.
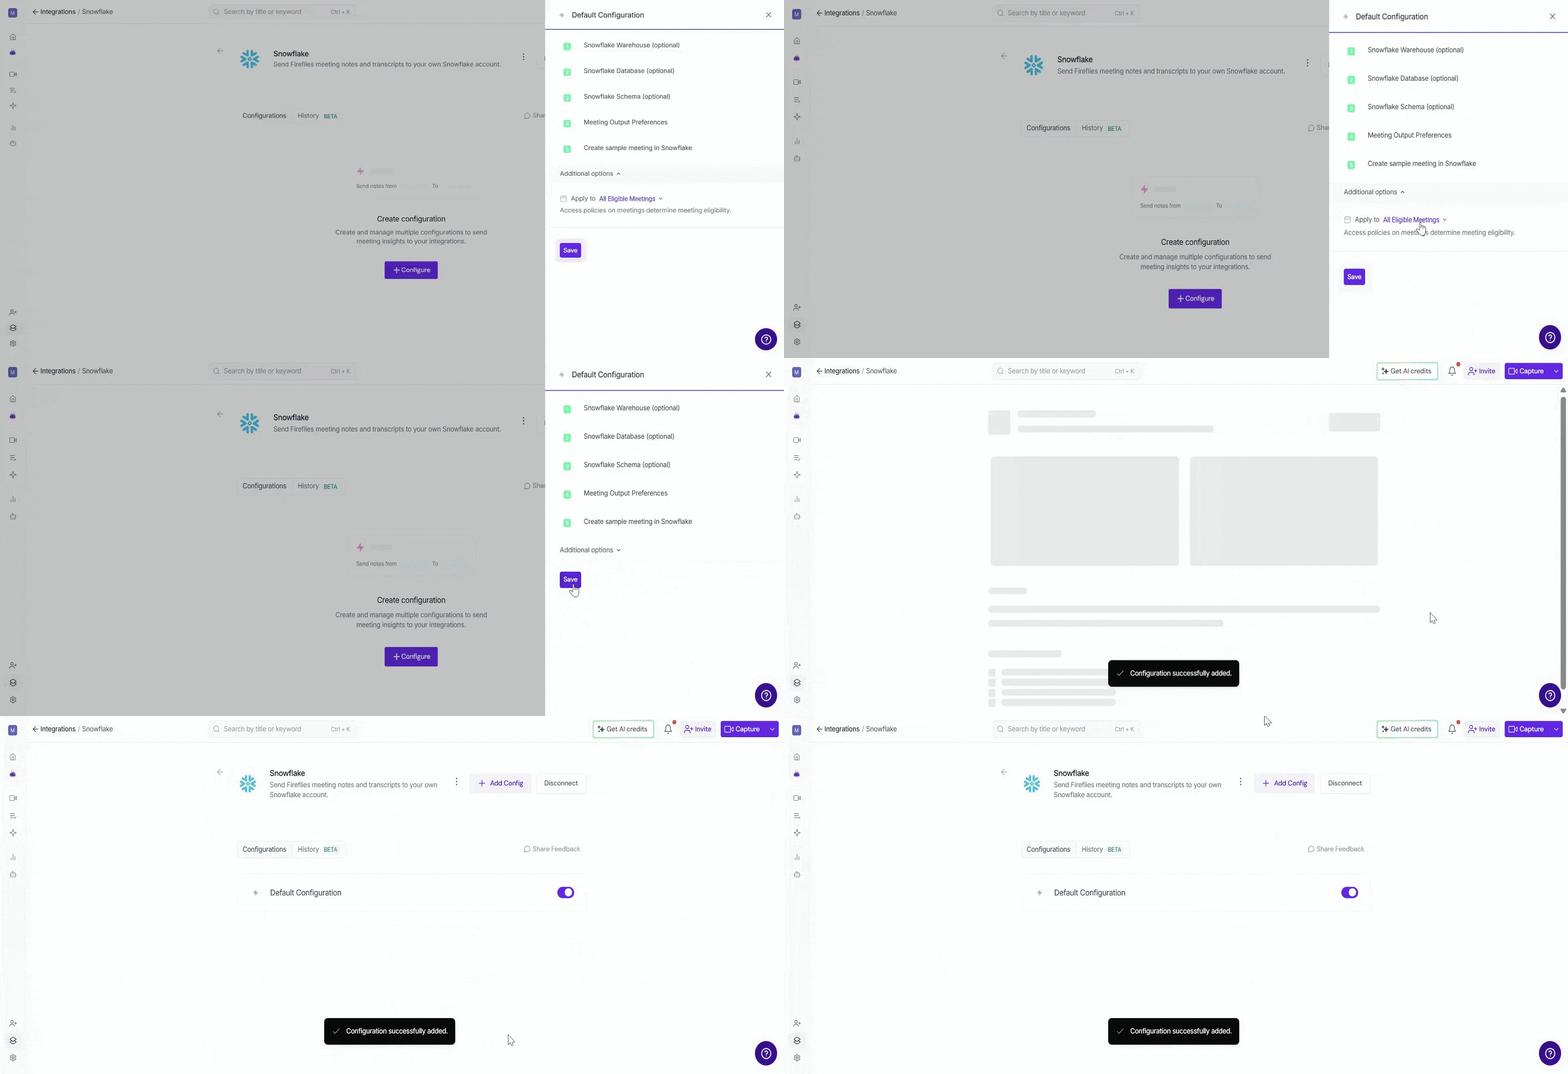
You can set up multiple configurations — for example, one for internal team boards and another for client project boards.
👥 Team Integration Settings
Workspace admins can control how the Snowflake integration is used across their team. The available options depend on your plan and workspace role.
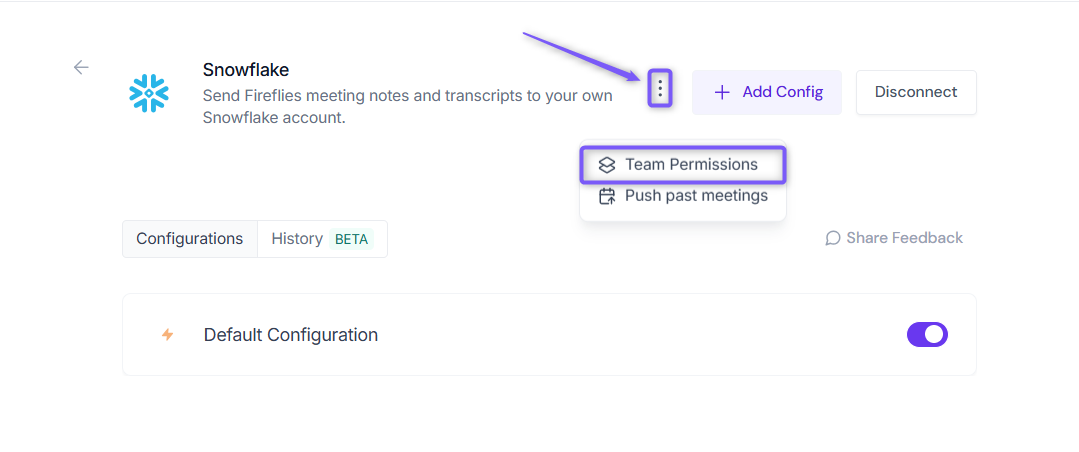
Click the vertical ellipsis (⋮) next to your Snowflake integration and select Team Permissions from the dropdown list.
Business and Enterprise
If you are a Workspace Admin on a Business or Enterprise plan, you can manage granular Integration Permissions for the integration, including who can access and connect it.
📖 See Integration Permissions: Control Who Can Access and Connect Integrations for detailed instructions on managing integration permissions.

Free and Pro
Free and Pro users do not have access to the full Integration Permissions dashboard. Instead, Team Permissions opens a modal with the available workspace-level settings.
Apply to entire workspace → Toggle this ON to apply the Snowflake integration across your Fireflies workspace. All team meetings accessible by the team admin will have notes sent to Snowflake, keeping everything centralized.
📌Meetings that are set to private in a teammate’s Privacy Settings won’t be pushed to Snowflake unless you’re a Super Admin who can access meetings regardless of privacy settings.
Restrict non-admin usage → Toggle this ON to prevent non-admin members from creating their own Snowflake configurations. This helps maintain consistent data practices and avoids accidental CRM clutter.
After adjusting the toggles to fit your team’s workflow, click Save to apply the changes.

Note: Business and Enterprise Workspace Admins have access to granular integration permissions, while Free and Pro workspaces have more limited workspace-level controls.
🛠 Manage Configuration
Over time, you may need to update your Snowflake integration — for example, to rename a configuration, update where meeting data is sent, change meeting rules, or remove a configuration you no longer use. Fireflies provides a few simple options to manage your configurations.
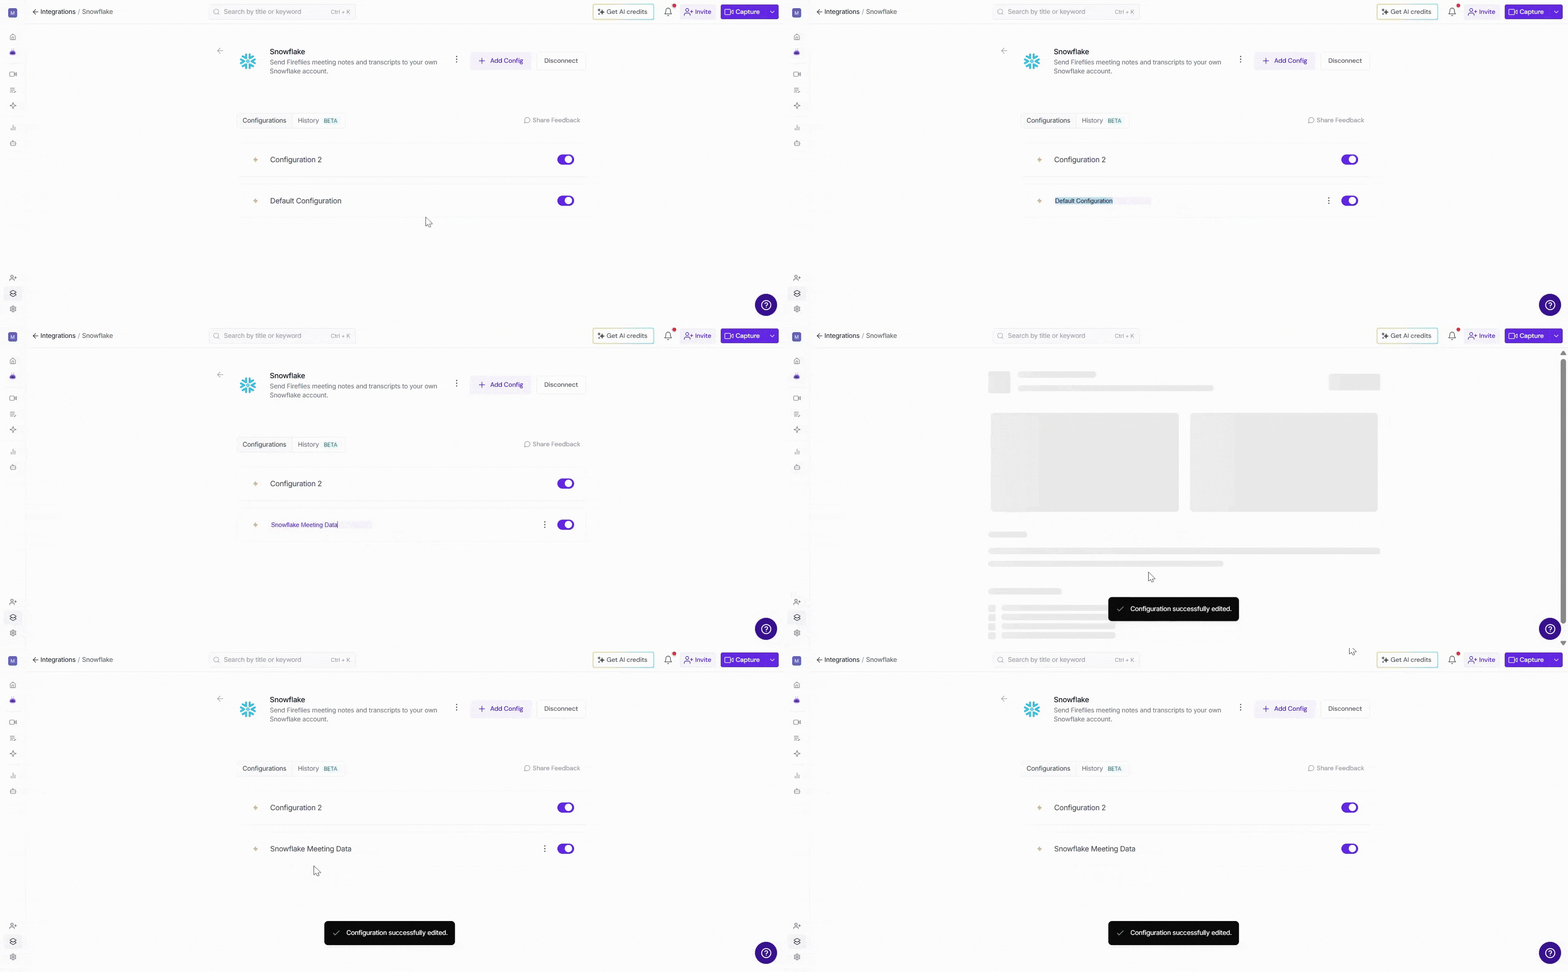
✏ Edit Configuration Name → Give each Snowflake configuration a clear, descriptive name so it’s easy to recognize. Click the configuration name (for example, Default Configuration), enter a new name (such as Snowflake Meeting Data), and click outside the field to save.
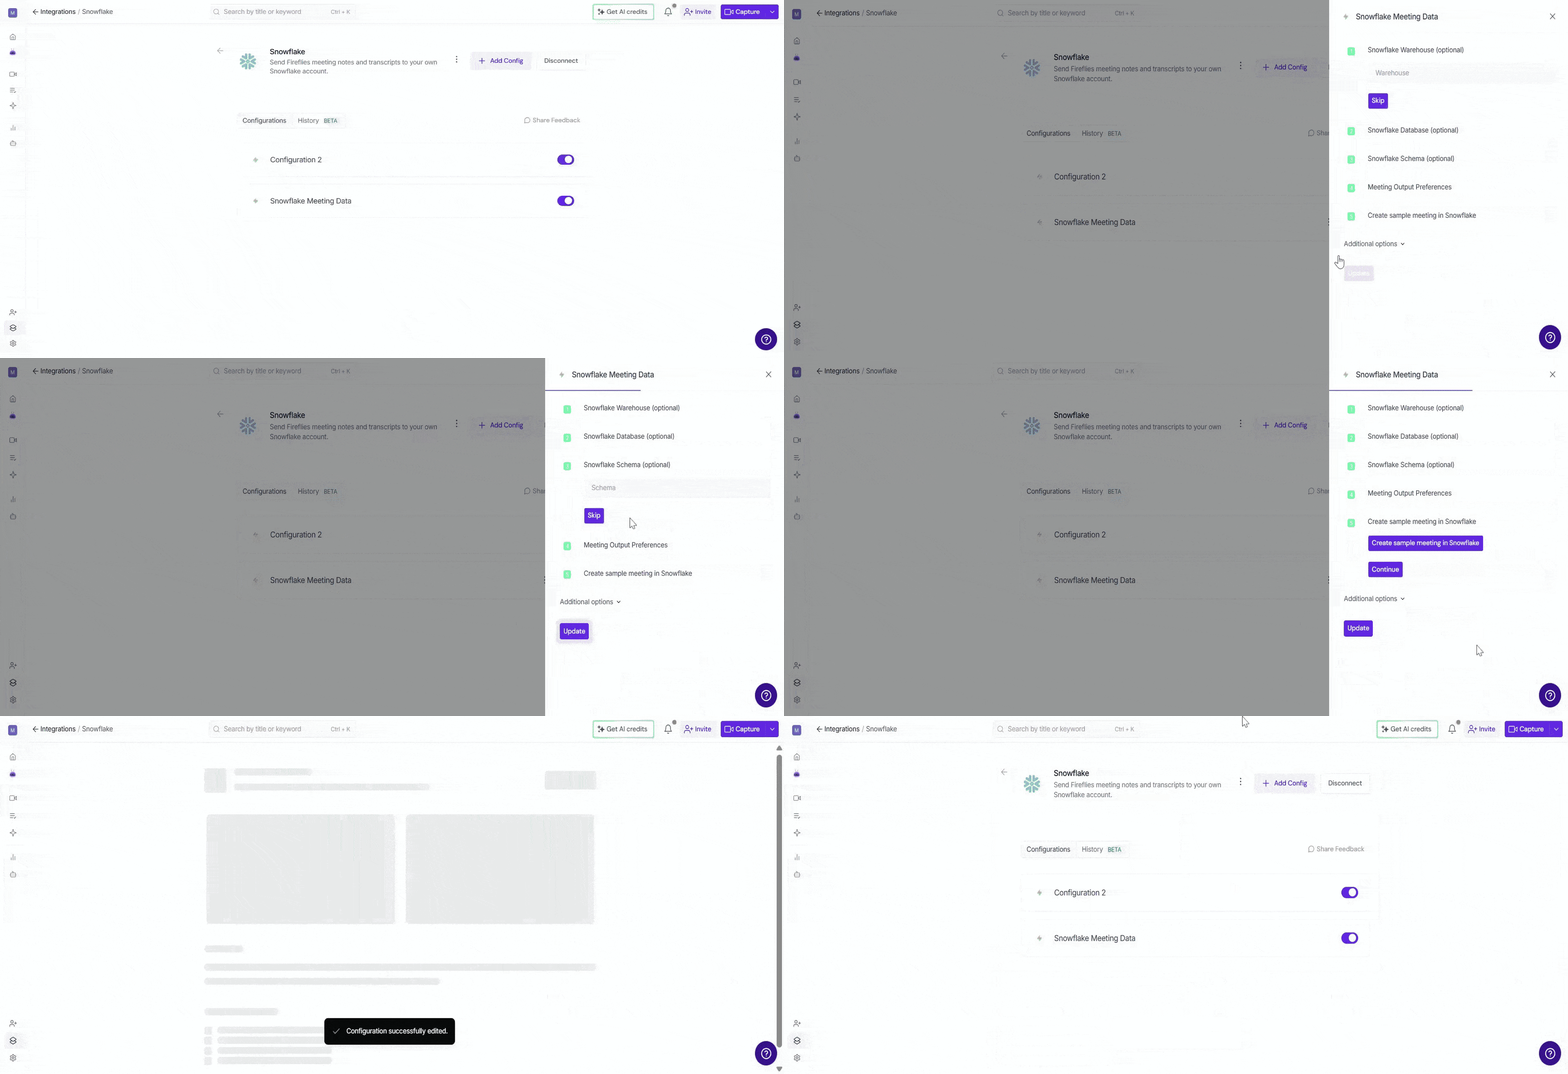
⚙ Edit Configuration Settings → Need to update your Snowflake settings or meeting rules? Click the vertical ellipsis (⋮) next to a configuration, select Edit, update the configuration settings, and click Update to save your changes.
🔘 Enable or Disable a Configuration → Use the toggle next to a configuration to control it quickly. Toggle ON to allow Fireflies to send meeting data to Snowflake based on your configuration; toggle OFF to pause the configuration without deleting it.
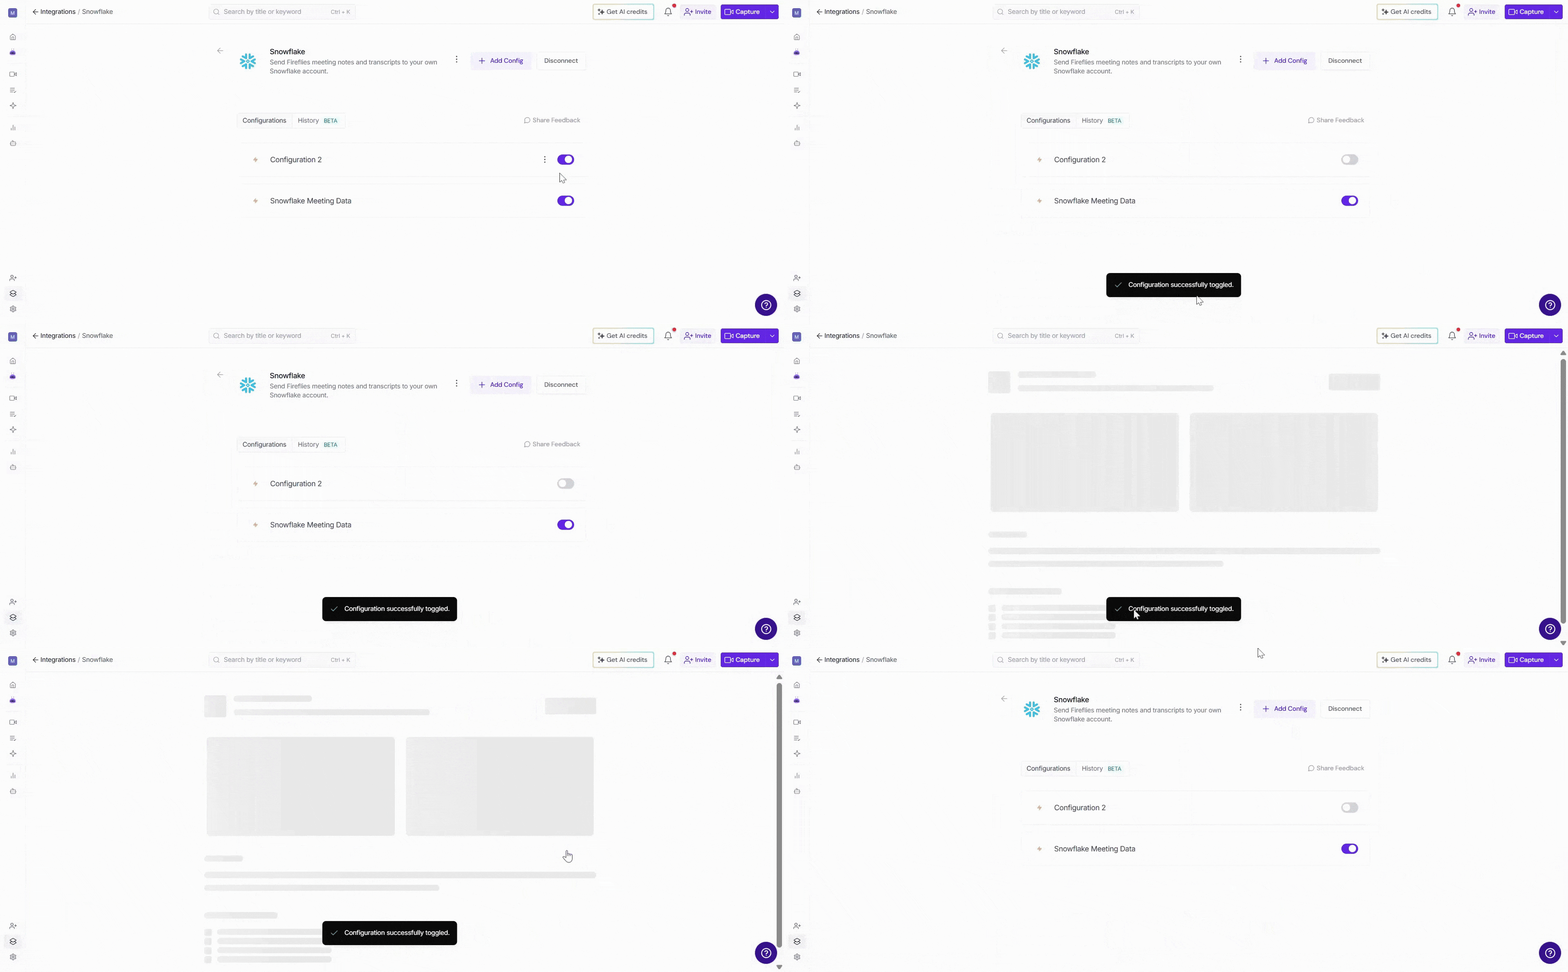
Disabling a configuration is useful if you want to temporarily stop sending meeting data to Snowflake while keeping the configuration for later.
🗑 Delete Configuration → If a configuration is no longer needed, you can delete it. Click the vertical ellipsis (⋮) next to the configuration, select Delete, and confirm.
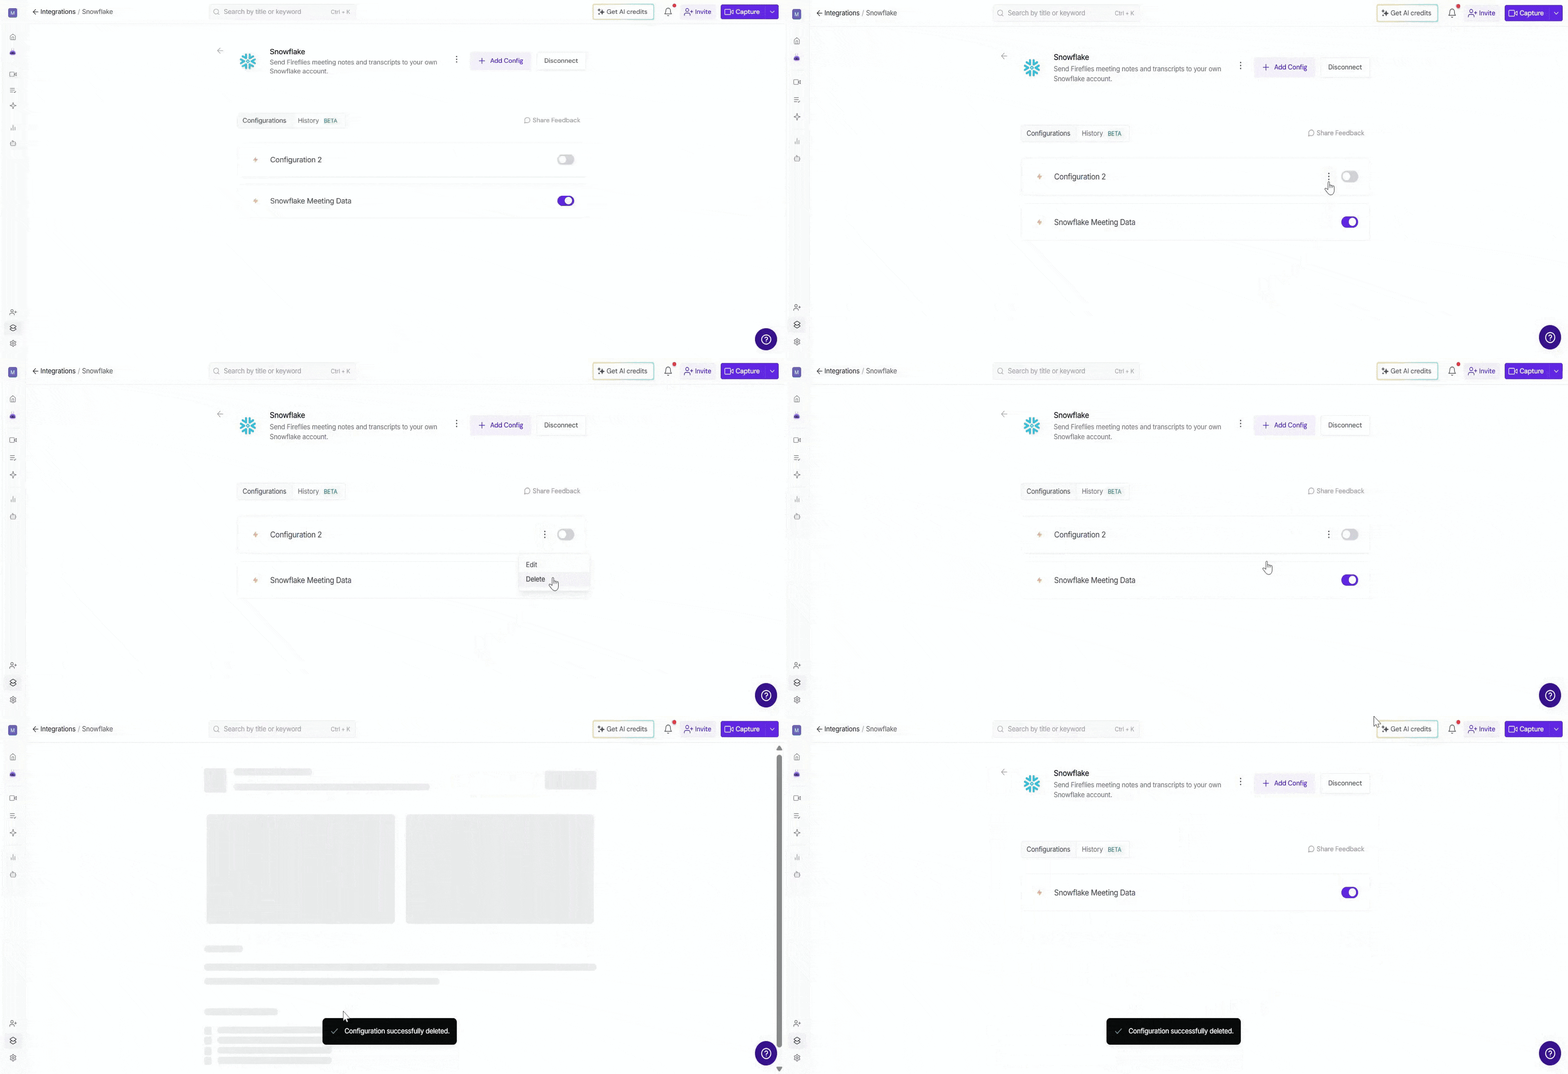
Deleting a configuration stops Fireflies from sending meeting data to Snowflake through that configuration, so make sure you no longer need it before removing it.
📤 How Meeting Data Appears in Snowflake
Once your configuration is saved, Fireflies sends your meeting data to Snowflake, where you can view and work with it.
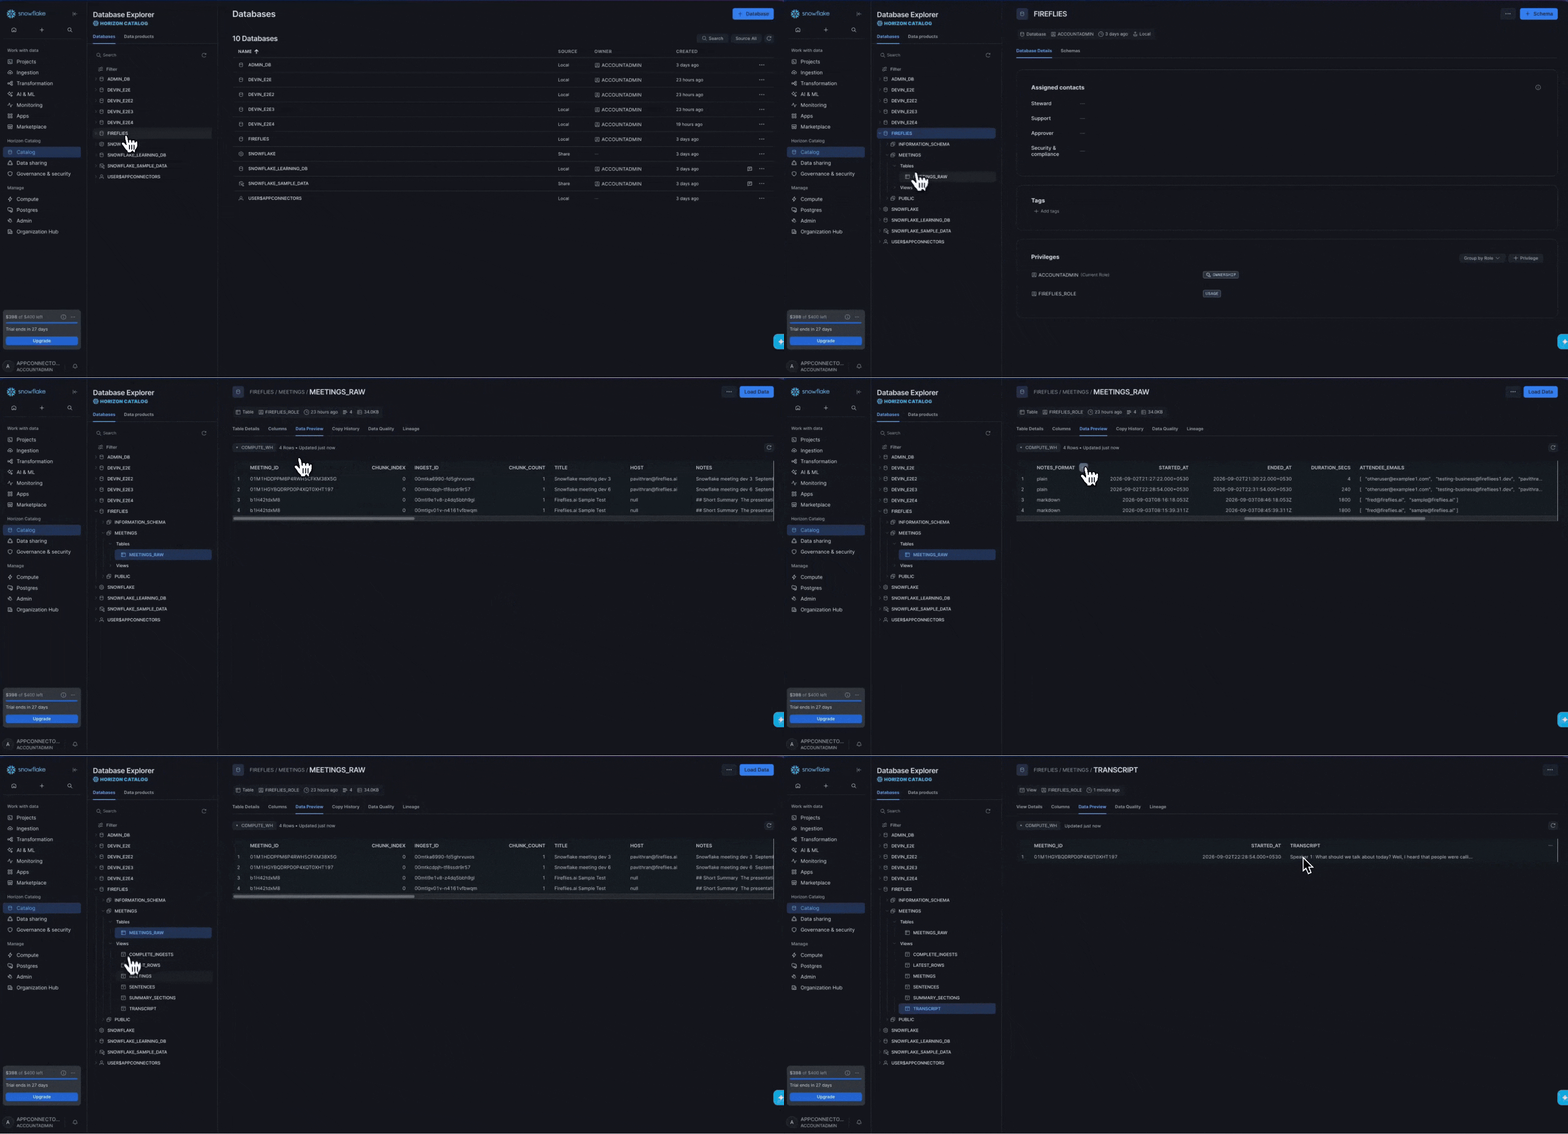
🗂 Meeting data: In
FIREFLIES → MEETINGS → Tables → MEETINGS_RAW, you can view details such as the meeting ID, title, host, notes, timing, duration, and attendees.📝 Transcripts: In
FIREFLIES → MEETINGS → Views → TRANSCRIPT, you can view the transcripts from your Fireflies meetings.
⏪ Push Past Meetings to Snowflake
Sometimes, the meetings you want in Snowflake happened before you connected the integration. Whether you enabled the integration later or want to add older meeting notes to Snowflake, Push Past Meetings lets you choose a date range and meeting type, then send those meetings in just a few clicks.
Note: Make sure you've connected Snowflake and created at least one push configuration before using Push Past Meetings. If you haven't, complete the Setting Up Your Configuration section above first.
Follow the steps below to push past meetings to Snowflake.
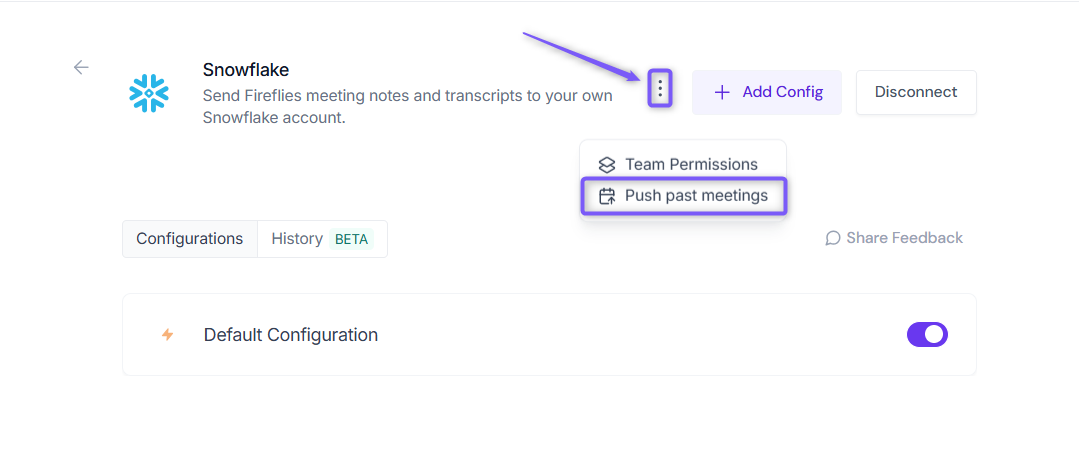
From the Snowflake integration page, click Push past meetings.
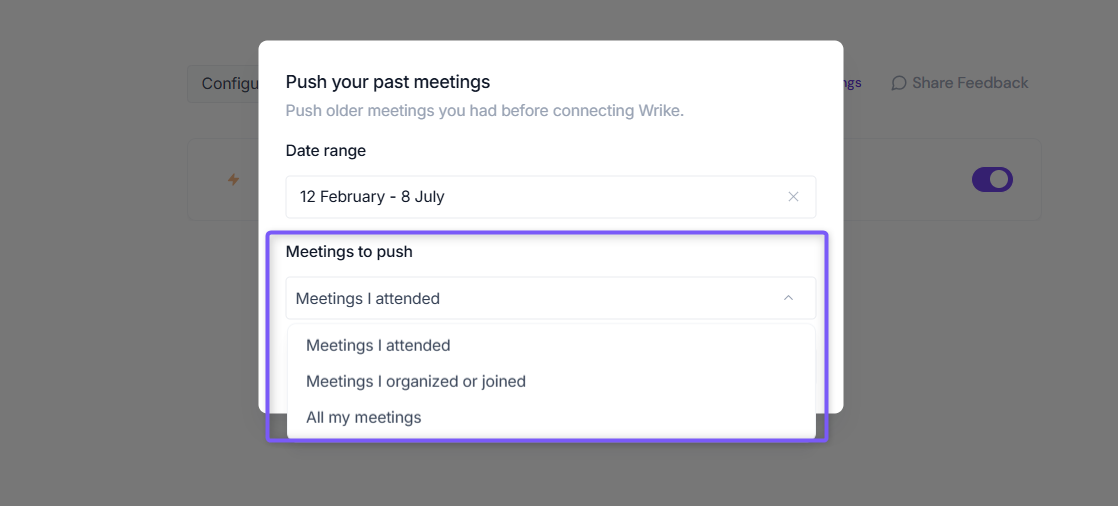
A dialog box will appear. Choose the following:
Date range → Select the meetings you want to send by choosing Last 7, 14, 30, 60, or 90 days, or specify a custom date range.
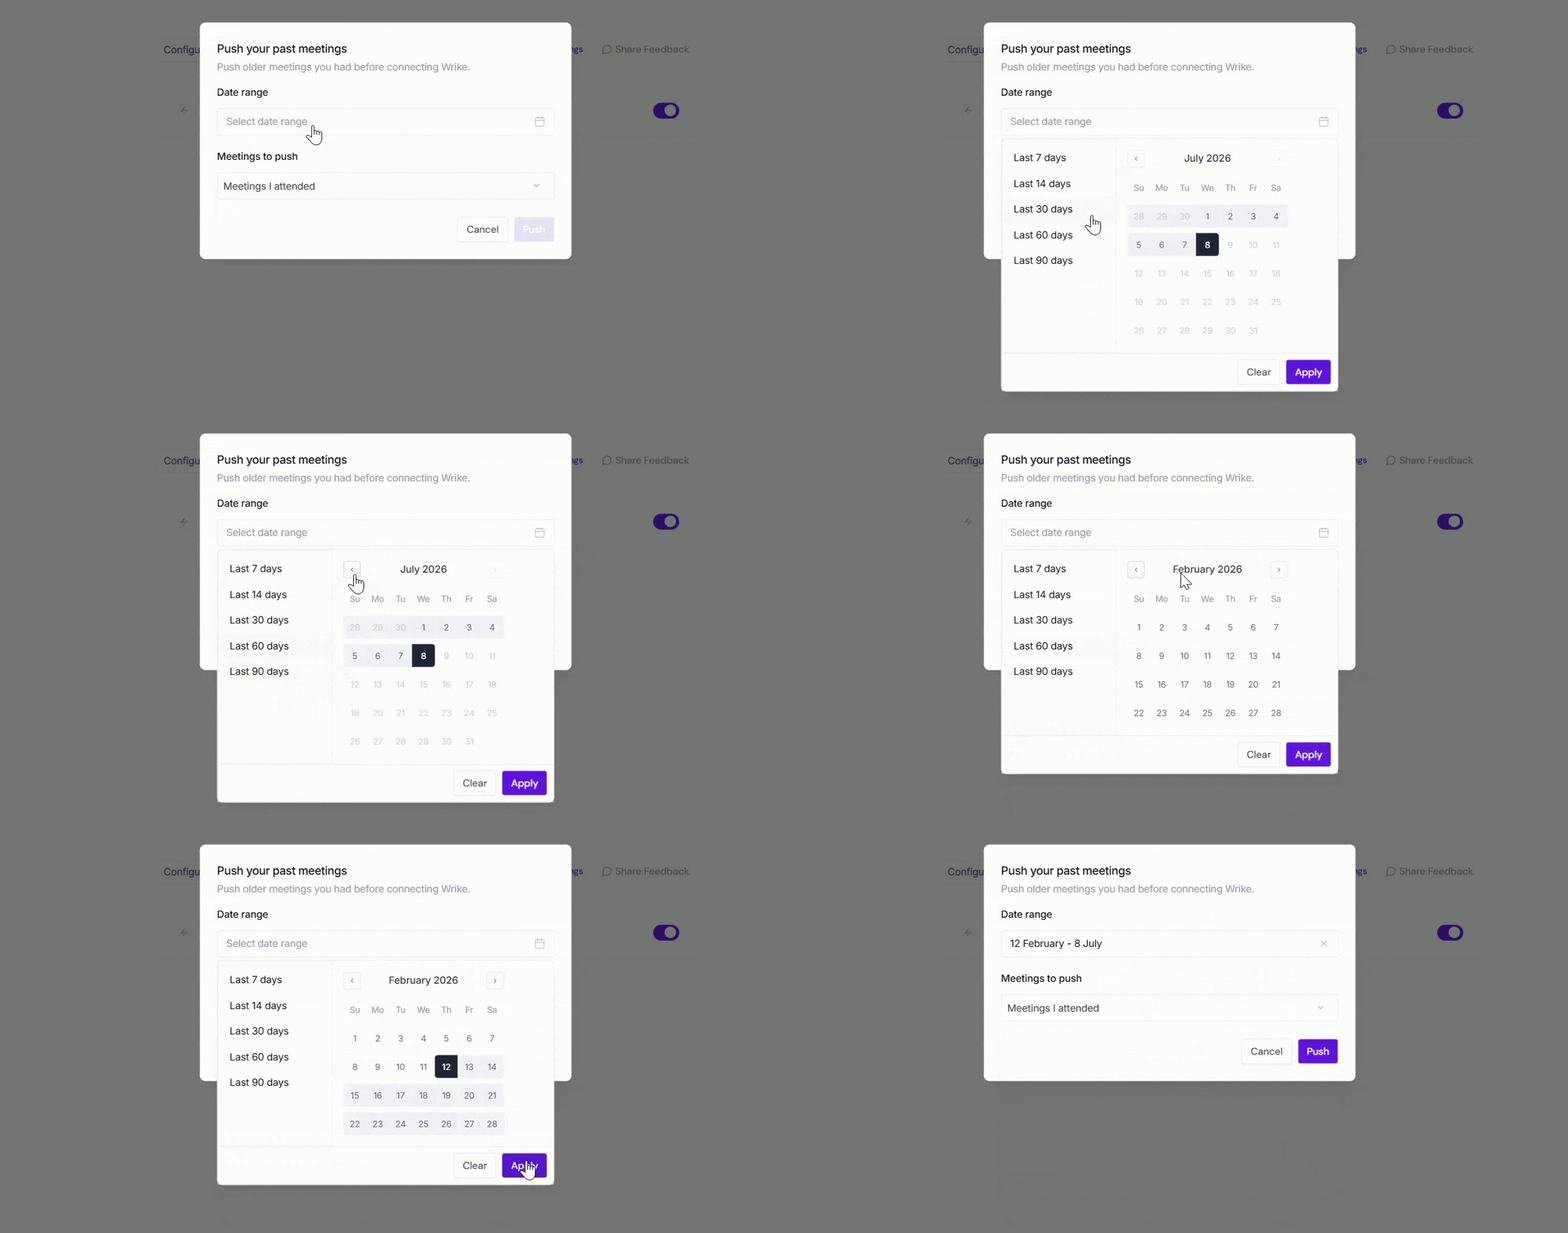
Meetings to push → Choose whether to push Meetings I attended, Meetings I organized or joined, or All my meetings.
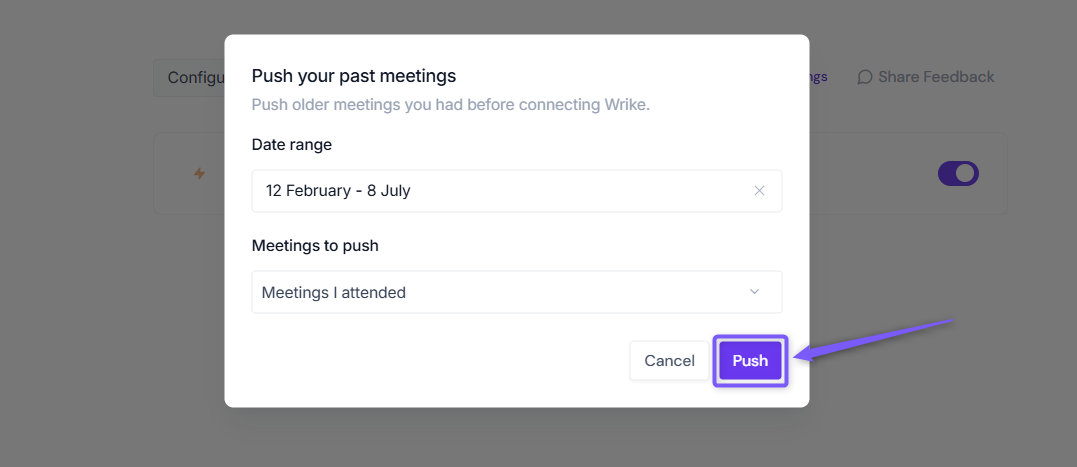
Click Push. Fireflies will send the matching meeting notes to Snowflake using your existing configuration settings.
Meetings recorded after you connect Snowflake are sent automatically. Push Past Meetings is only needed for meetings that happened before the integration was connected.
❌ Disconnect Integration
If you no longer want Fireflies connected to Snowflake, you can disconnect the integration at any time.
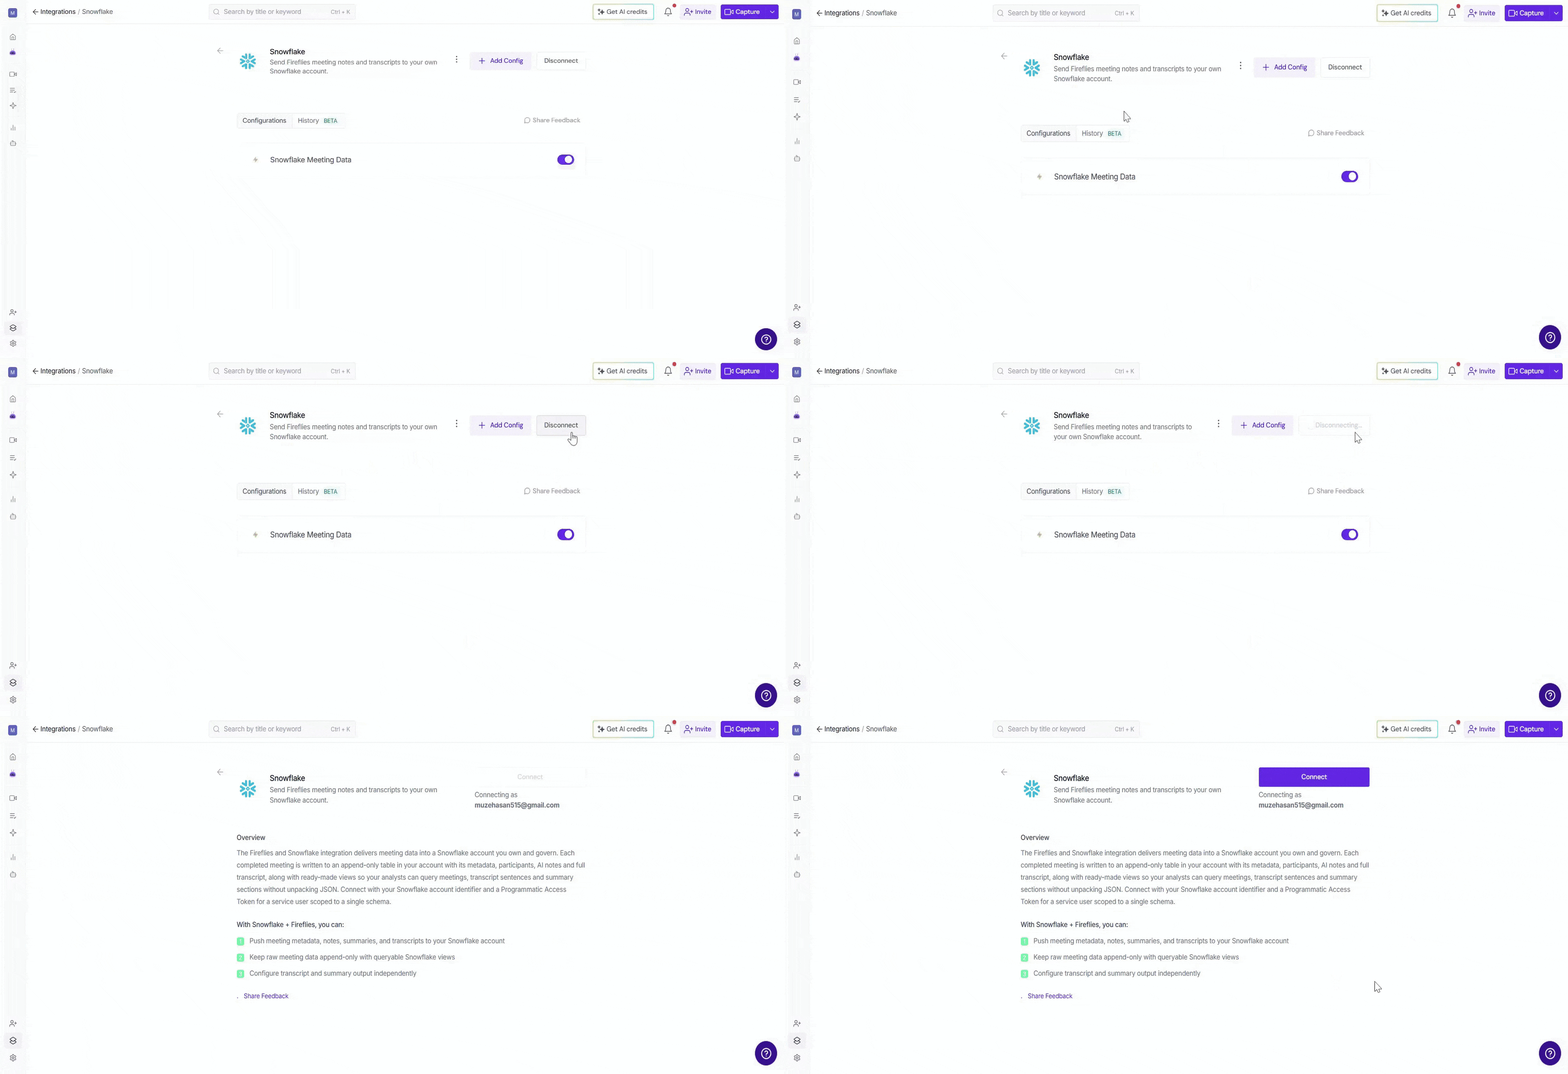
Click Disconnect to remove the Snowflake integration. Fireflies will stop sending meeting data to your Snowflake account.
Once disconnected, Fireflies will stop sending new meeting data to Snowflake. You can always reconnect later if needed.
🛠 Troubleshooting
Issue | What to Check / Do |
|---|---|
Unable to authorize Snowflake | Make sure the correct Snowflake account identifier and Programmatic Access Token (PAT) are entered in Fireflies. |
PAT has expired | Run the Fireflies setup script again and uncomment |
Meeting data isn't appearing in Snowflake | Make sure the Snowflake configuration is enabled and the meeting meets your Integration Rules. You can also create a sample meeting to test the connection. |
Transcript isn't appearing | Make sure Save Meeting Transcript is enabled in your Meeting Output Preferences. Then check |
Can't find meeting data | In Snowflake, go to |
Sample meeting isn't appearing | Create a sample meeting from the Snowflake configuration and check MEETINGS_RAW in Snowflake. |
Still stuck? Contact support via this link for more help.
❓ Frequently Asked Questions
Q1. Can Fireflies create the Snowflake database for me?
Yes. You can let Fireflies automatically create the database for storing your meeting data, or choose your own Warehouse, Database, and Schema.
Q2. Do I have to choose a Warehouse, Database, and Schema?
No. These fields are optional. Click Skip to let Fireflies create the database automatically.
Q3. What meeting data can I send to Snowflake?
You can choose to send Meeting Summary and Notes, Meeting Transcript, or both.
📌 Note: Transcript syncing is available on Business and Enterprise plans.
Q4. Can I choose which meetings are sent to Snowflake?
Yes. Use Integration Rules to control which eligible meetings are sent to Snowflake. You can filter meetings by title, host, participants, type, or duration.
Q5. Can I test the Snowflake connection?
Yes. During setup, click Create sample meeting in Snowflake to verify that your connection is working.
Q6. What happens if I turn the configuration OFF?
Turning the configuration OFF pauses the integration. Fireflies will stop sending meeting data to Snowflake until you turn it ON again.
Q7. What's the difference between turning a configuration OFF and deleting it?
Turn OFF: Temporarily pauses the integration but keeps your configuration.
Delete: Permanently removes the configuration.
Q8. Where can I find meeting data in Snowflake?
Meeting data is available under
FIREFLIES → MEETINGS → Tables → MEETINGS_RAW.Transcripts are available under
FIREFLIES → MEETINGS → Views → TRANSCRIPT.
🔄️ Recap
The Snowflake integration lets you send Fireflies meeting data directly to Snowflake and choose which meeting information to store.
Store meeting data in your Snowflake account.
Choose what to send - summaries and notes, transcripts, or both.
Control which meetings are included using Integration Rules.
Test your connection with a sample meeting.
Manage your configuration by editing, enabling, disabling, or deleting it.
📌 Related Guides
How to Integrate Zapier with Fireflies → Connect Fireflies with Zapier to automate meeting data across your workflow.
Learn about n8n x Fireflies Integration → Build flexible workflows with Fireflies and n8n.
Pylon → Explore Fireflies integrations with Pylon for team access and automation.