Autofill CRM for Salesforce: Automatically Extract and Sync Meeting Data to Contacts, Accounts, and Opportunities
Last updated: July 31, 2026
Keeping Salesforce records up to date after every customer conversation can be time-consuming. Autofill CRM for Salesforce helps streamline this process by extracting relevant information from your meeting transcripts and preparing CRM updates for your existing Contact, Account, and Opportunity records.
After each meeting, Fireflies analyzes the meeting transcript, identifies relevant details, and drafts updates for your configured Salesforce fields. You can review the suggested values, make any necessary changes, and choose when to send them to Salesforce.
You stay in control. Fireflies prepares CRM updates for review, but nothing is sent to Salesforce until you review and approve it.
💡Want a quick walkthrough first? Watch this Autofill CRM webinar to see how to connect your CRM, turn Autofill on, add custom fields with your own prompts, choose append or overwrite per field, and review every update before it syncs. Then follow the steps below to set up Autofill CRM in Fireflies.
🔍 What Can Autofill CRM Do?
With Autofill CRM, you can:
Automatically extract information from meeting transcripts.
Populate Salesforce Contact, Account, and Opportunity fields.
Configure both default and custom Salesforce fields.
Choose whether new information should Append to or Overwrite existing values.
Control which meetings Autofill CRM runs on using Rules.
Review, edit, or exclude extracted values before sending them to Salesforce.
Run Autofill CRM On Demand for past meetings.
🔑 Prerequisites
Before setting up Autofill CRM for Salesforce , make sure you have:
An active Fireflies account.
A Salesforce account with Contacts, Accounts, and Opportunities available.
Your Fireflies account connected to Salesforce (if you haven't connected it yet, we'll show you how in the next section).
Autofill CRM is available on Business and Enterprise plans.
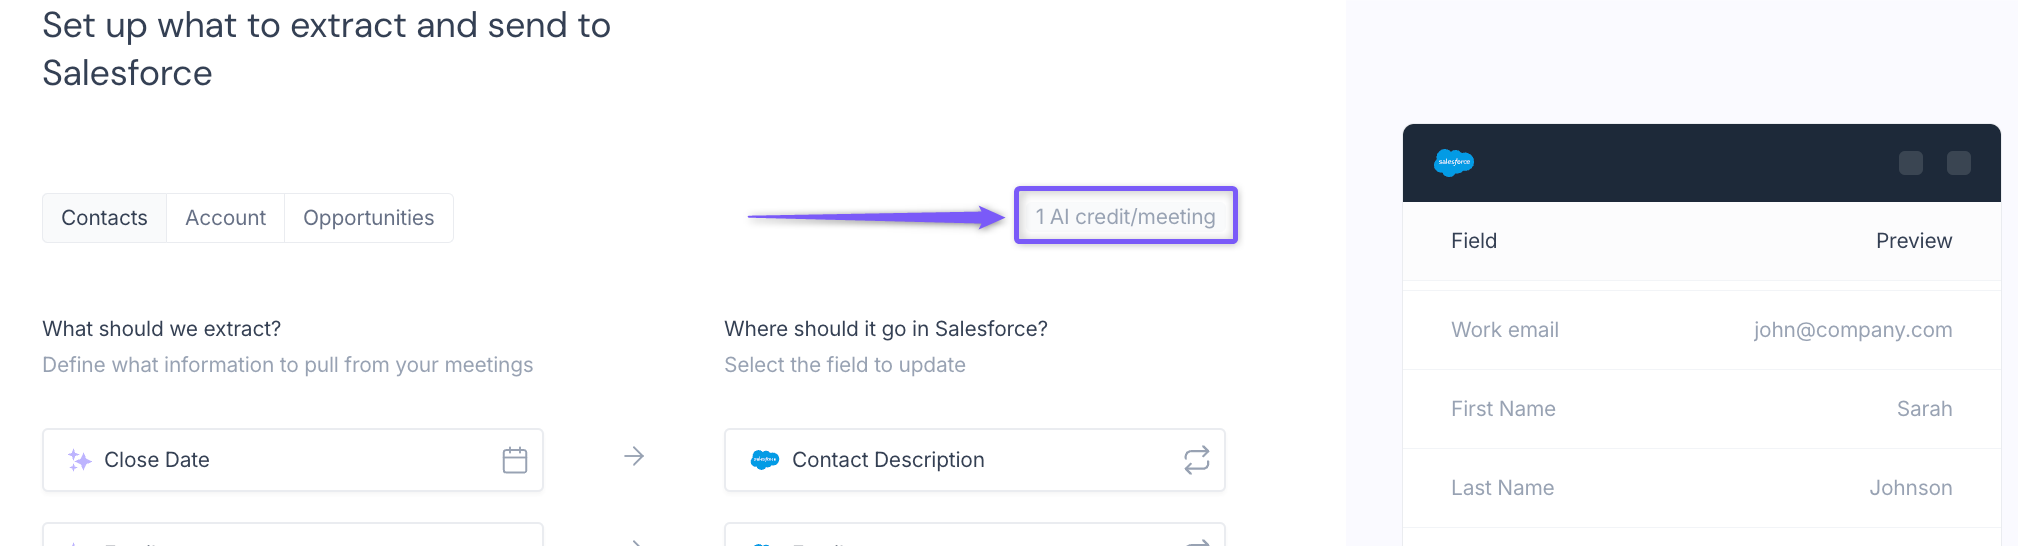
Autofill CRM uses 1 AI credit each time meeting data is extracted. Reviewing, editing, and sending data to Salesforce does not consume additional AI credits.
🔗 Connect Salesforce to Fireflies
Before configuring Autofill CRM, make sure your Salesforce integration is connected to Fireflies.
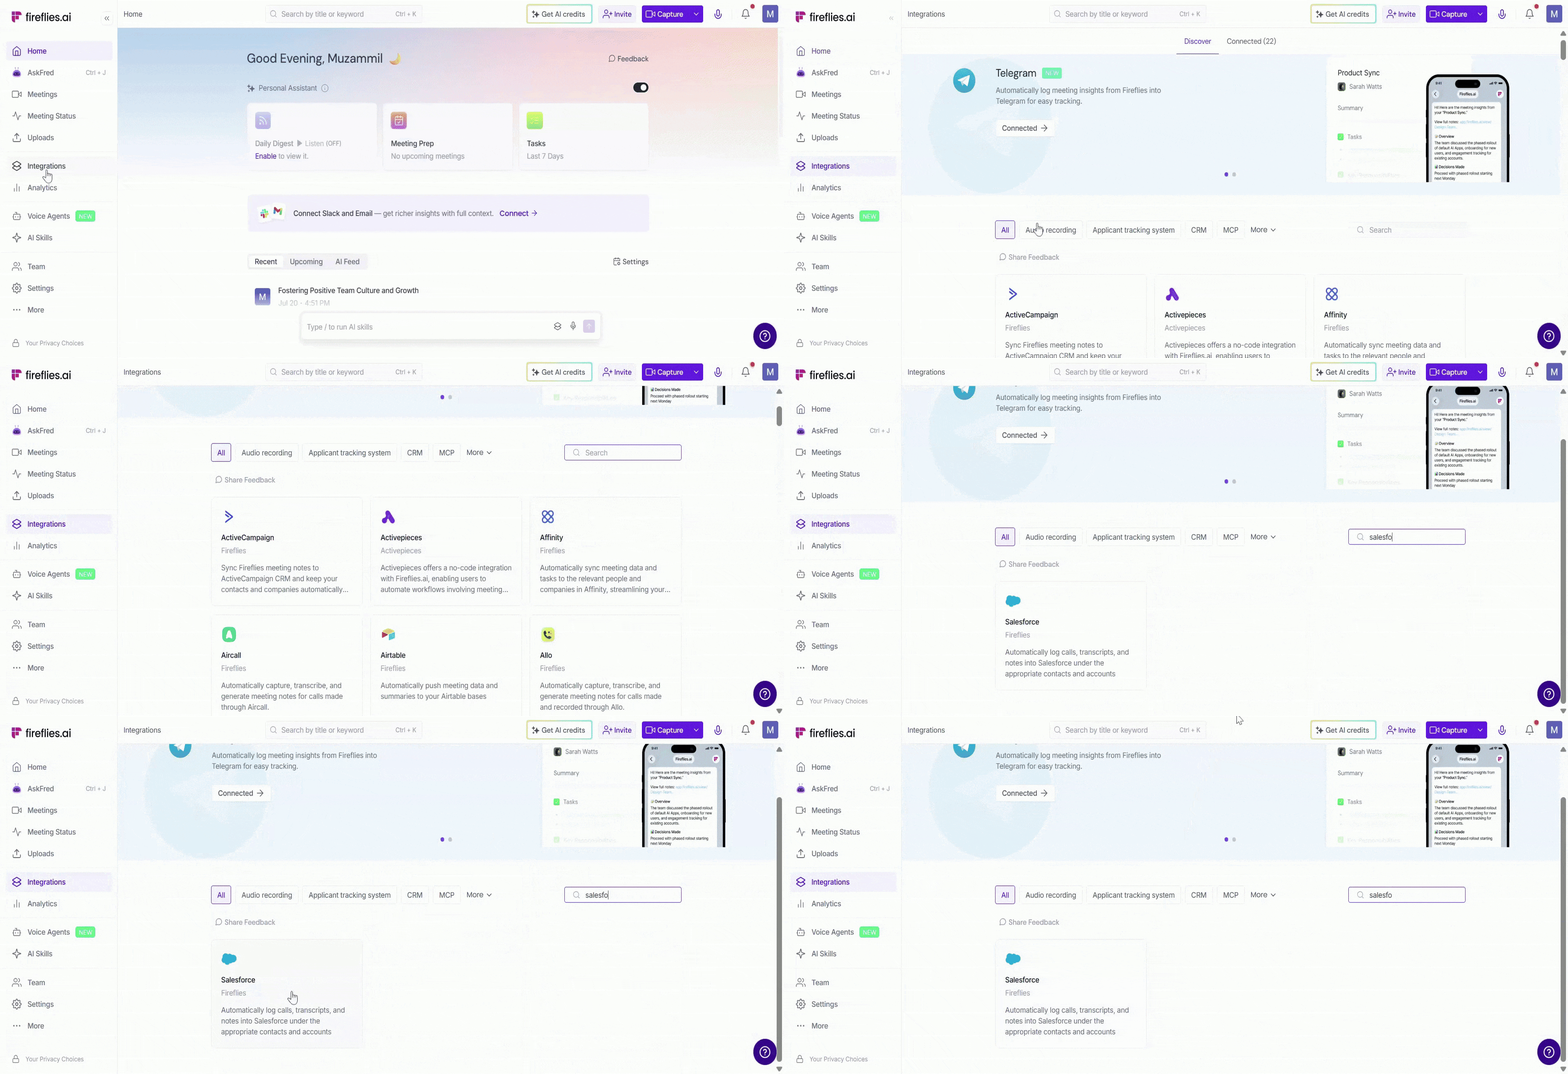
Step 1: Log in to your Fireflies account, navigate to the Integrations page, and search for Salesforce. Click on it to get started.
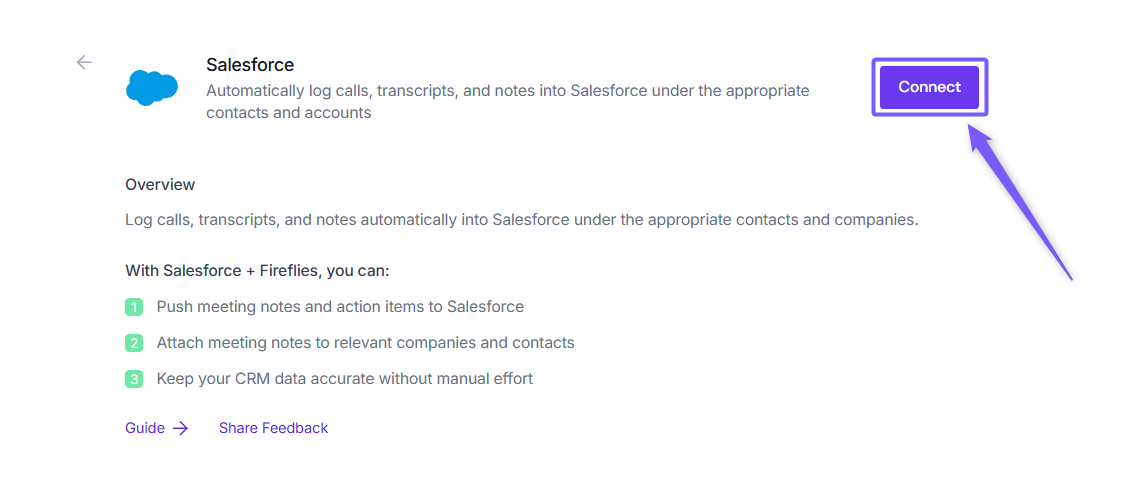
Step 2: Click Connect, then sign in to your Salesforce account and complete the authentication process.
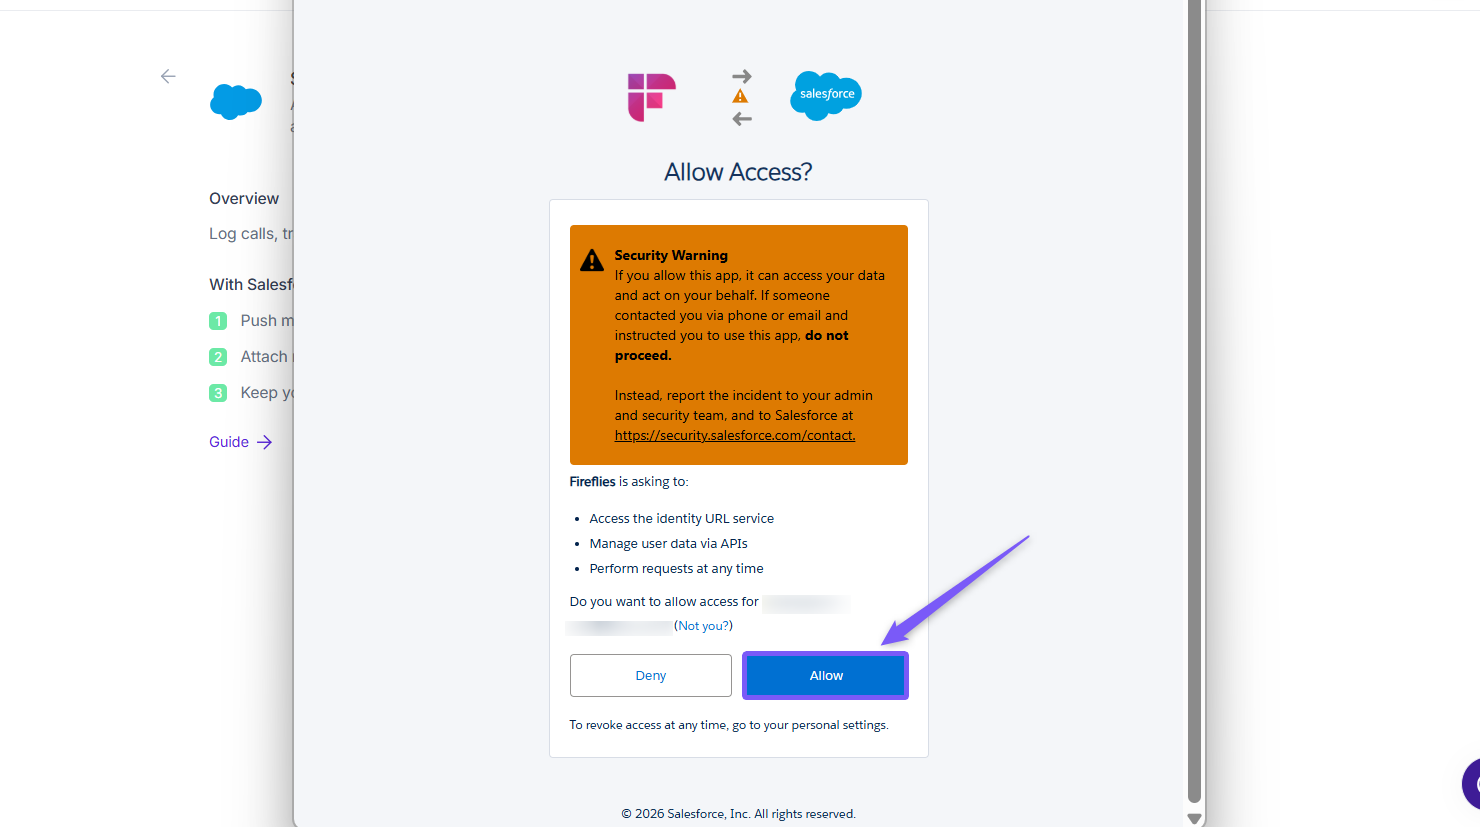
Step 3: Review the requested permissions and click Allow to grant Fireflies access to your Salesforce account.
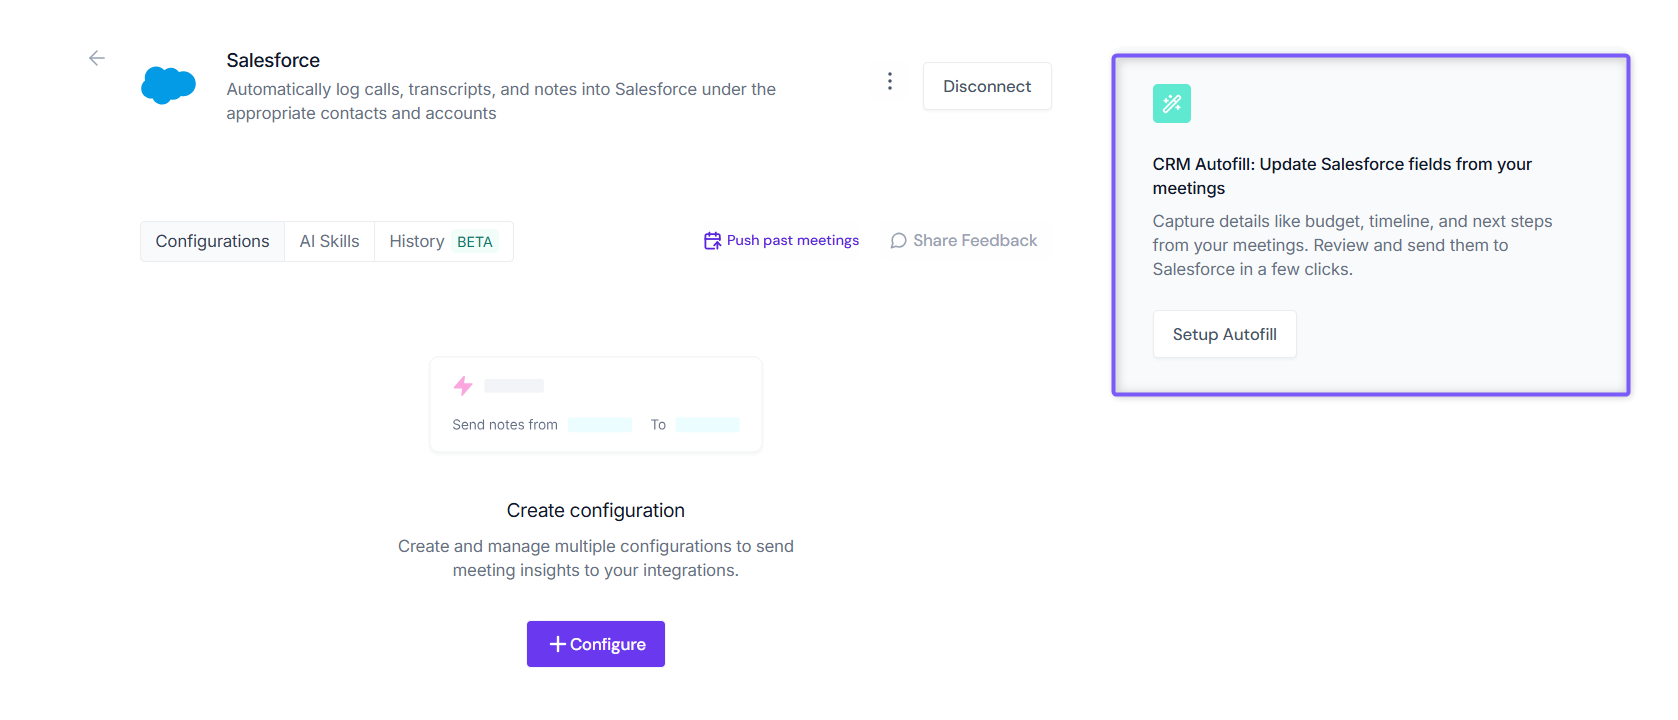
Step 4: Once authorization is complete, you'll be redirected back to Fireflies to continue setting up Autofill CRM.
⚙ Set Up Autofill CRM
This is where you tell Fireflies what to extract from your meetings and where each piece of information should go in Salesforce.
Step 1: Open Autofill CRM Setup
In the CRM Autofill section on the right-hand side, click Setup Autofill.
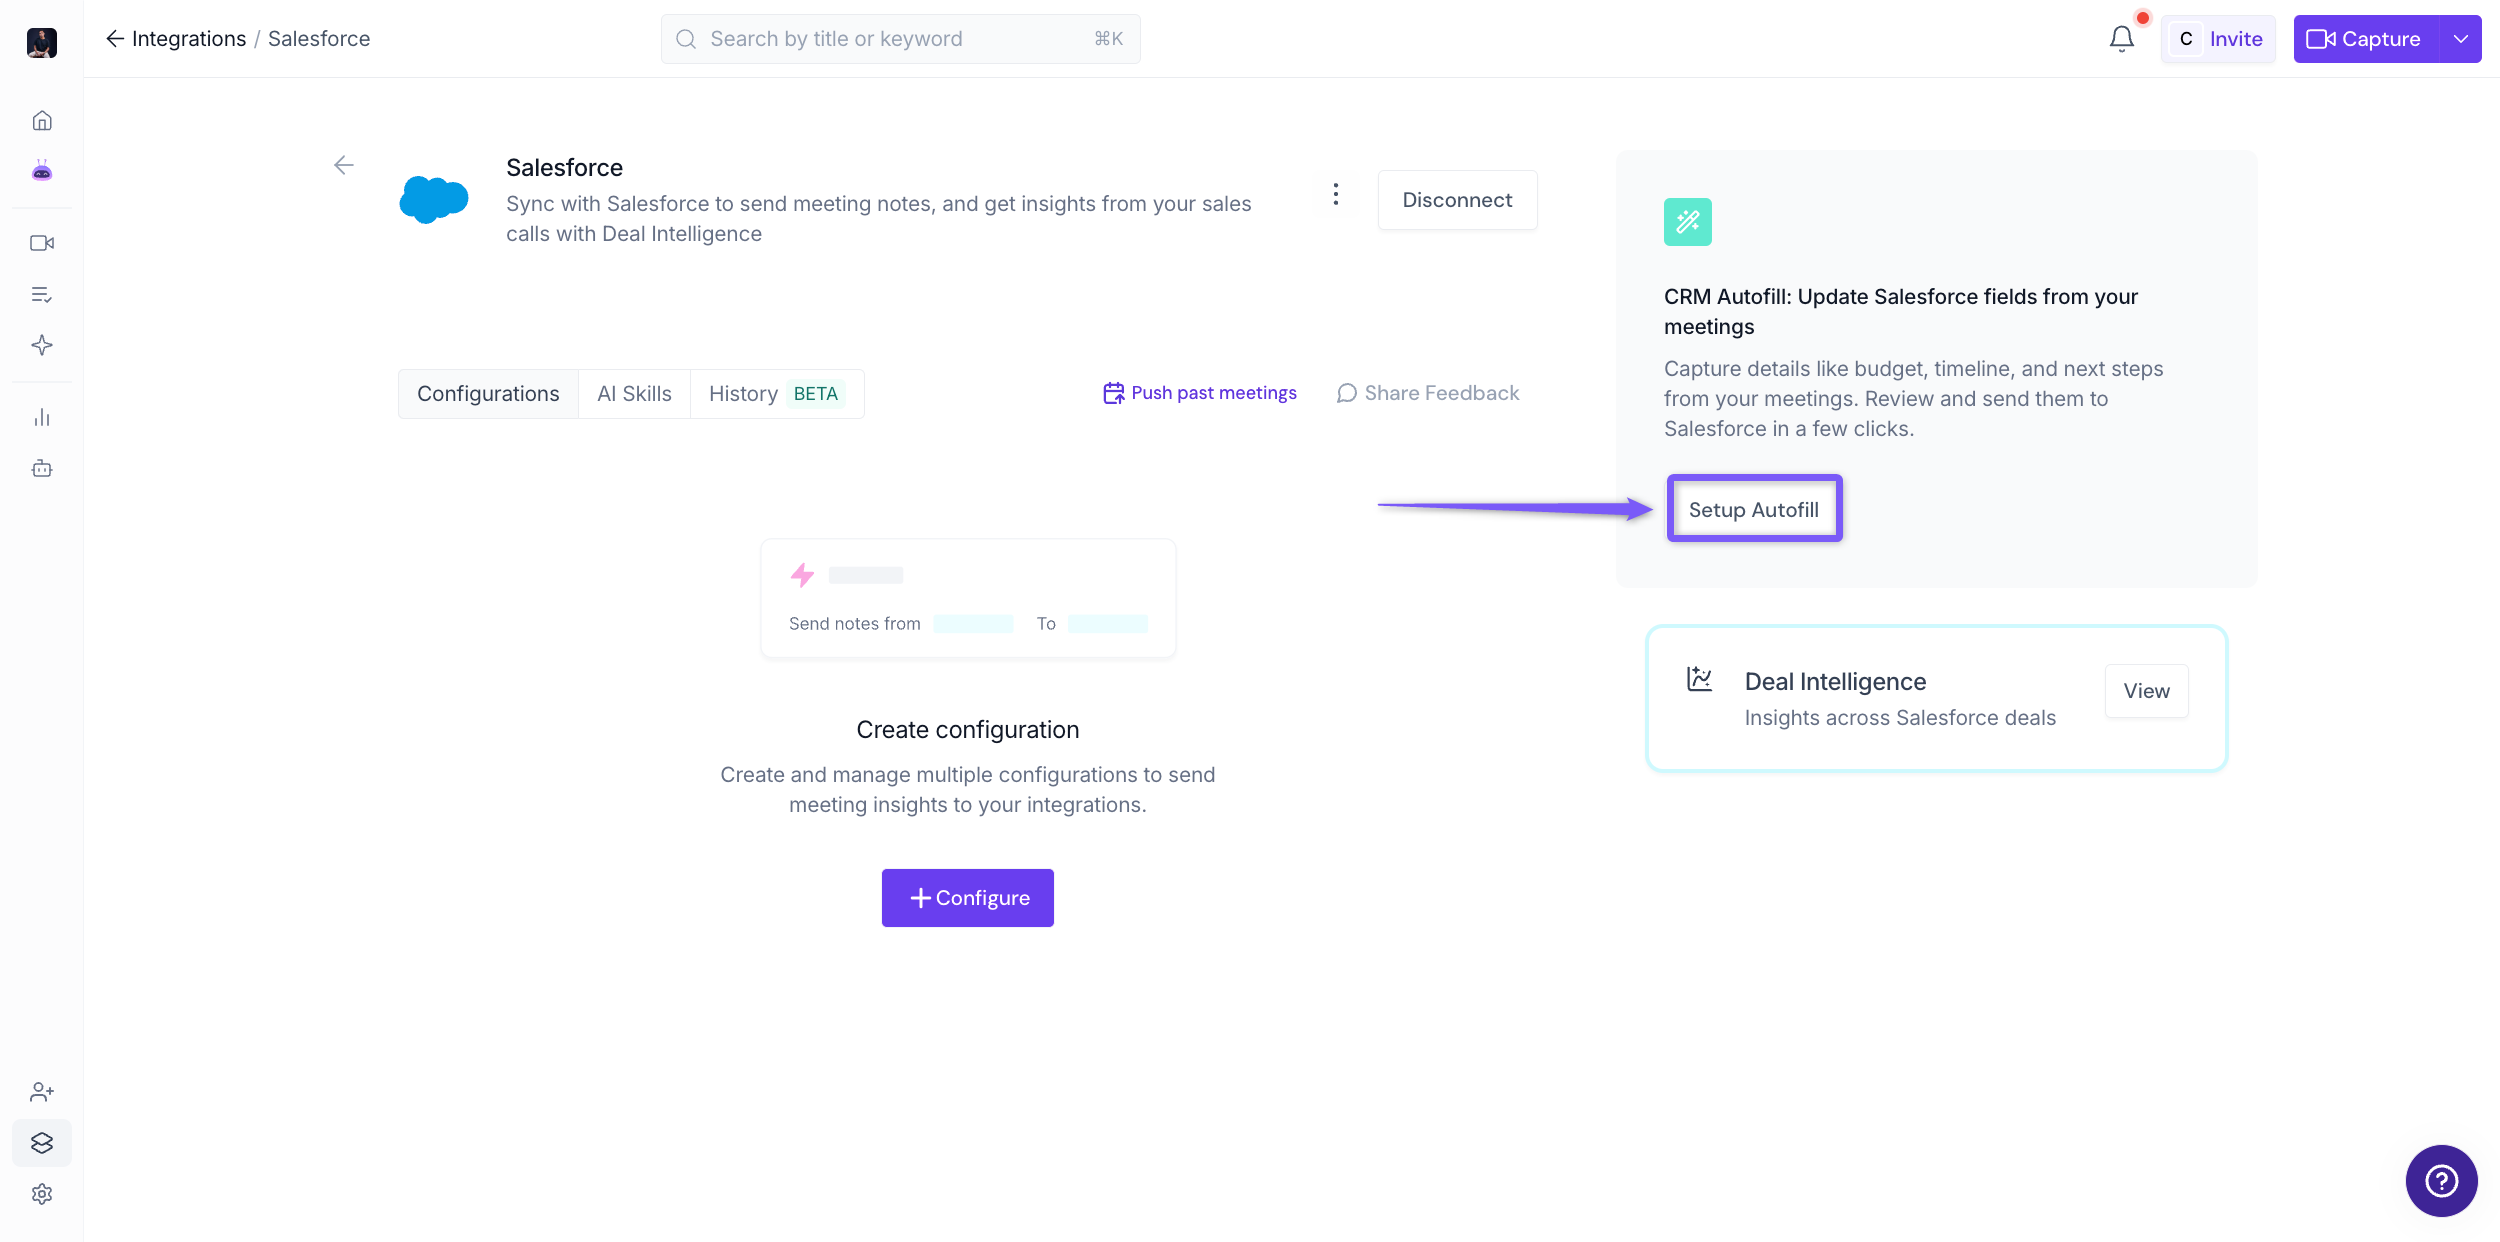
Step 2: Select the Salesforce Record Types to Update
Choose which Salesforce records you want Fireflies to update with information extracted from your meetings.
Contacts – Use this if you only want to update Contact fields, such as job title, email, phone number, or other contact-related details.
Accounts – Use this if you only want to update Account fields, such as industry, annual revenue, employee count, or account-related details.
Opportunities – Use this if you only want to update Opportunity fields, such as stage, amount, close date, next steps, or opportunity-related details.
You can select one, two, or all three record types based on your workflow.
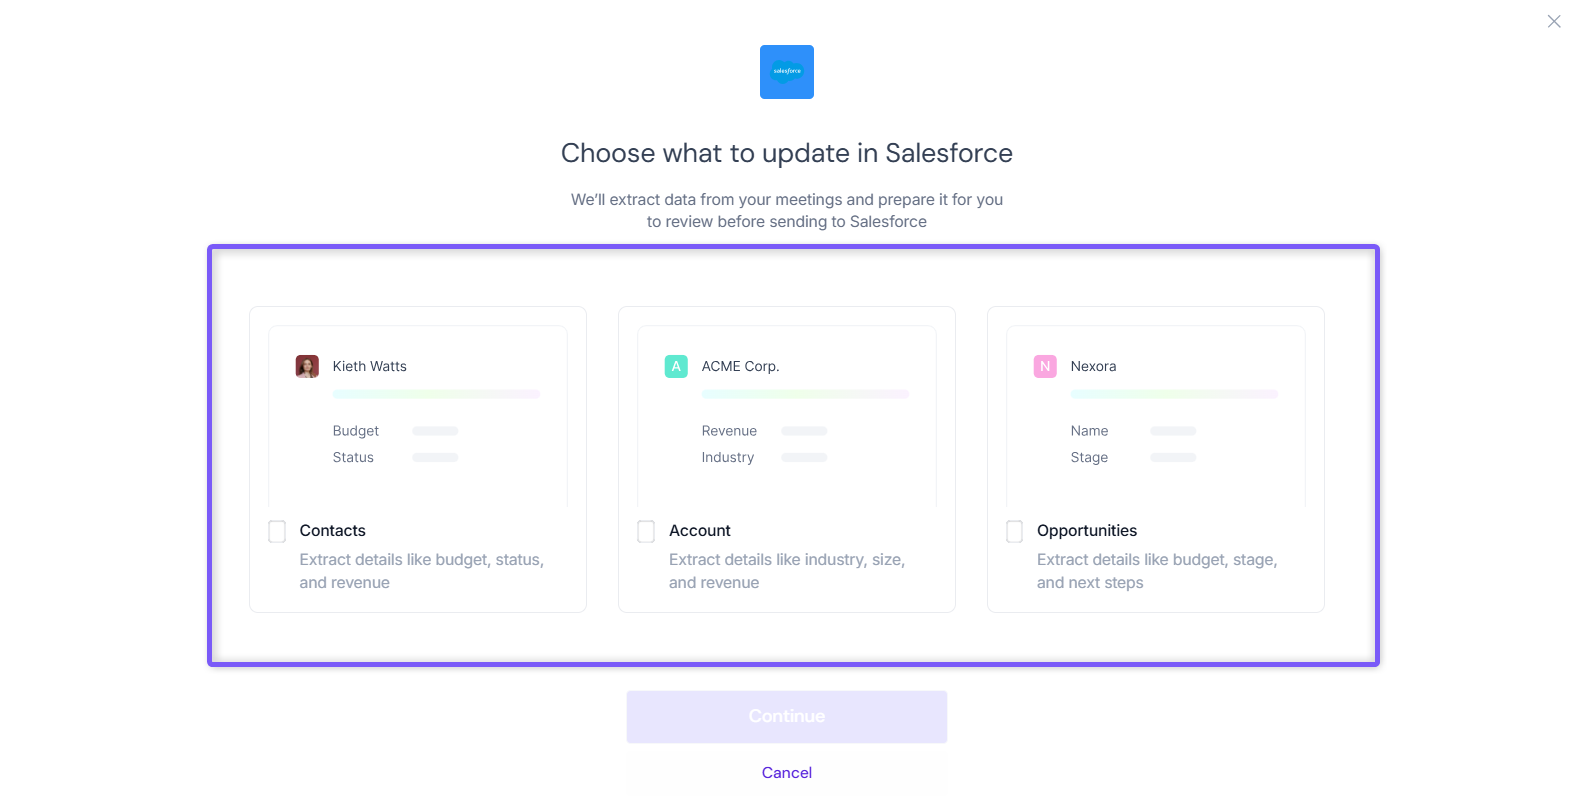
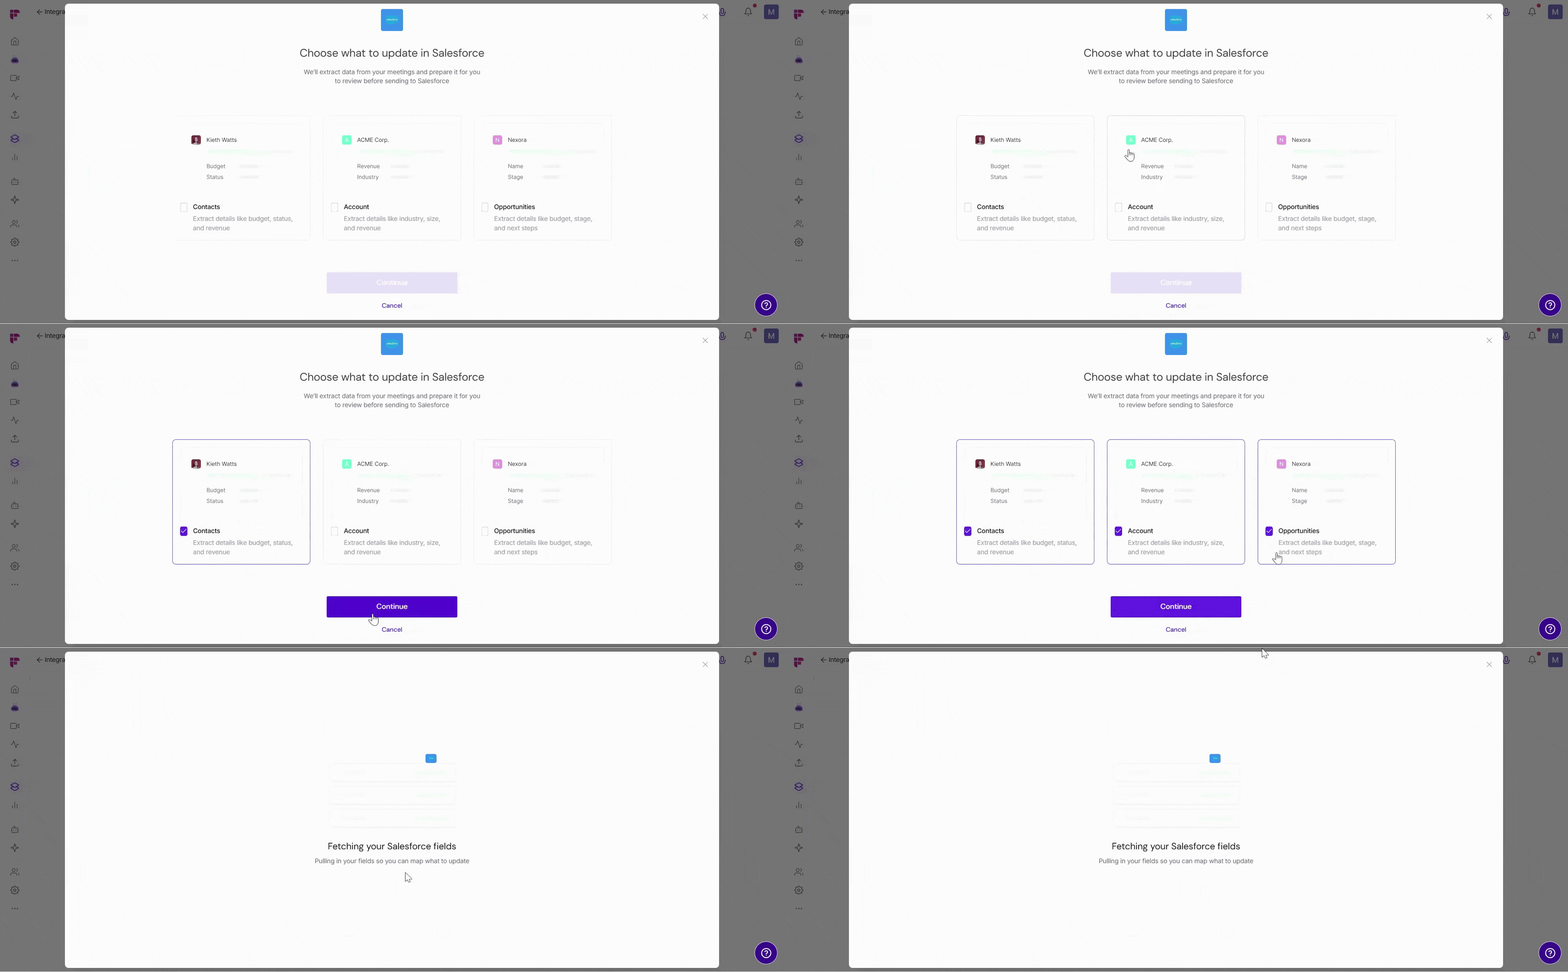
For demonstration purposes, we'll select all three record types - Contacts, Accounts, and Opportunities. Click Continue to proceed.
Fireflies analyzes your Salesforce records and suggests a ready-to-use configuration to help you get started quickly.
Step 3: Review Suggested Fields
Fireflies automatically suggests fields based on your recently updated Salesforce records. Use the Contacts, Accounts, and Opportunities tabs to review the information Fireflies will extract from your meetings and where it will be stored in Salesforce.
You can edit, remove, or add fields at any time during setup.
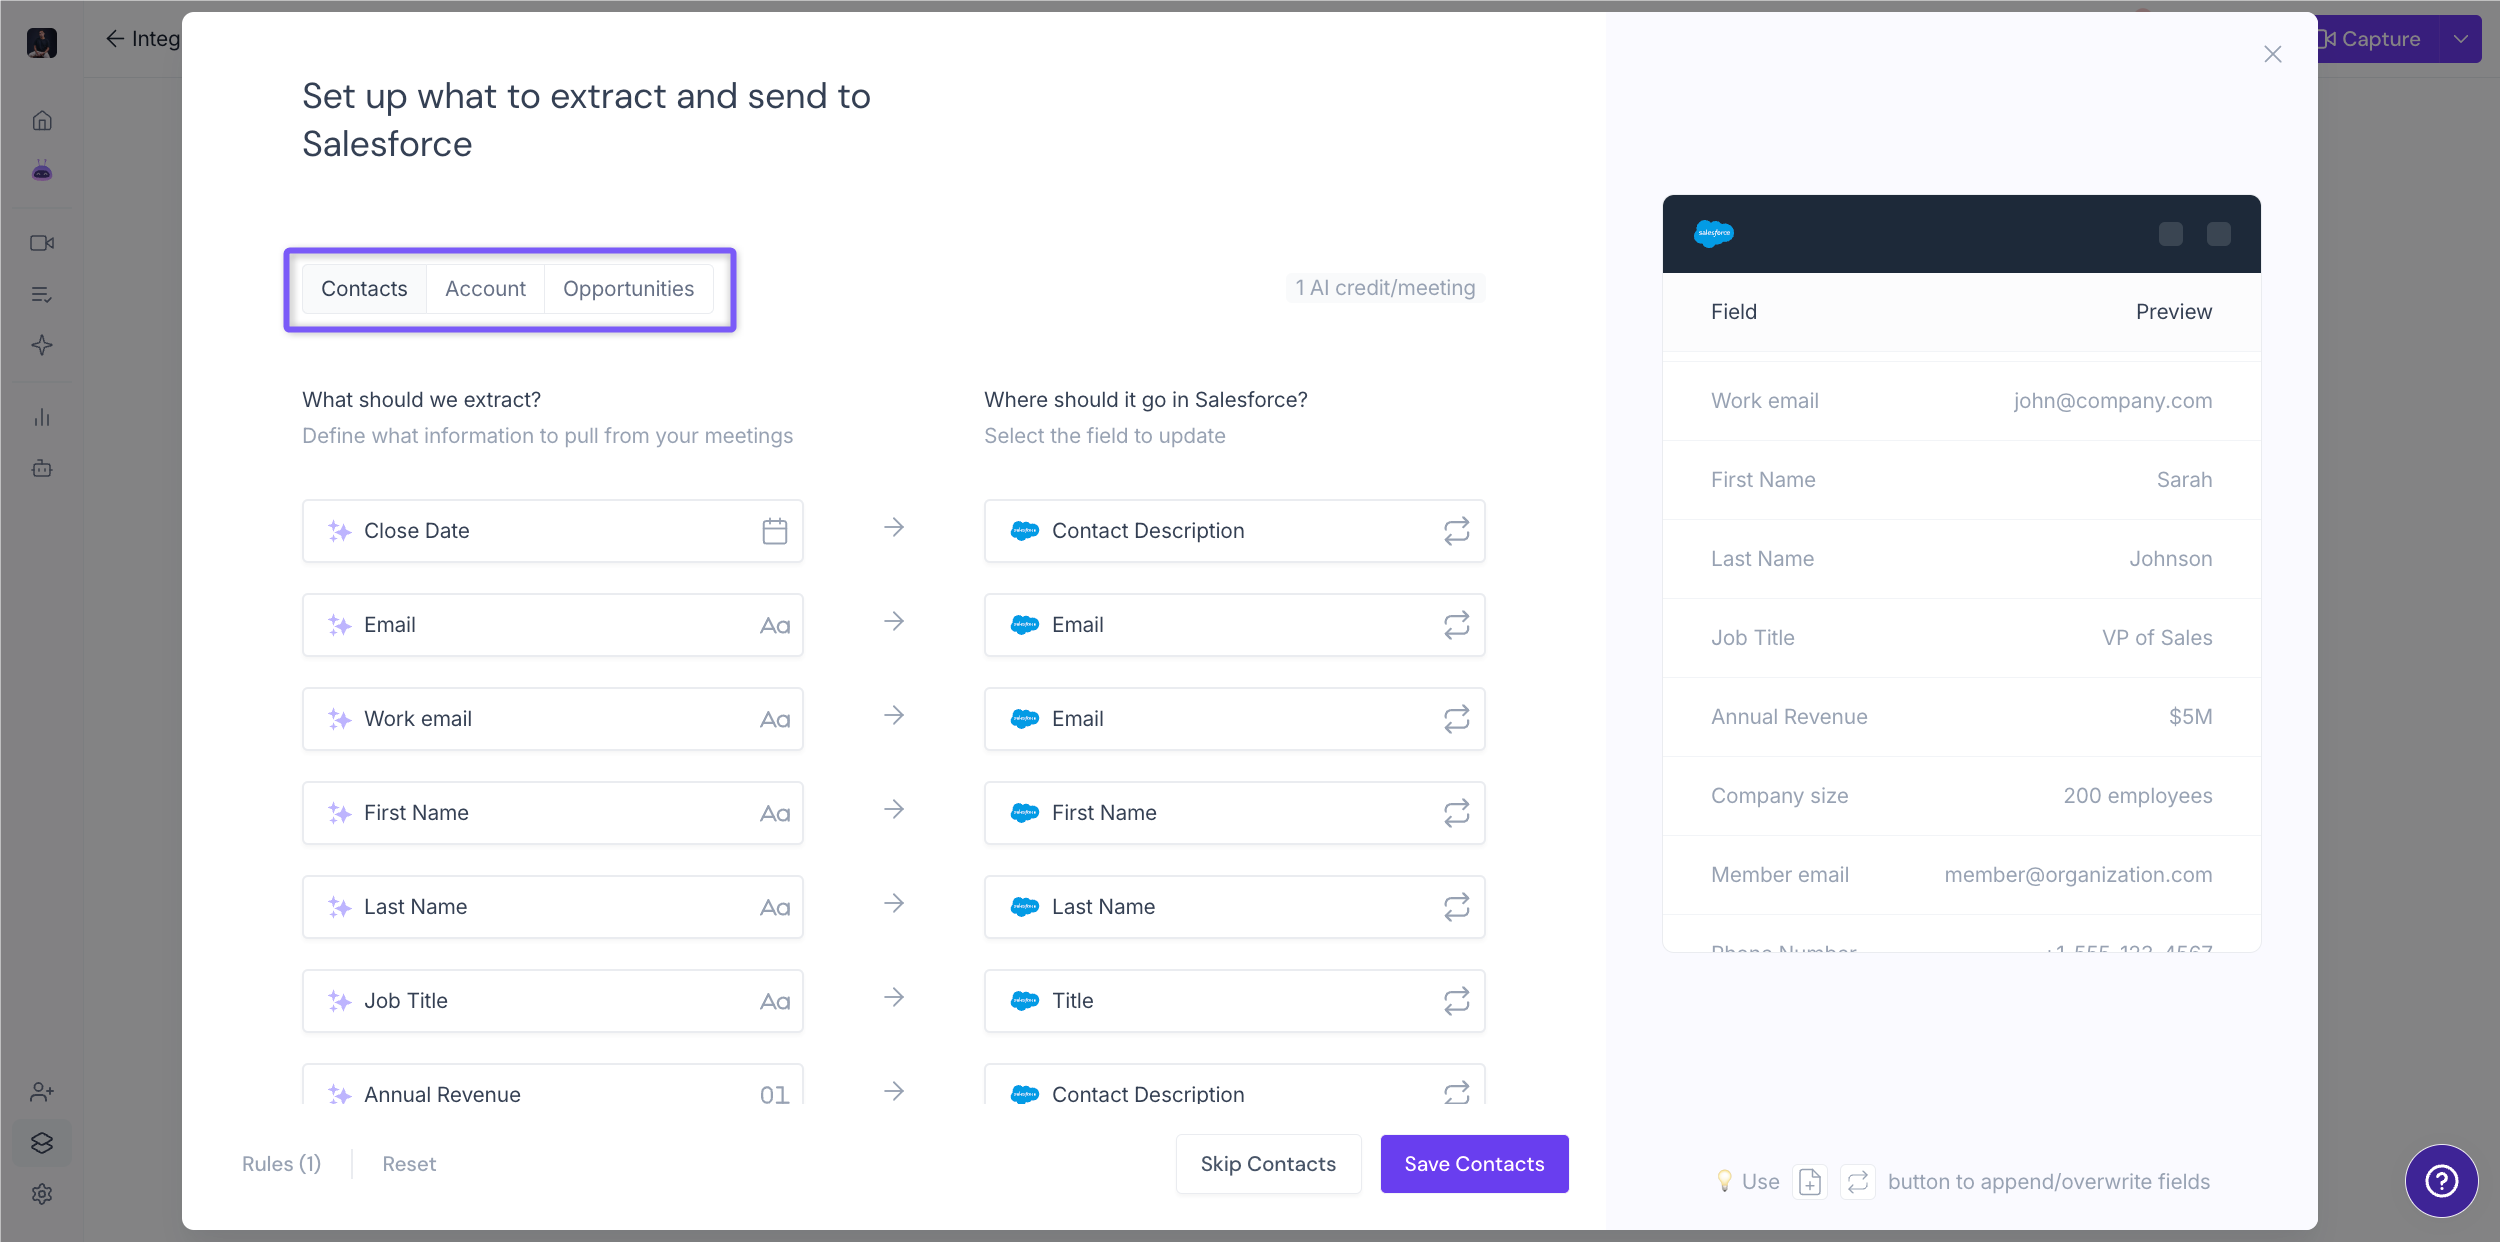
The configuration screen is divided into two sections (panes):
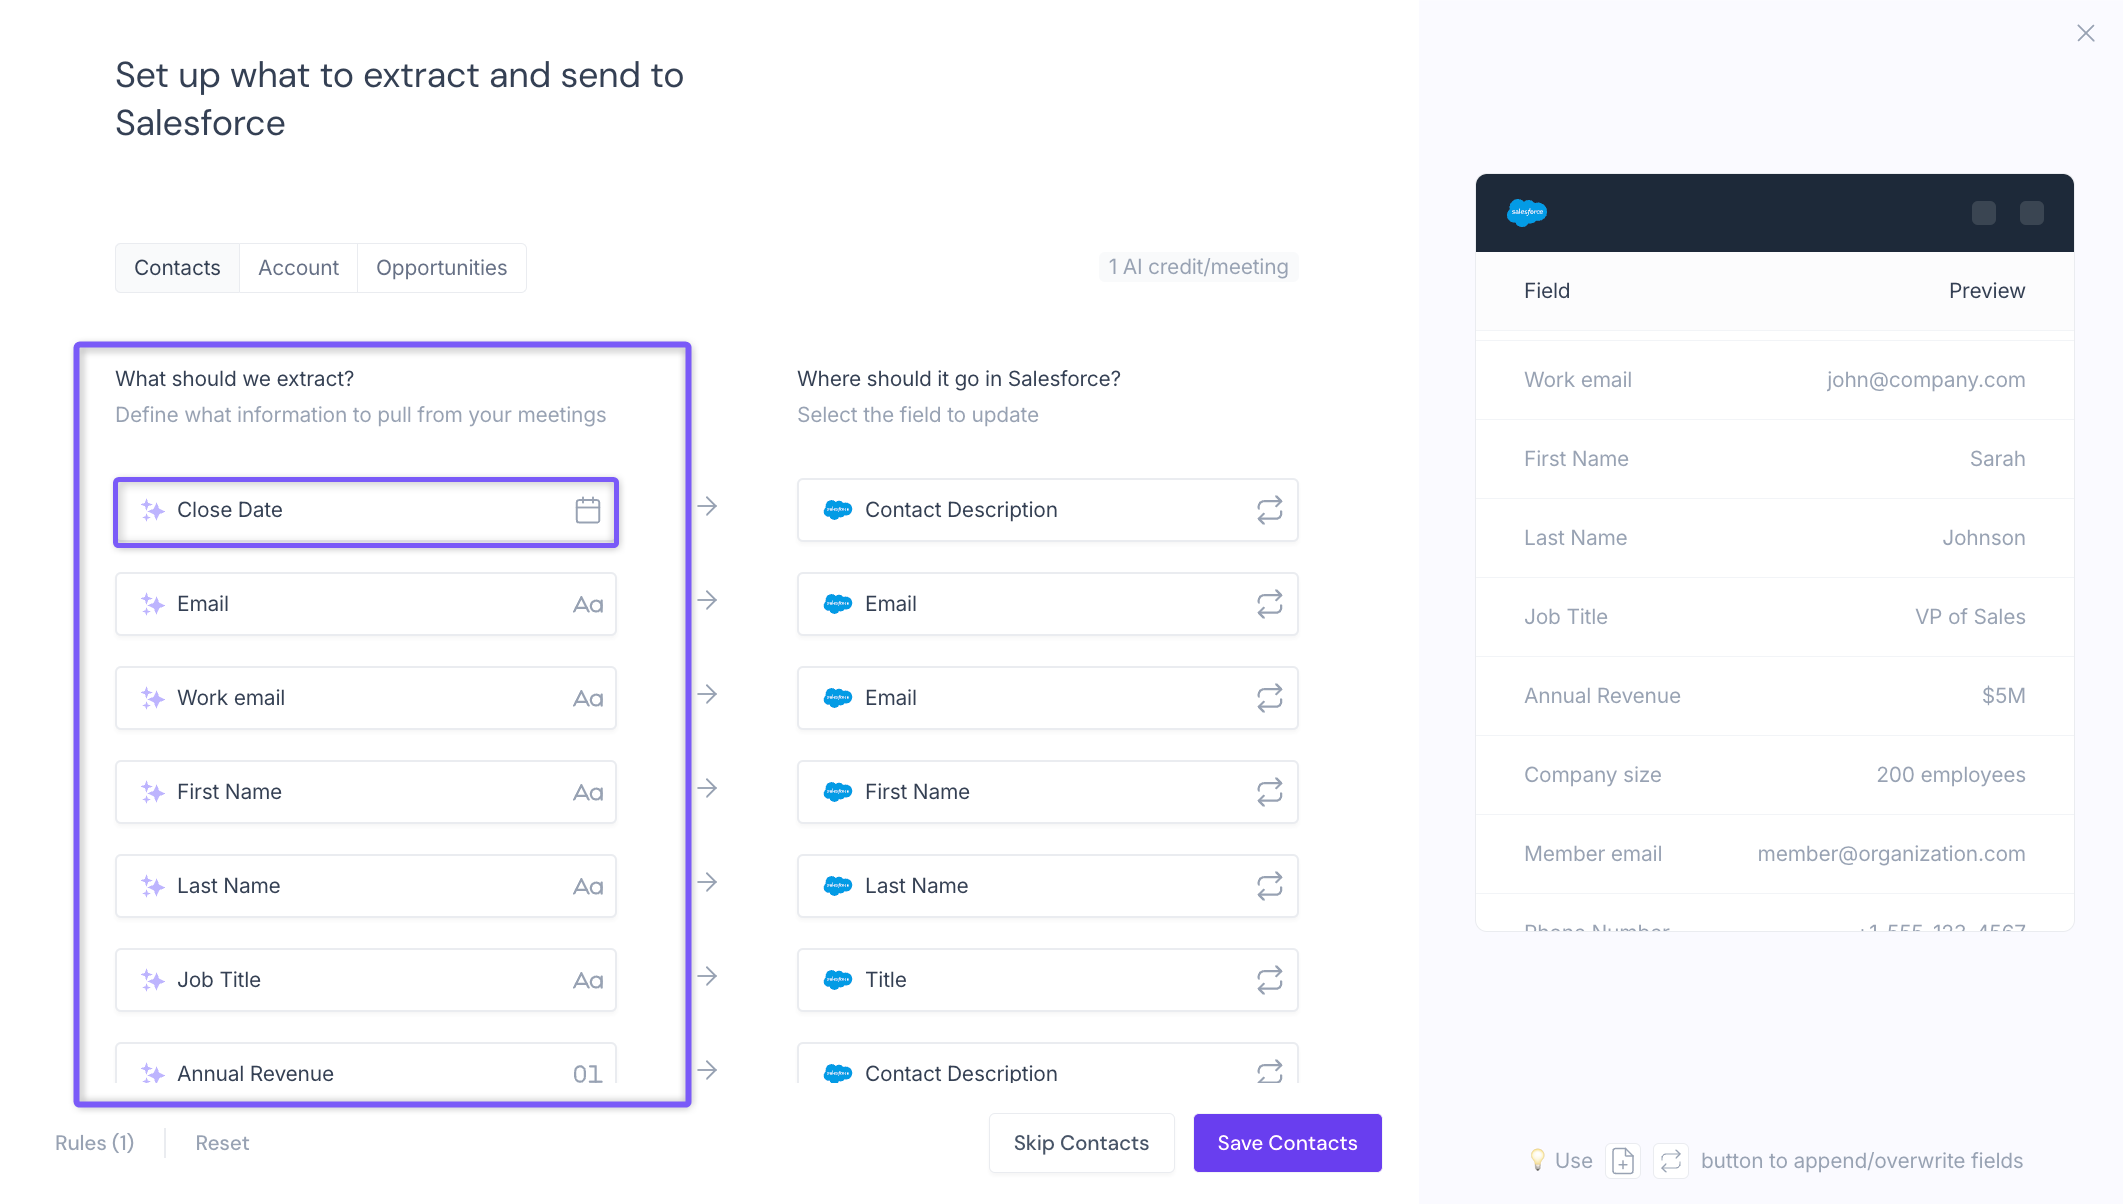
Left pane - What should we extract?
This section defines the information Fireflies should look for in your meeting transcripts.
Each field shows its data type, such as text (Aa) or date (📅) - no need to worry about formatting, Fireflies automatically matches extracted data to the appropriate Salesforce field type.
Review and customize these fields as needed before saving your configuration.
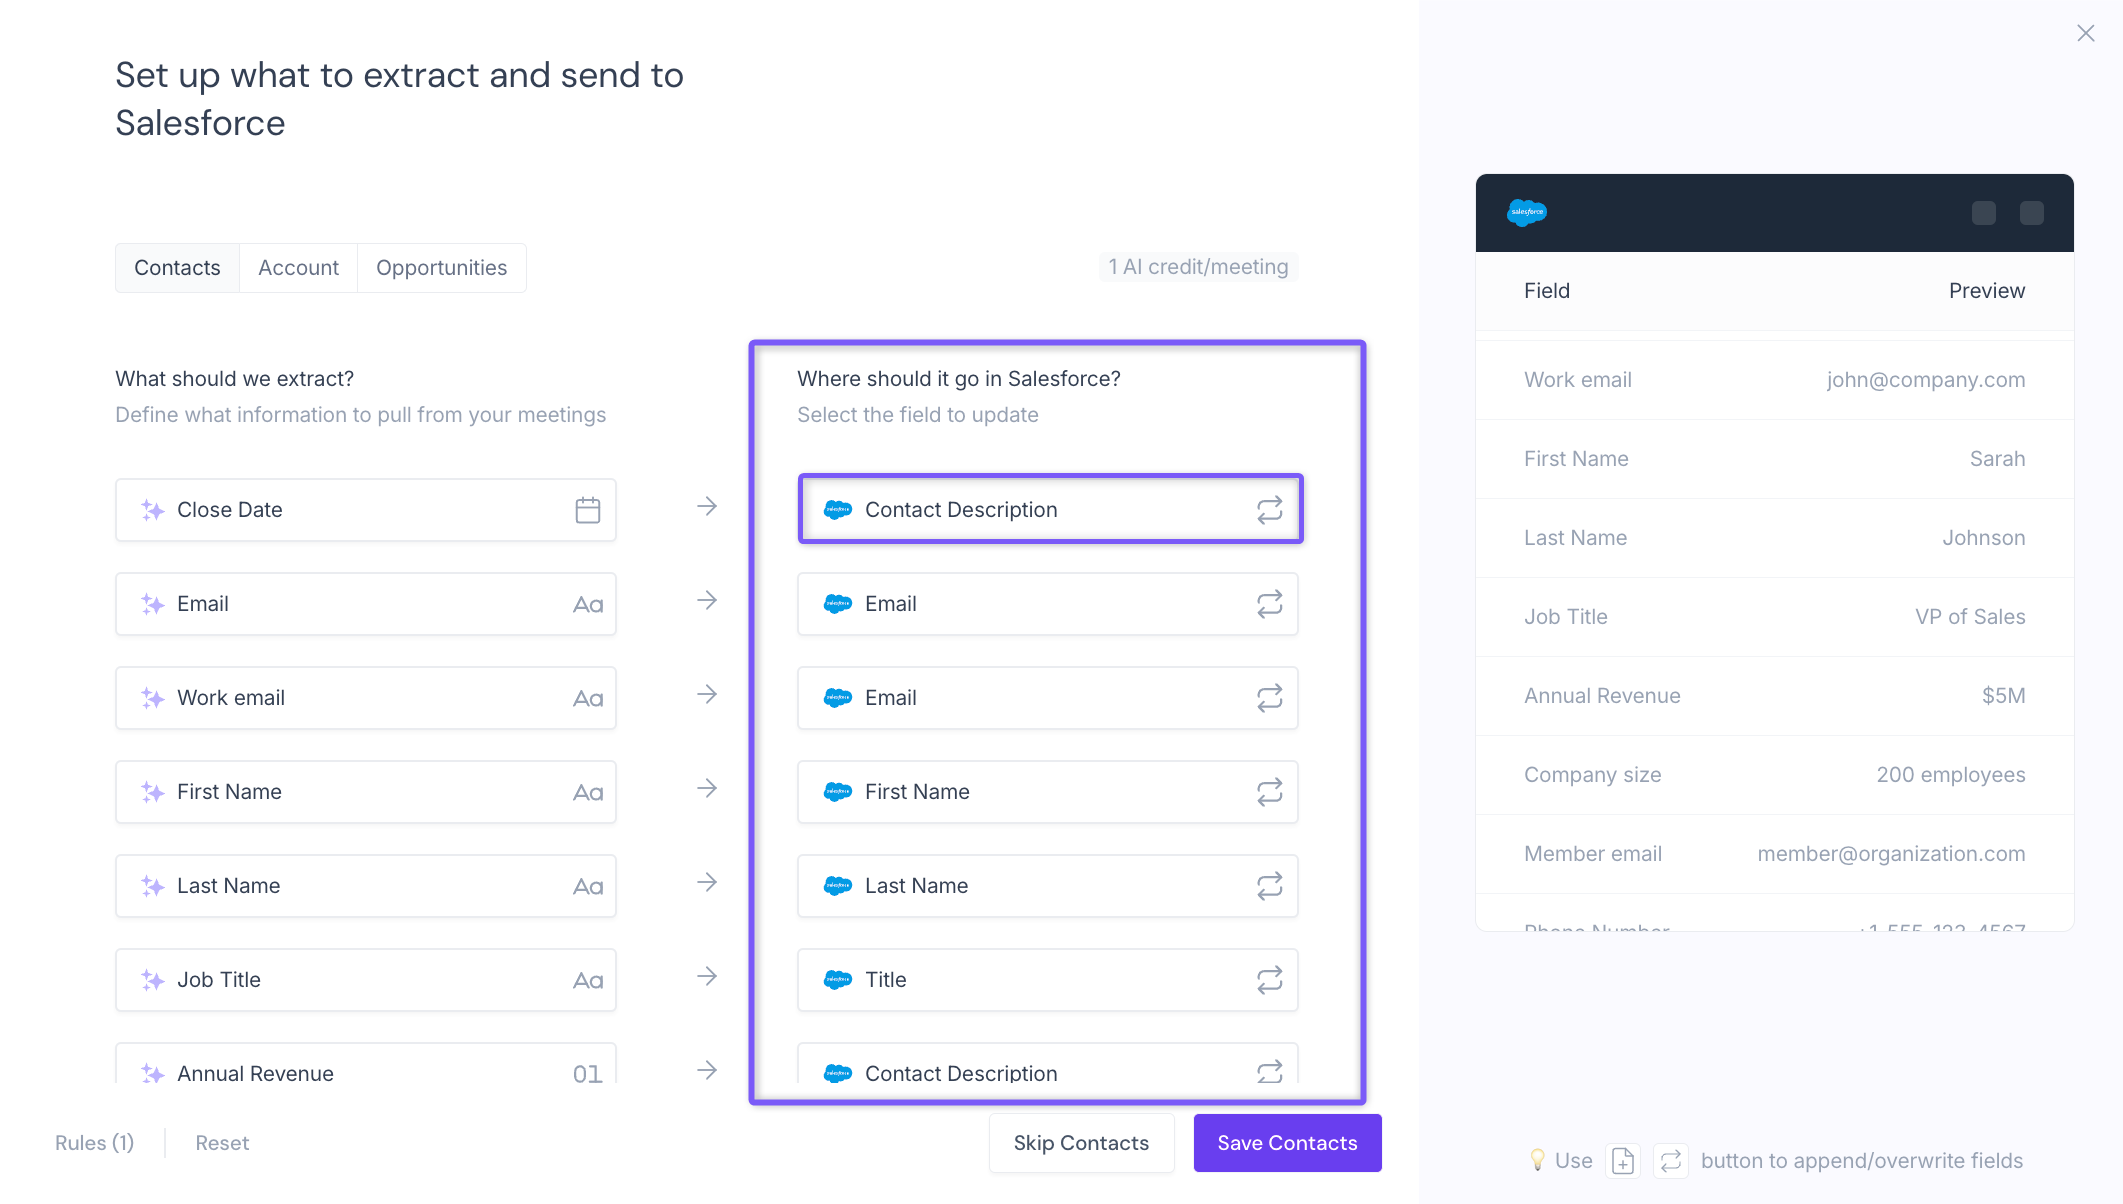
Right pane - Where should it go in Salesforce?
This section defines where the extracted information should be stored in Salesforce.
Fireflies automatically suggests Salesforce field mappings, but you can review and update them as needed.
When data is extracted from a meeting, Fireflies automatically formats it and maps it to the selected Salesforce field.
Step 4: Configure Field Update Behavior
For each mapped Salesforce field, choose how Fireflies should handle existing data when new information is extracted from a meeting.
Important: Each field can use a different update behavior. Review this setting carefully, as it determines whether new information is added to an existing Salesforce field or replaces it.
📄+ Append: Adds the extracted information to the existing value in the Salesforce field.
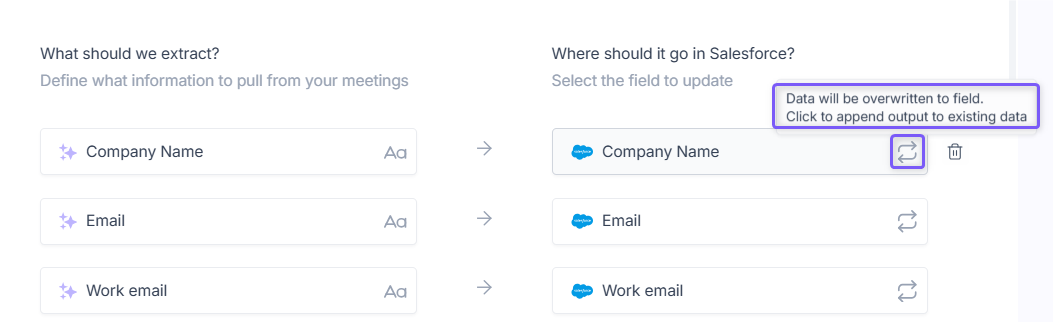
🔄 Overwrite: Replaces the existing value in the Salesforce field with the newly extracted information.
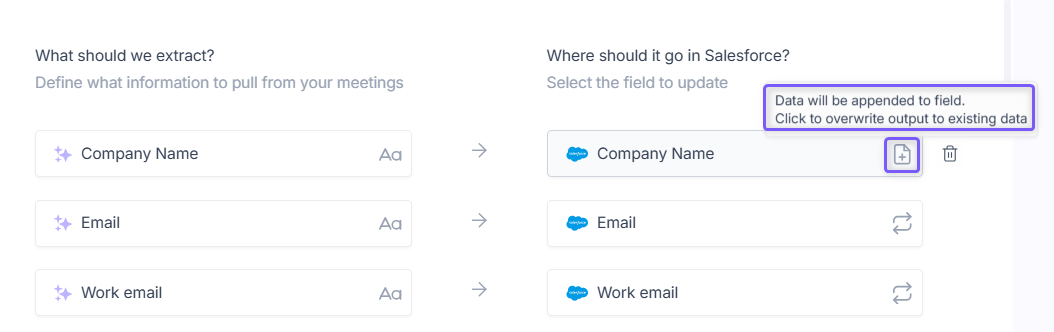
Click the icon next to a field to switch between Append and Overwrite. The displayed icon indicates which update behavior is currently applied to that field.
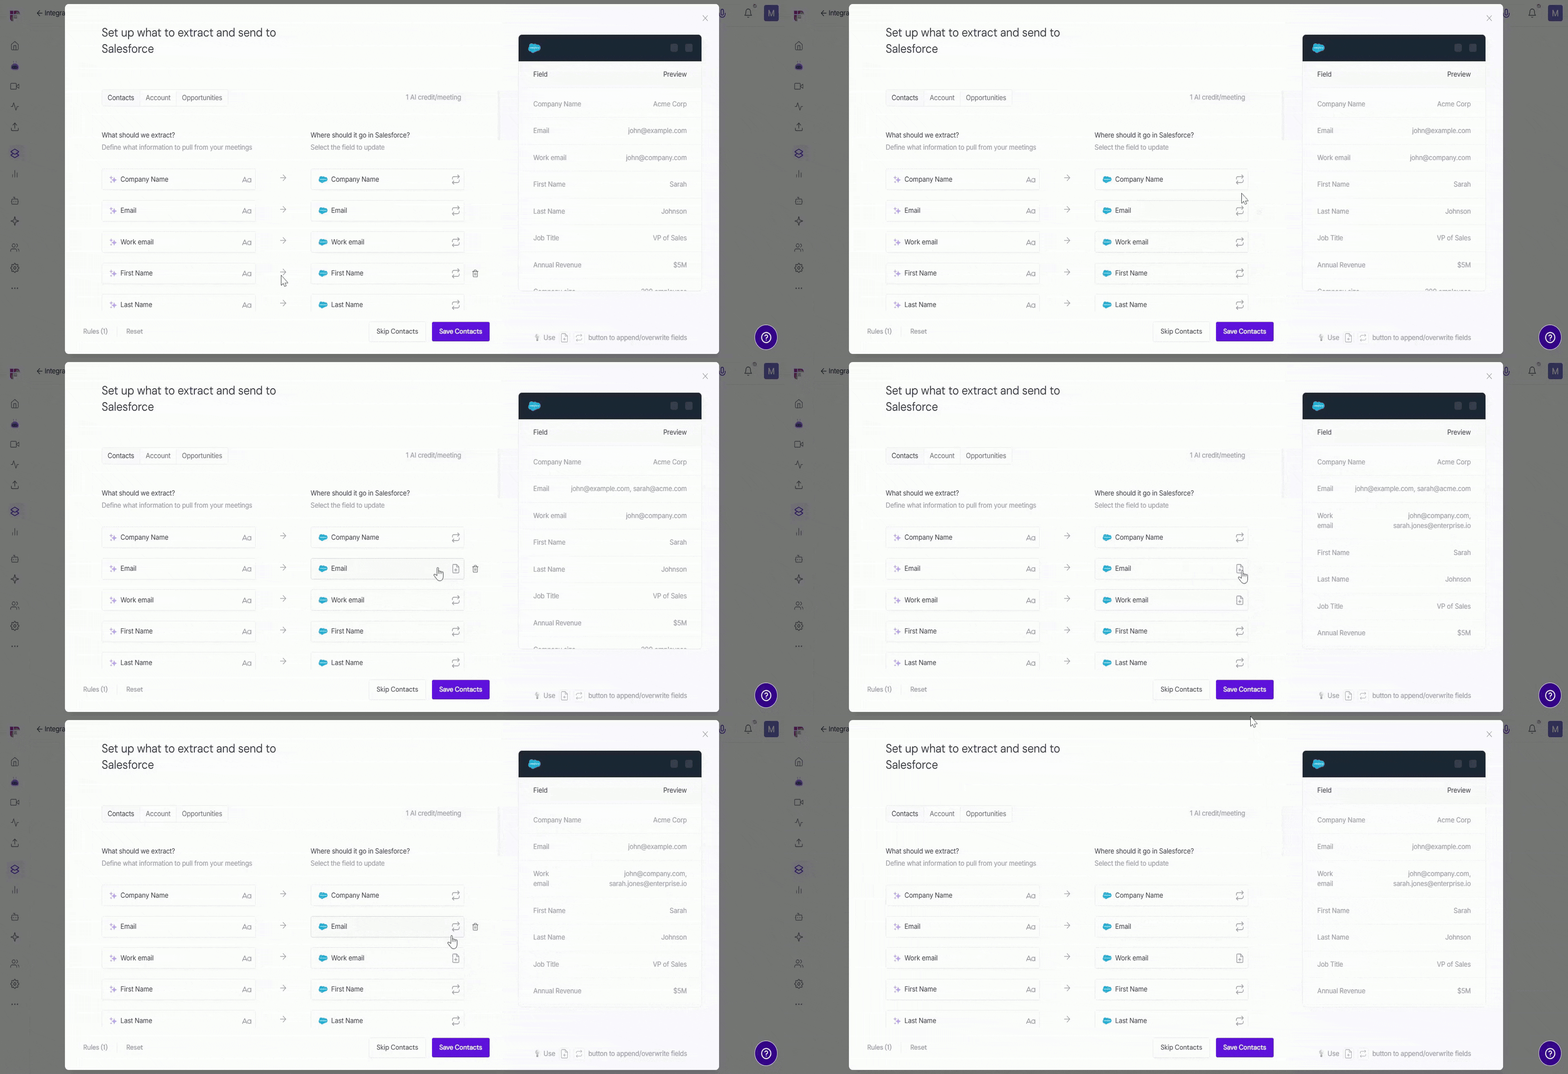
Tip: Use 📄+ Append when you want to preserve existing information and add new details over time. Use 🔄 Overwrite when you want the latest meeting information to replace the current field value.
Step 5: Add or Customize Fields
Need to capture additional information or adjust the suggested field mappings? You can modify existing fields or add custom fields to match your CRM workflow.
For example, you might want Fireflies to extract information such as budget, employee count, competitor mentions, or other details that aren't included in the suggested fields.
Modify Existing Fields:
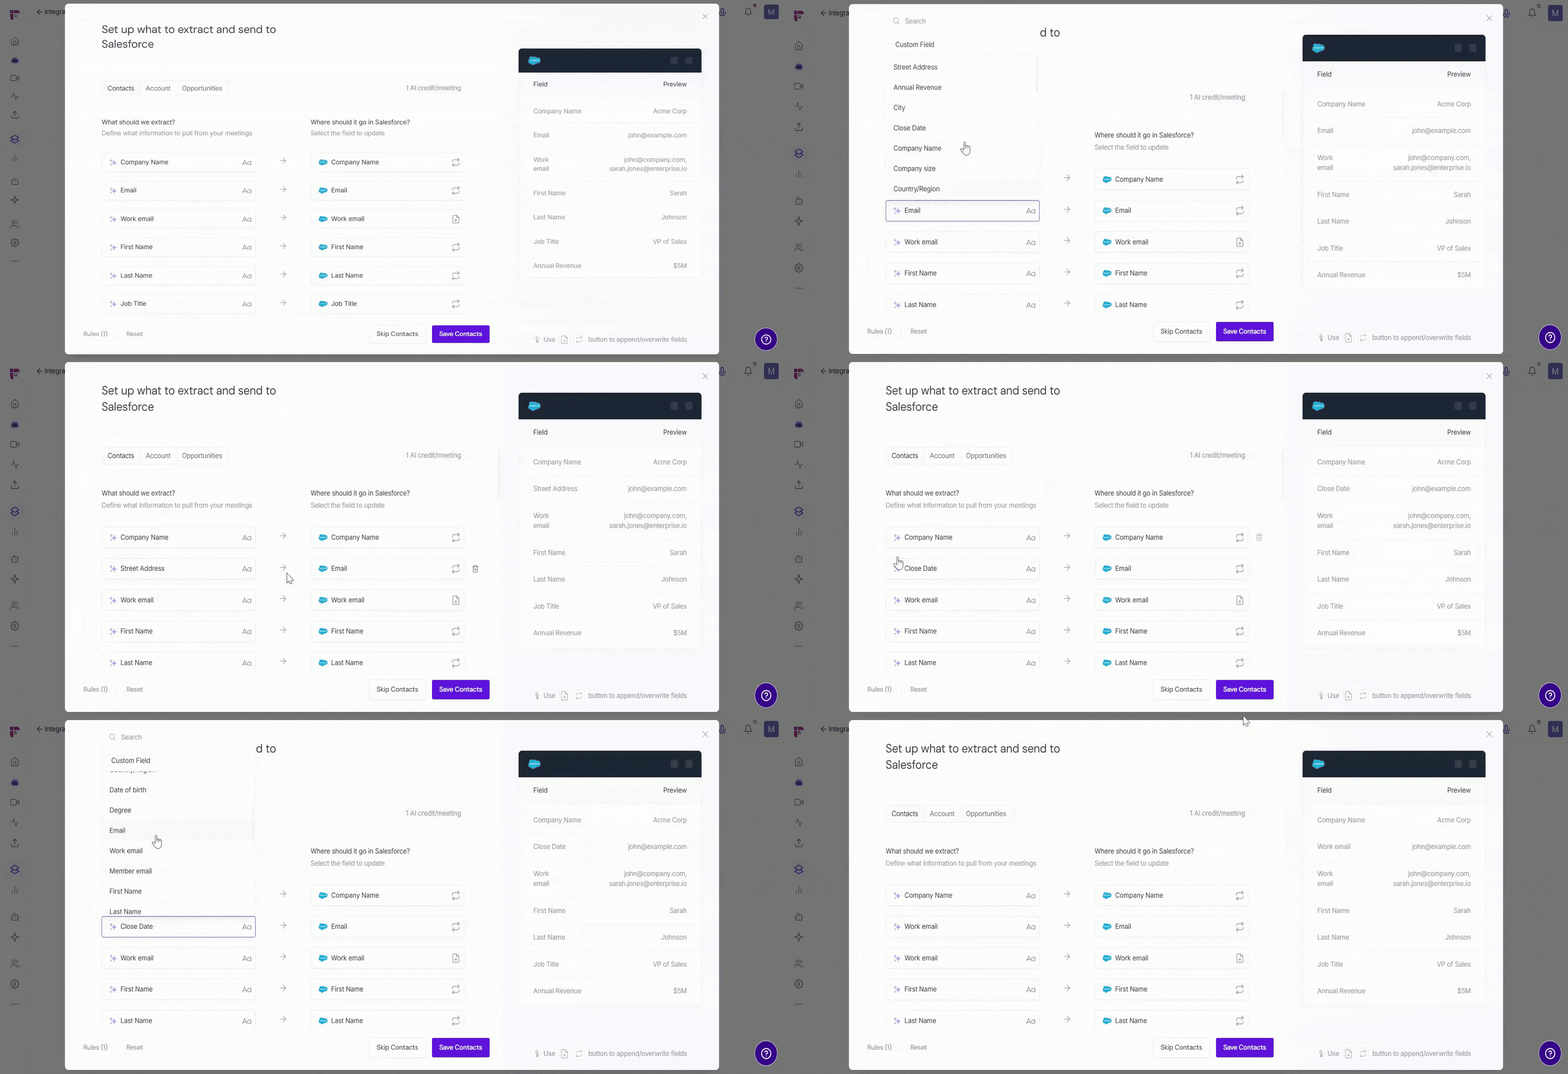
1. Click an existing field to select a different Salesforce field or replace it with a Custom Field.
2. Update the extraction prompt to control what information Fireflies extracts from your meetings.
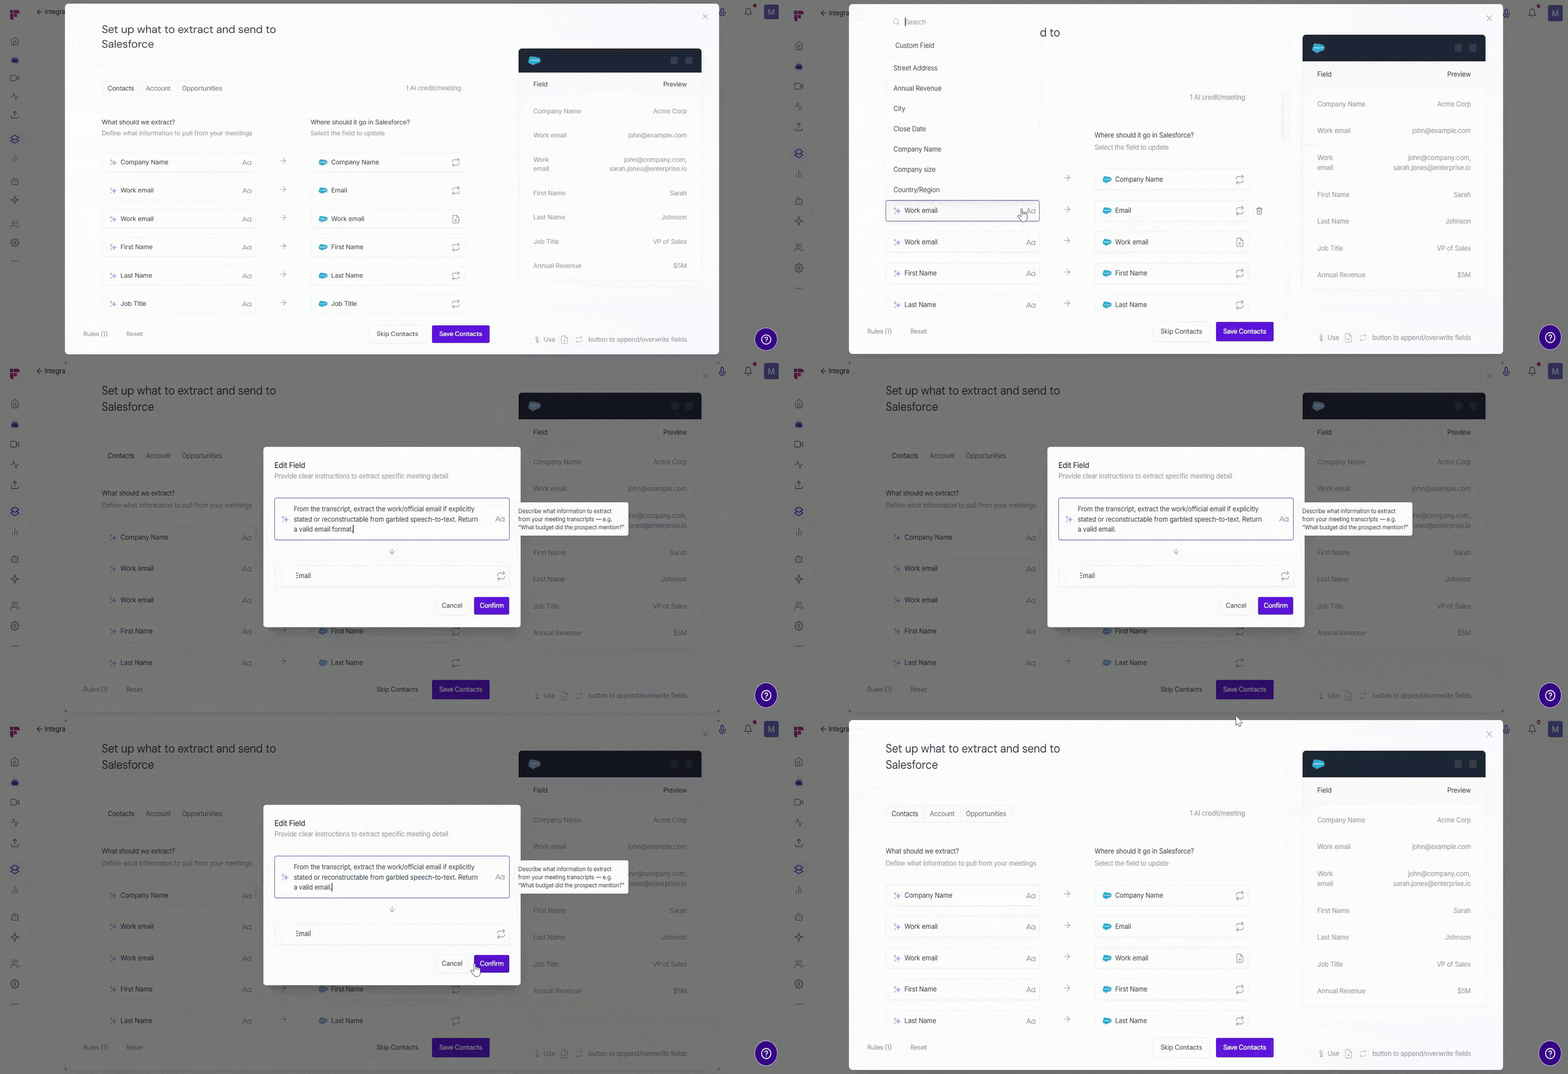
📌 Before adding a custom field in Fireflies, make sure the corresponding custom property already exists in your Salesforce account.
To add a custom field:
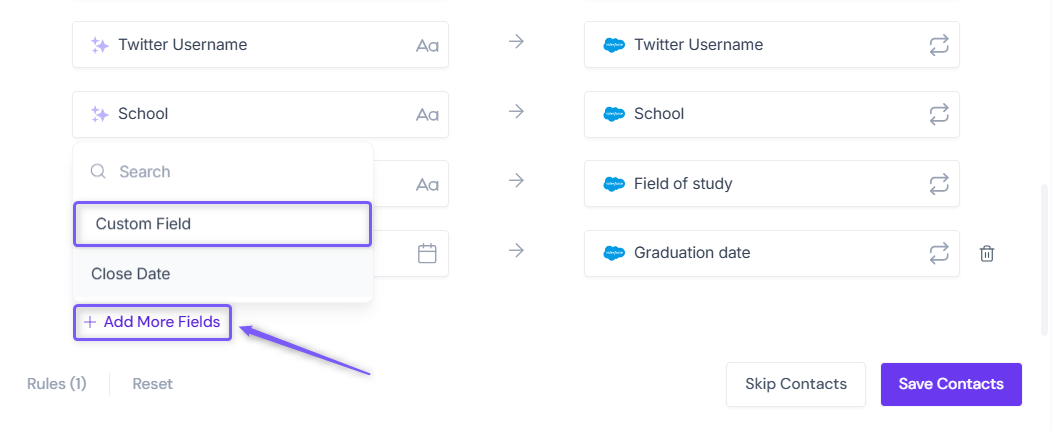
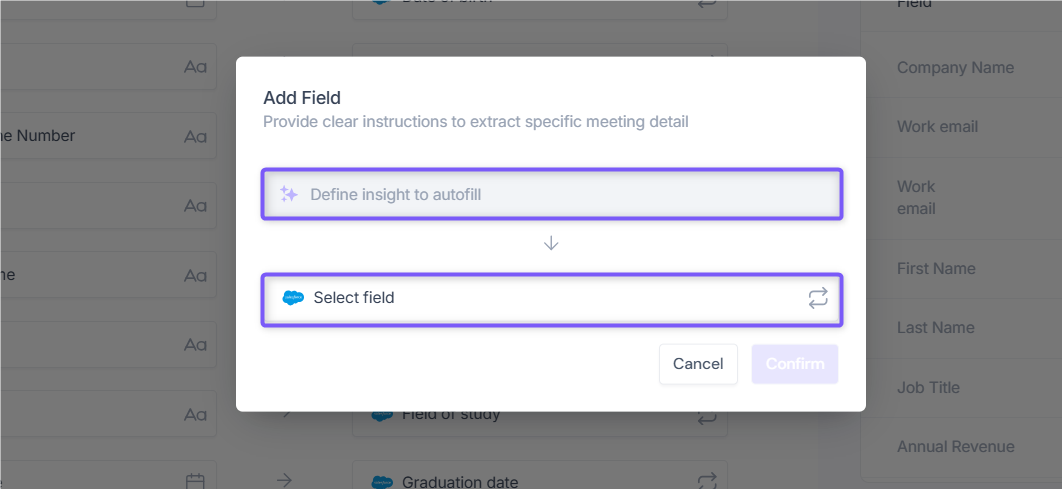
1. At the bottom of the What should we extract? pane, click Add Field → Custom Field.
2. In the modal window:
Under Select field, choose the Salesforce field where the extracted information should be stored.
In the Define insight to autofill field, enter a prompt describing the information Fireflies should extract from your meetings.
💡 Tip: The more specific your extraction prompt is, the more accurately Fireflies can identify and extract the information from your meetings.
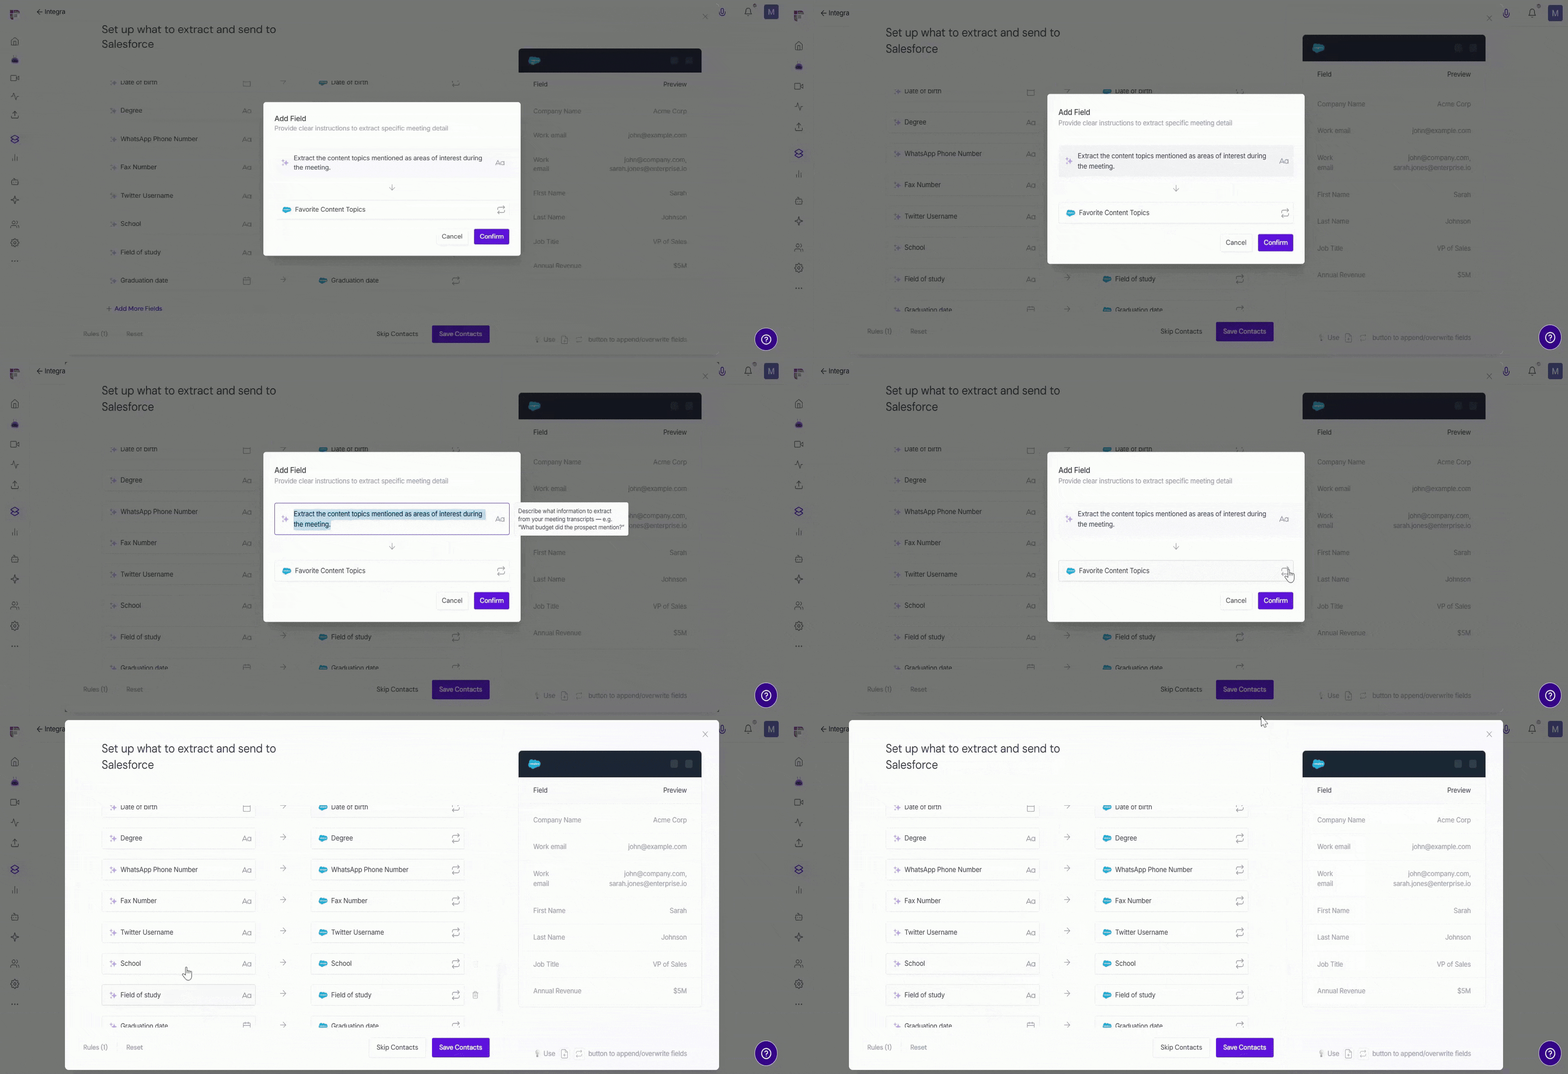
Example: Select Favorite Content Topics and use the prompt "Extract the content topics mentioned as areas of interest during the meeting."
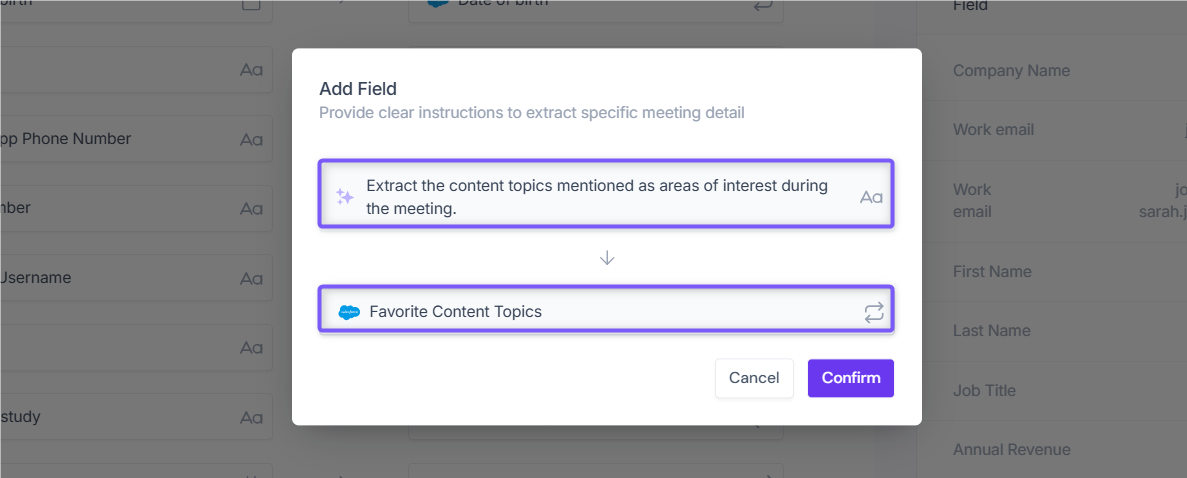
3. Choose the Append (📄+) or Overwrite (🔄) option for the field.
4. Click Confirm to add the field to your Autofill CRM configuration.
Step 6 (Optional): Configure Autofill CRM Rules
Rules allow you to control exactly which meetings Autofill CRM runs on, for example, only on demo calls, or only when a specific team member is the host.
The Rules Engine is available to Enterprise admins only. Don't have access to Rules? No problem - skip this step and continue to Step 7. Autofill CRM will still work normally based on your configured fields.
To configure rules, click Rules in the bottom-left corner of the setup screen. You can filter meetings by:
💡By default, Autofill CRM is configured to run only for External meetings. If needed, you can modify this rule or add additional filters to control which meetings Autofill CRM processes.
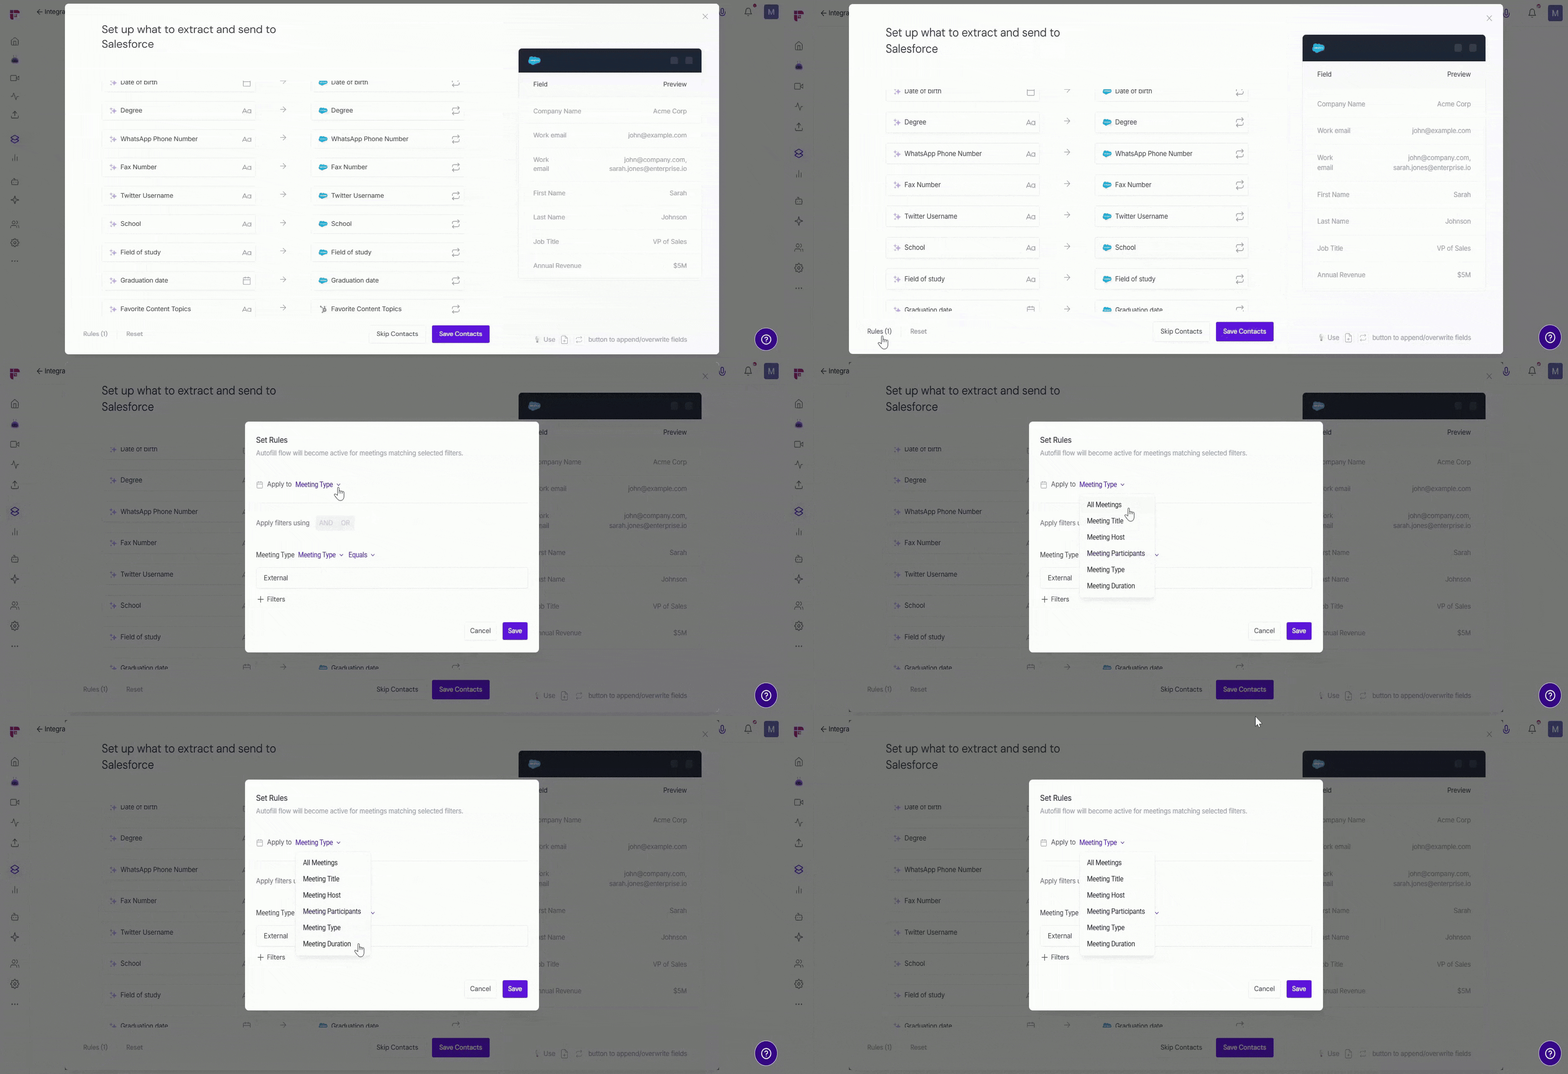
🗂 All Meetings
Run Autofill CRM on all meetings without applying any filters.
📝 Meeting Title
Run Autofill CRM only when the meeting title matches specific conditions.
Examples:
Title contains Demo
Title starts with Client Review
Title equals Discovery Call
👤 Meeting Host
Run Autofill CRM based on the meeting host.
Examples:
Host equals john@example.com
Host does not equal john@example.com
👥 Meeting Participants
Run Autofill CRM based on meeting participants.
Examples:
Participant contains sara@example.com
Participant does not contain alex@example.com
⏱ Meeting Duration
Run Autofill CRM only for meetings based on their duration.
Longer than – Run Autofill CRM only for meetings longer than the specified duration.
Shorter than – Run Autofill CRM only for meetings shorter than the specified duration.
Example: Set Longer than – 30 minutes to run Autofill CRM only for meetings that lasted more than 30 minutes.
🔀 Apply Multiple Filters
Combine multiple conditions for more precise control.
Example:
Meeting title contains Demo
Host equals john@example.com
You can combine filters using:
AND — All conditions must match.
OR — Any condition can match.
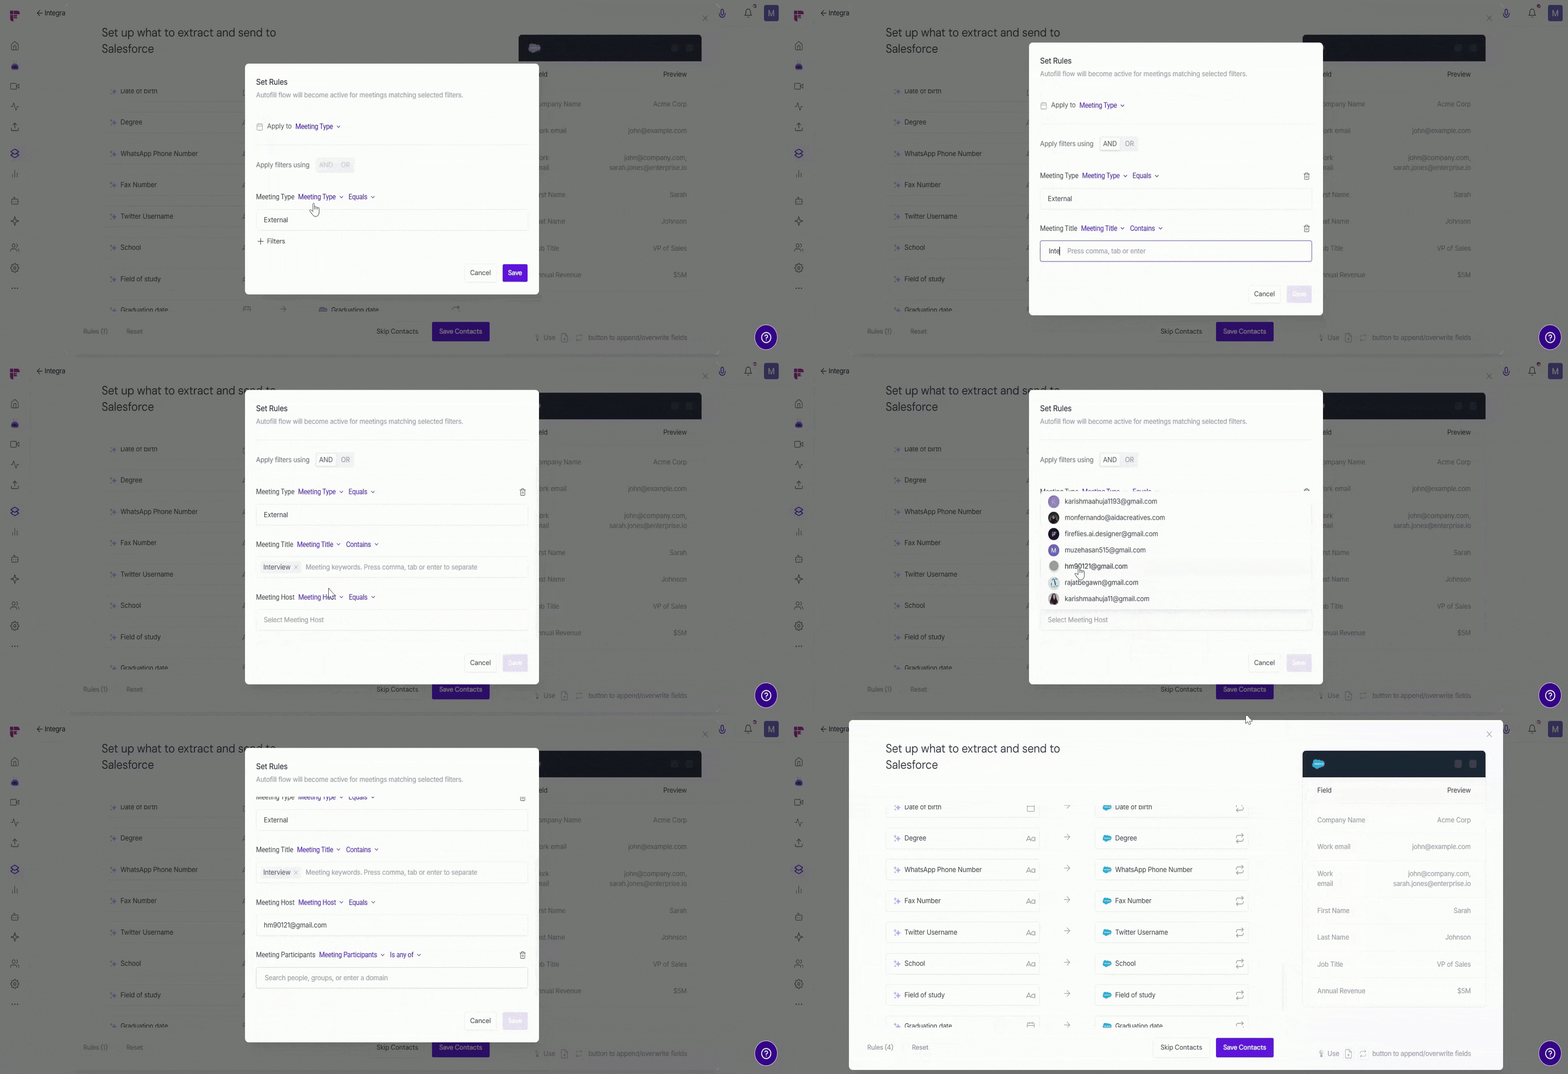
📖 Want to go deeper? See the Fireflies Rules Engine guide for advanced filter options and examples.
Step 7: Preview Extracted Data
The preview panel shows a sample of the information Fireflies will extract from your meetings based on the configured fields and prompts.
Field displays the Salesforce field that will be updated.
Preview displays a sample of the information Fireflies expects to extract and send to that field.
If something looks off, adjust your field mappings or extraction prompts before proceeding.
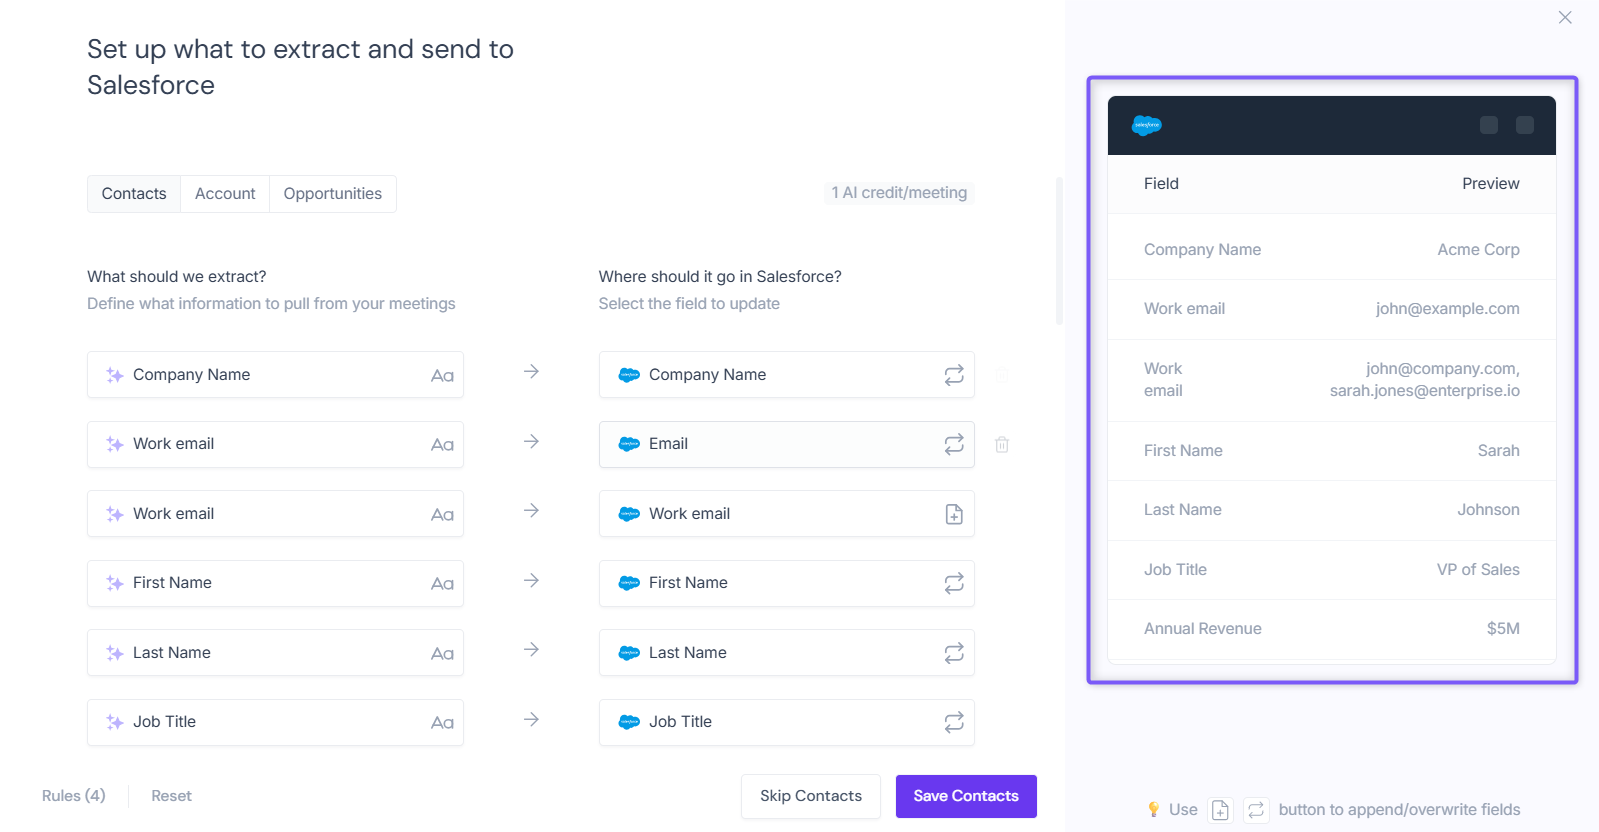
Selected multiple record types in Step 2? Fireflies guides you through configuring and saving each selected record type separately. After you save one record type, Fireflies automatically switches to the next selected record type. Review the fields, make any changes if needed, and save until all selected record types are configured.
Autofill CRM Rules configured for the first record type automatically apply to all other selected record types.
Step 8: Save Your Configuration
Once you're satisfied with the field mappings, extraction prompts, update behavior, and previewed data, click Save Configuration.
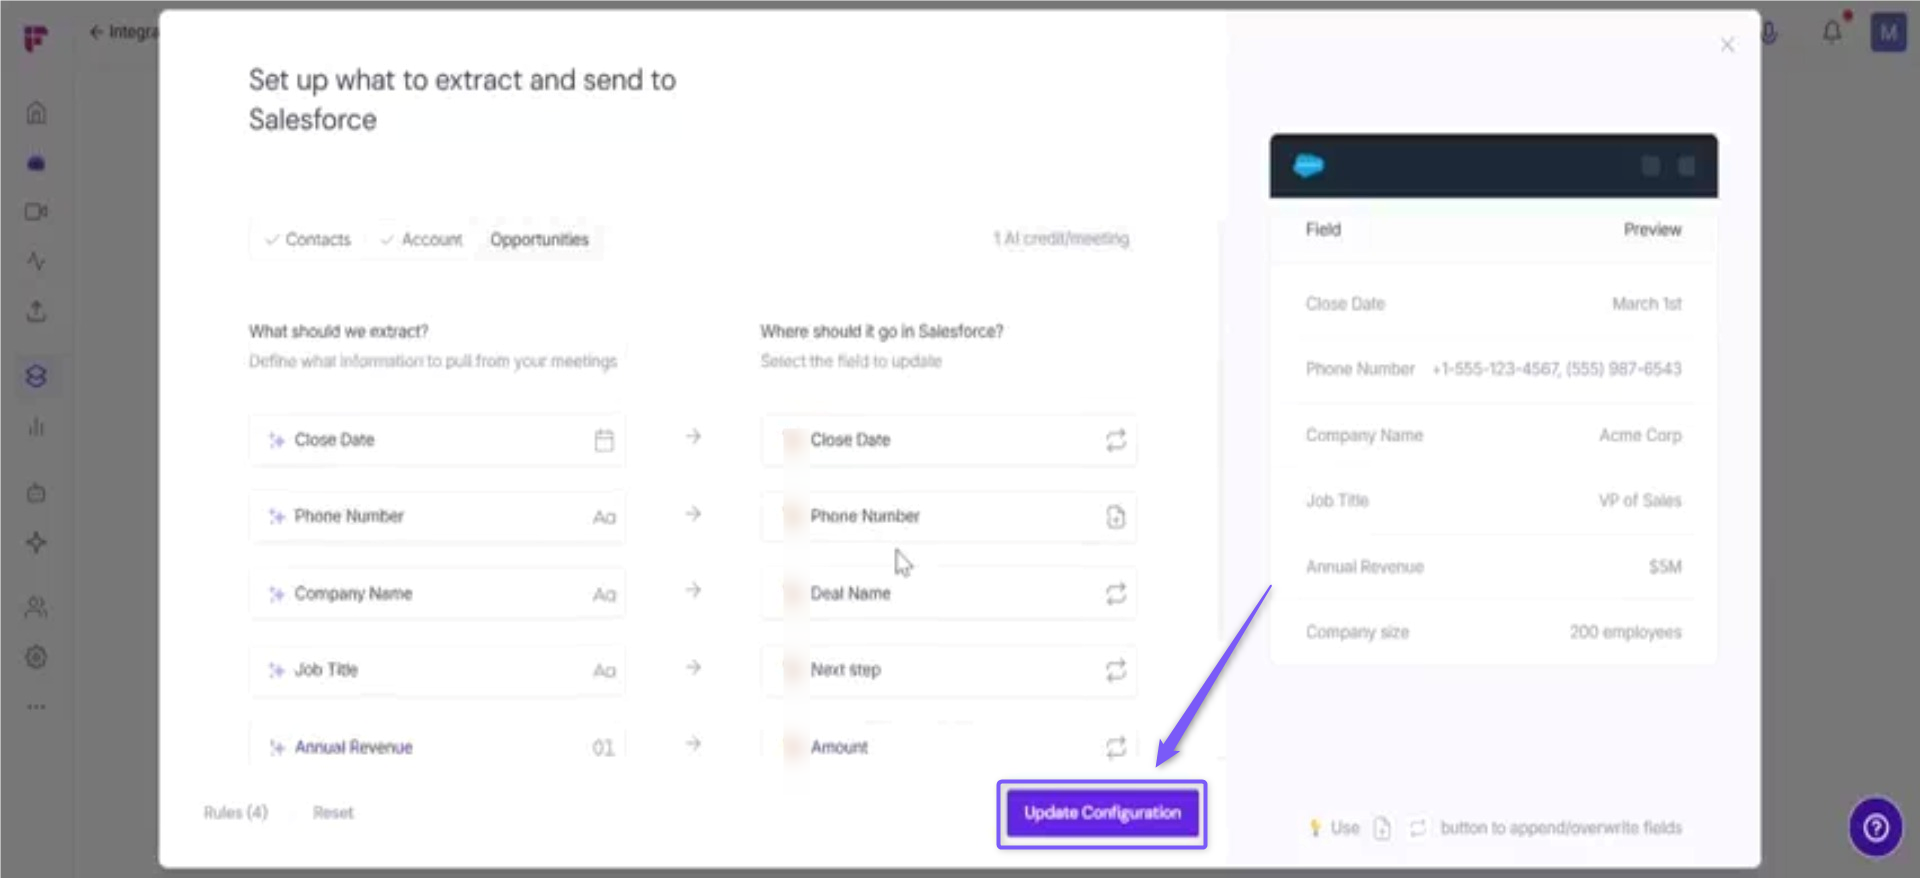
💡 What's next? Once you've configured and saved Autofill CRM, Fireflies automatically starts extracting information from future eligible meetings. The next section shows how to review the extracted data and send it to Salesforce.
◀ Review and Send Autofill CRM Data to Salesforce
If a meeting matches your Autofill CRM configuration, Fireflies extracts the configured information and prepares it for your review. An Autofill CRM banner appears in the meeting Notepad, where you can review the extracted data, make any edits if needed, and send it to Salesforce.
Autofill CRM works with all meeting types:
Calendar-scheduled meetings
Web-recorded meetings
Mobile-recorded meetings
Uploaded meetings
Step 1: From your Fireflies dashboard. Click the Meetings tab in the left sidebar.
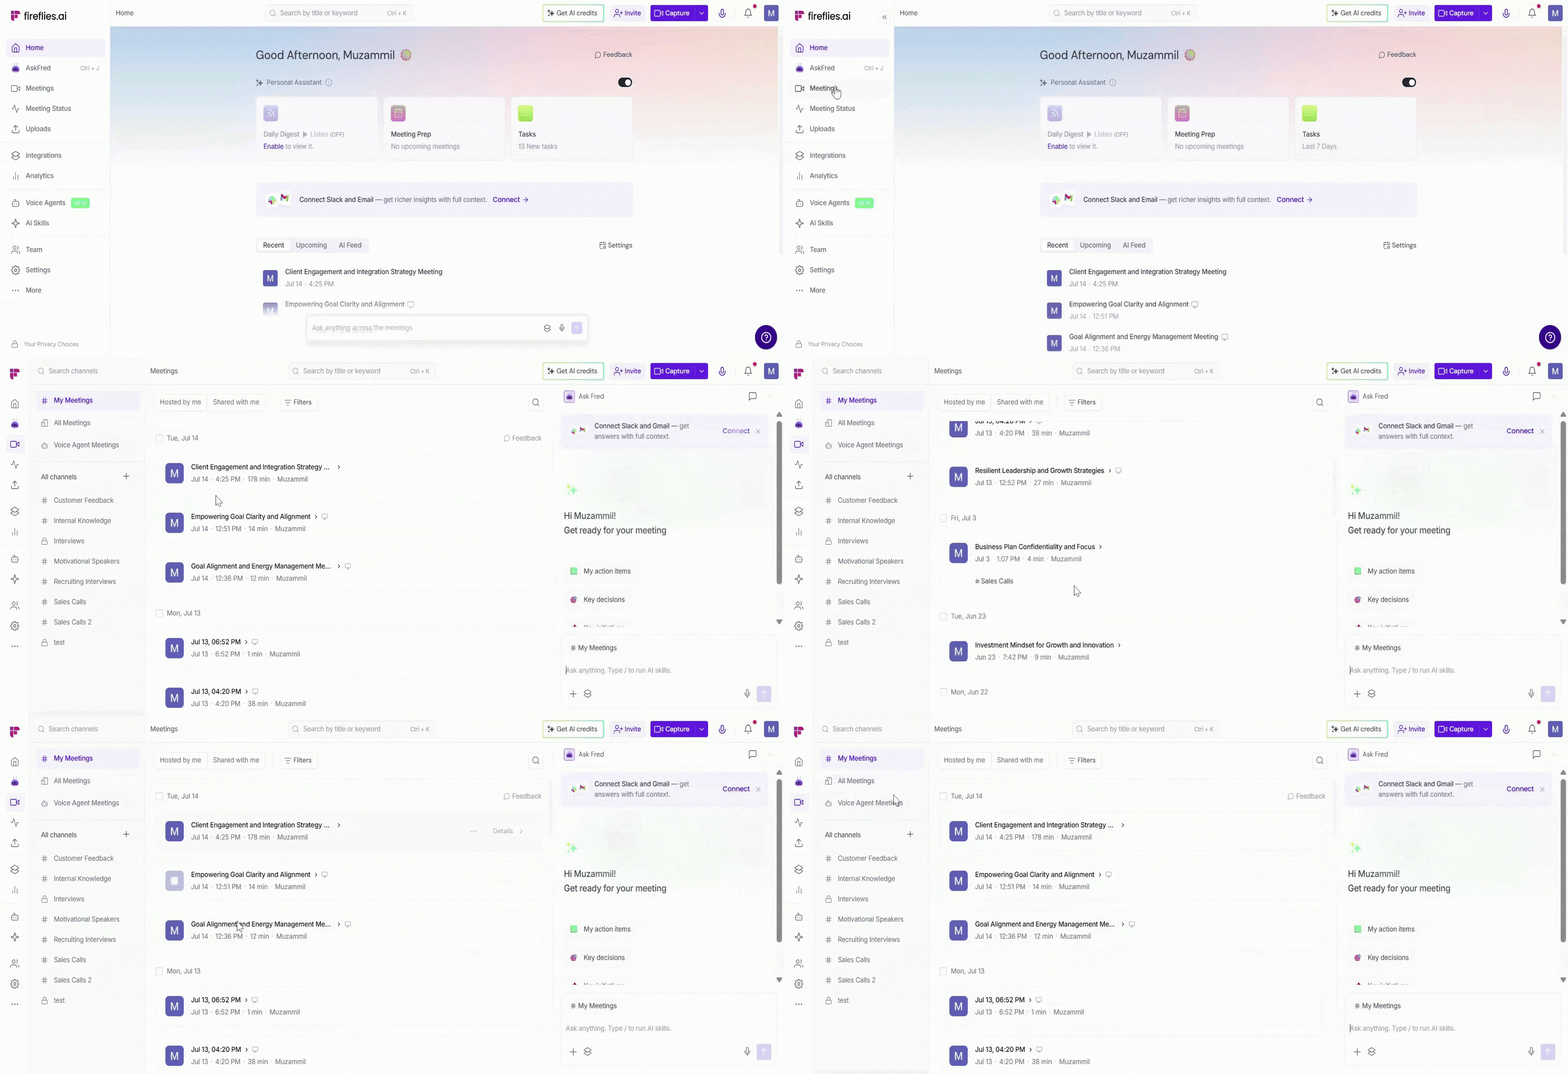
Step 2: Open the meeting you want to push data for.
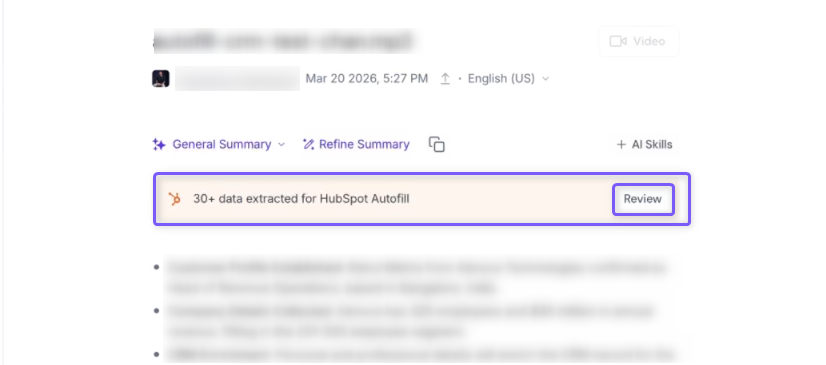
Step 3: You'll see an Autofill CRM banner showing the number of data fields extracted from the meeting. Click Review to view the data extracted from the meeting before sending it to Salesforce.
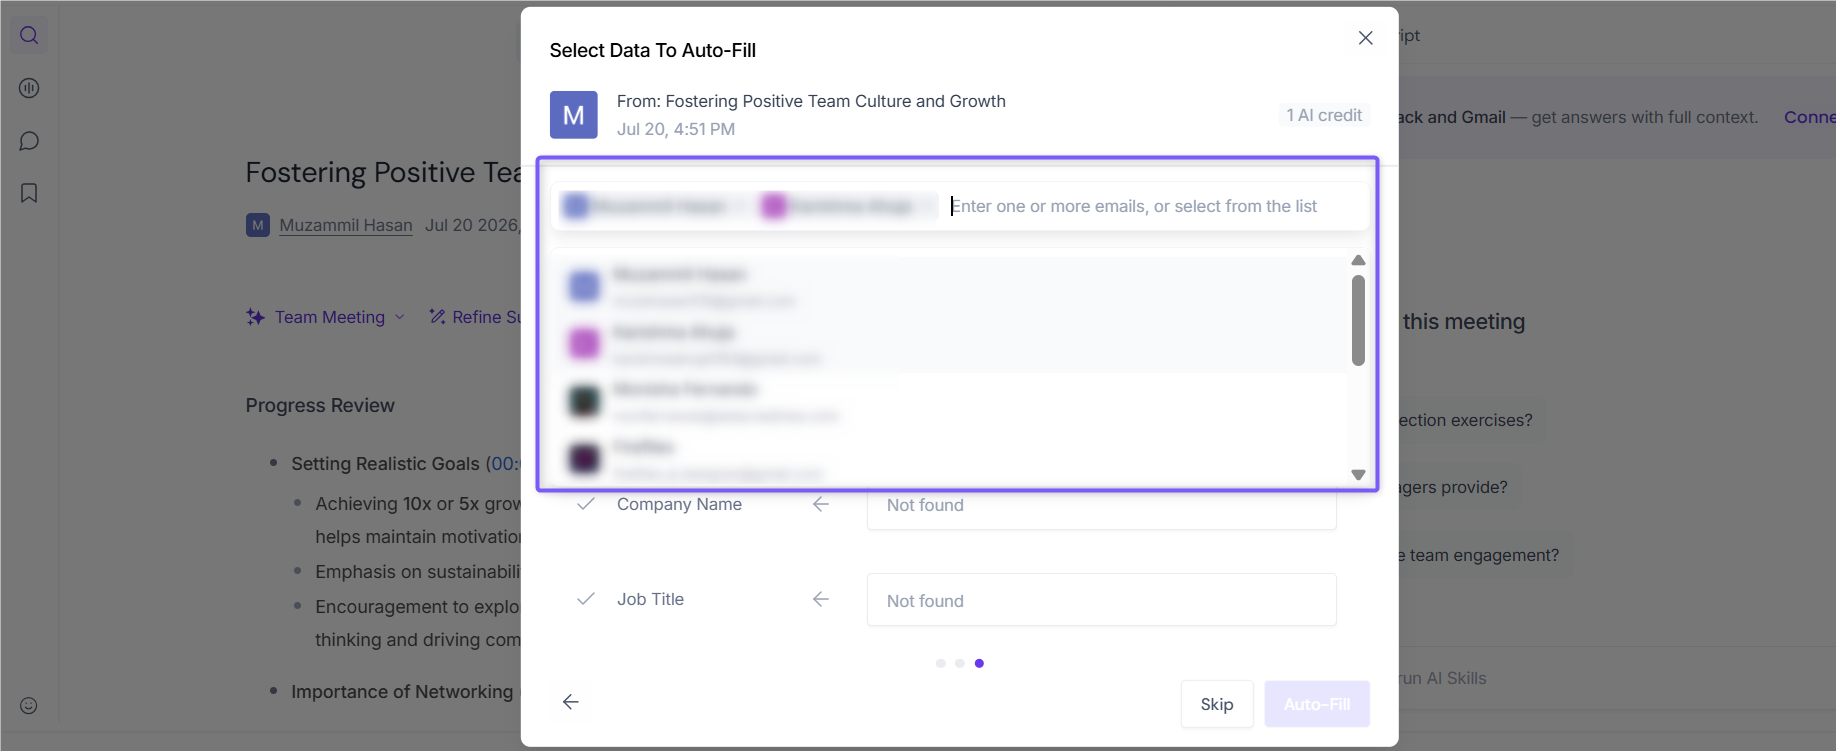
Step 4: Review the Contact record that should be updated in Salesforce.
For calendar meetings, Fireflies automatically populates the participant email addresses. Add or remove participants as needed.
For uploaded meetings or meetings without participant details, search for or enter the contact manually.
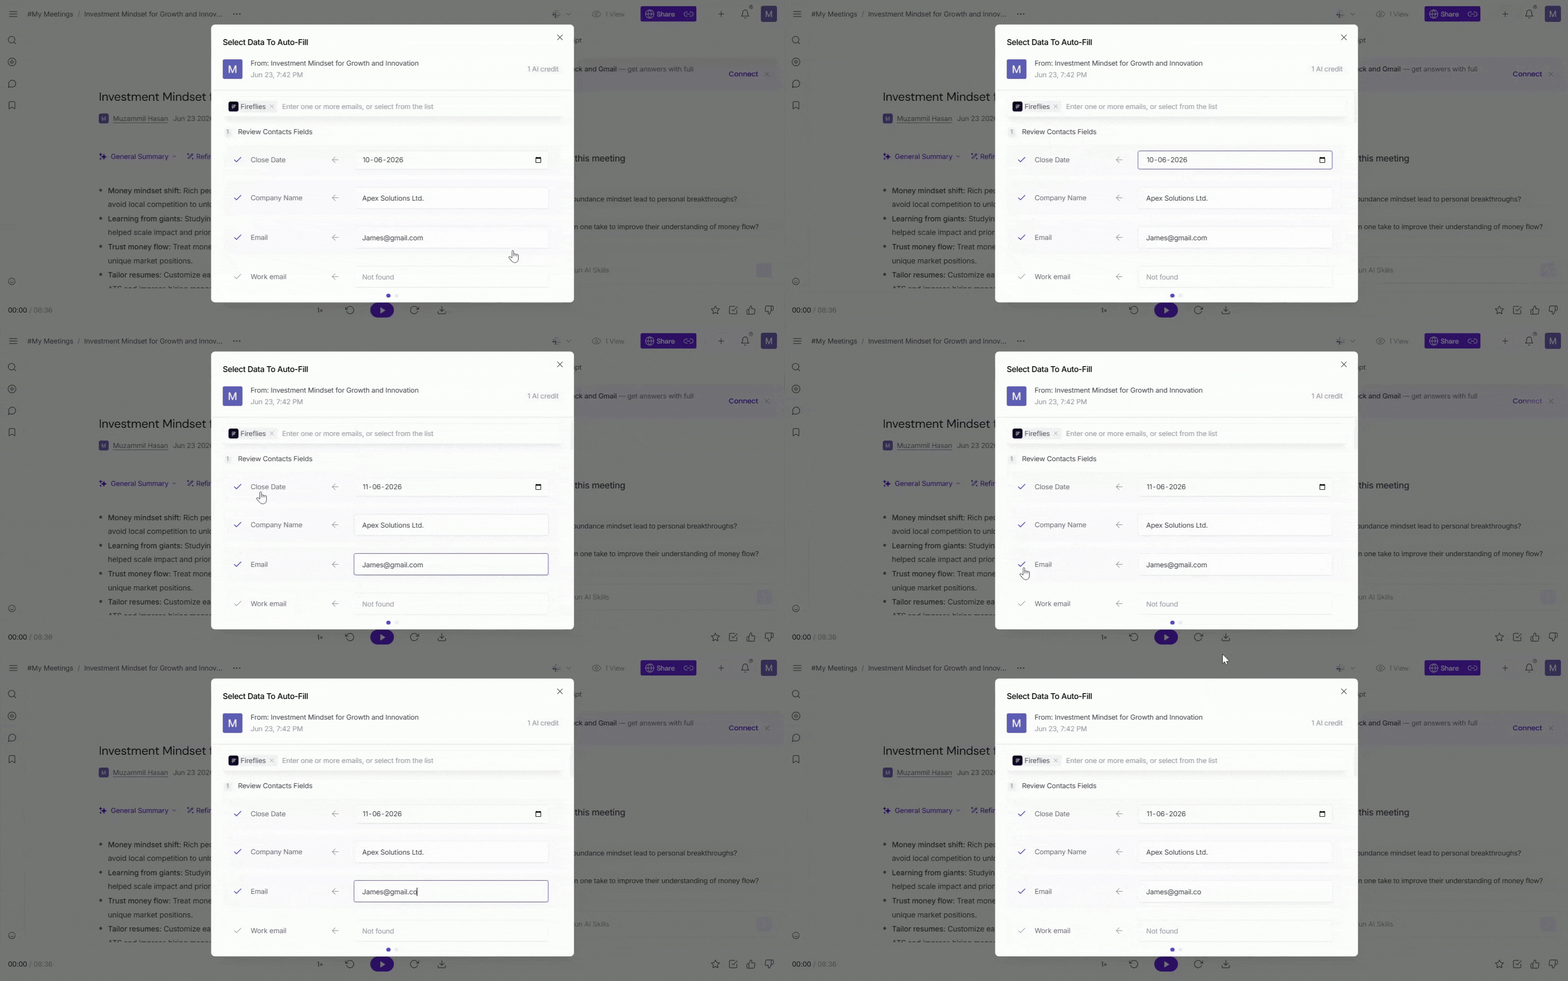
Step 5: Review and update the extracted data before sending it to Salesforce.
Review the extracted values for each selected record type.
Edit any extracted values if needed.
Click the
✓icon next to a field to include or exclude it from the Salesforce update.Switch between the selected record type tabs to review each set of data.
Step 6: Review each selected record type
Fireflies guides you through each selected record type one at a time. Review the extracted information, make any necessary changes, then continue until you've reviewed all selected record types.
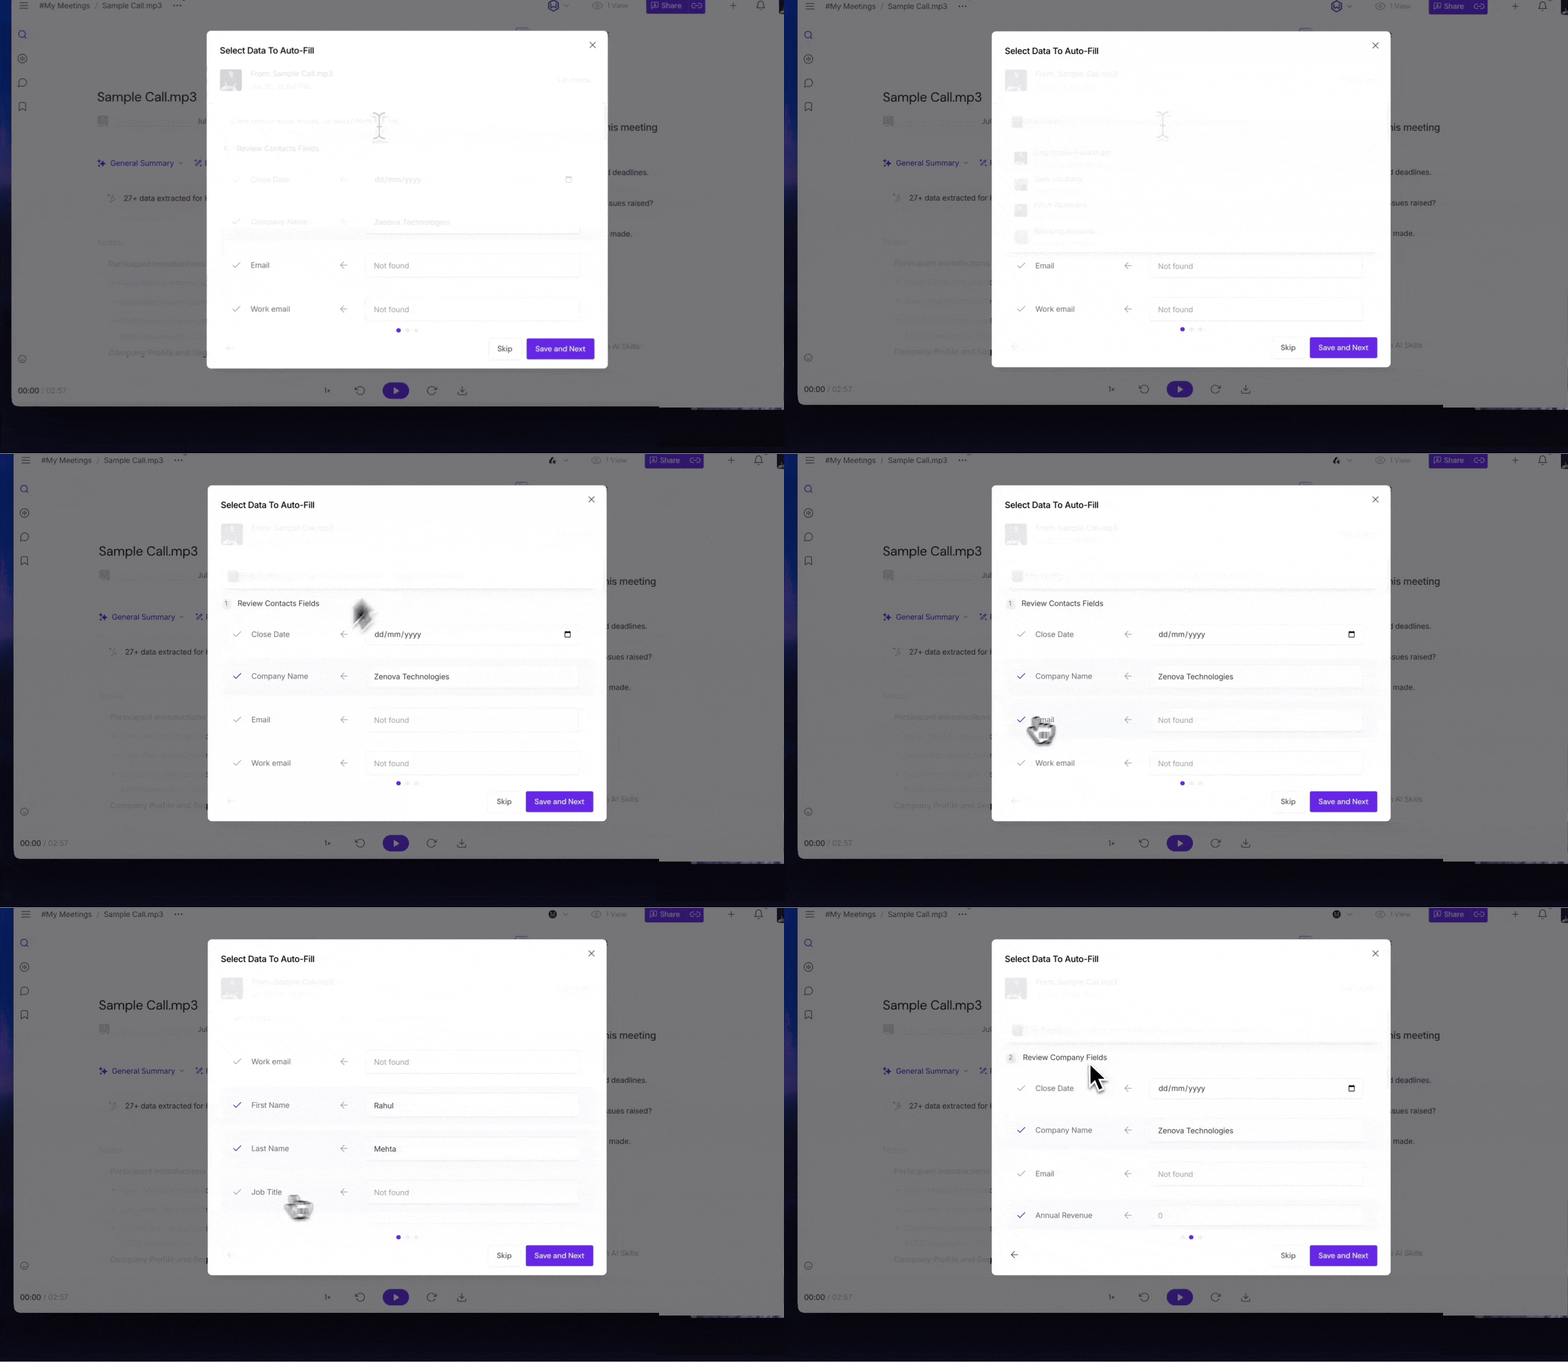
Contacts – Review the extracted Contact properties, edit any values if needed, then click Save and Next to continue.
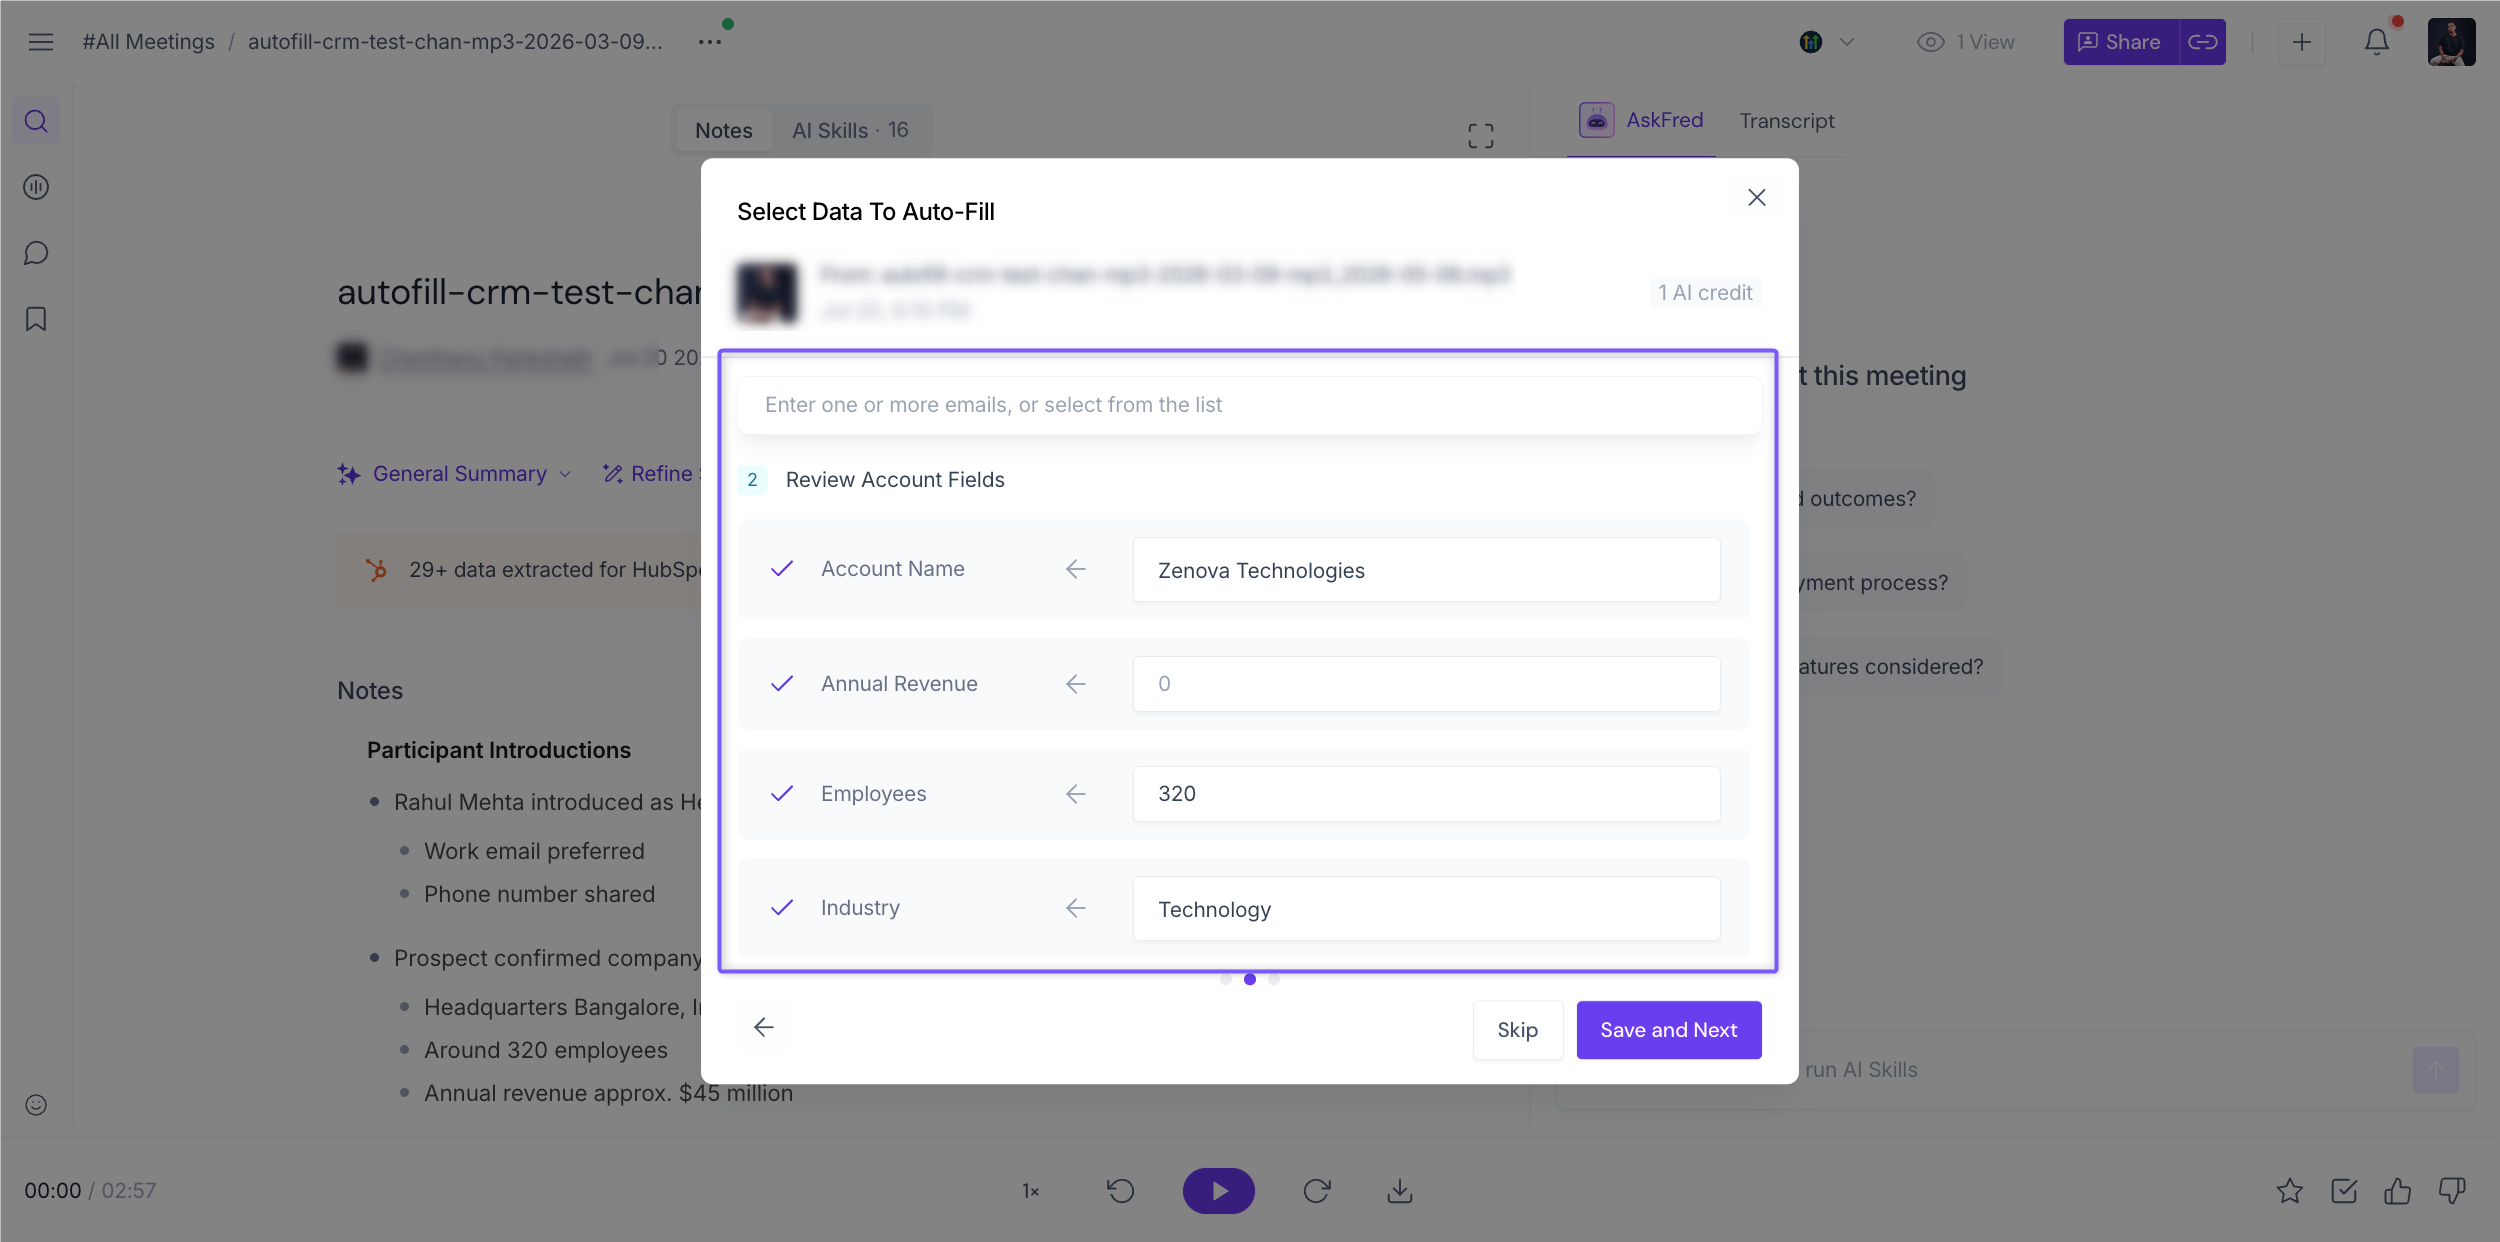
Accounts – Review the extracted Account fields, edit any values if needed, then click Save and Next to continue.
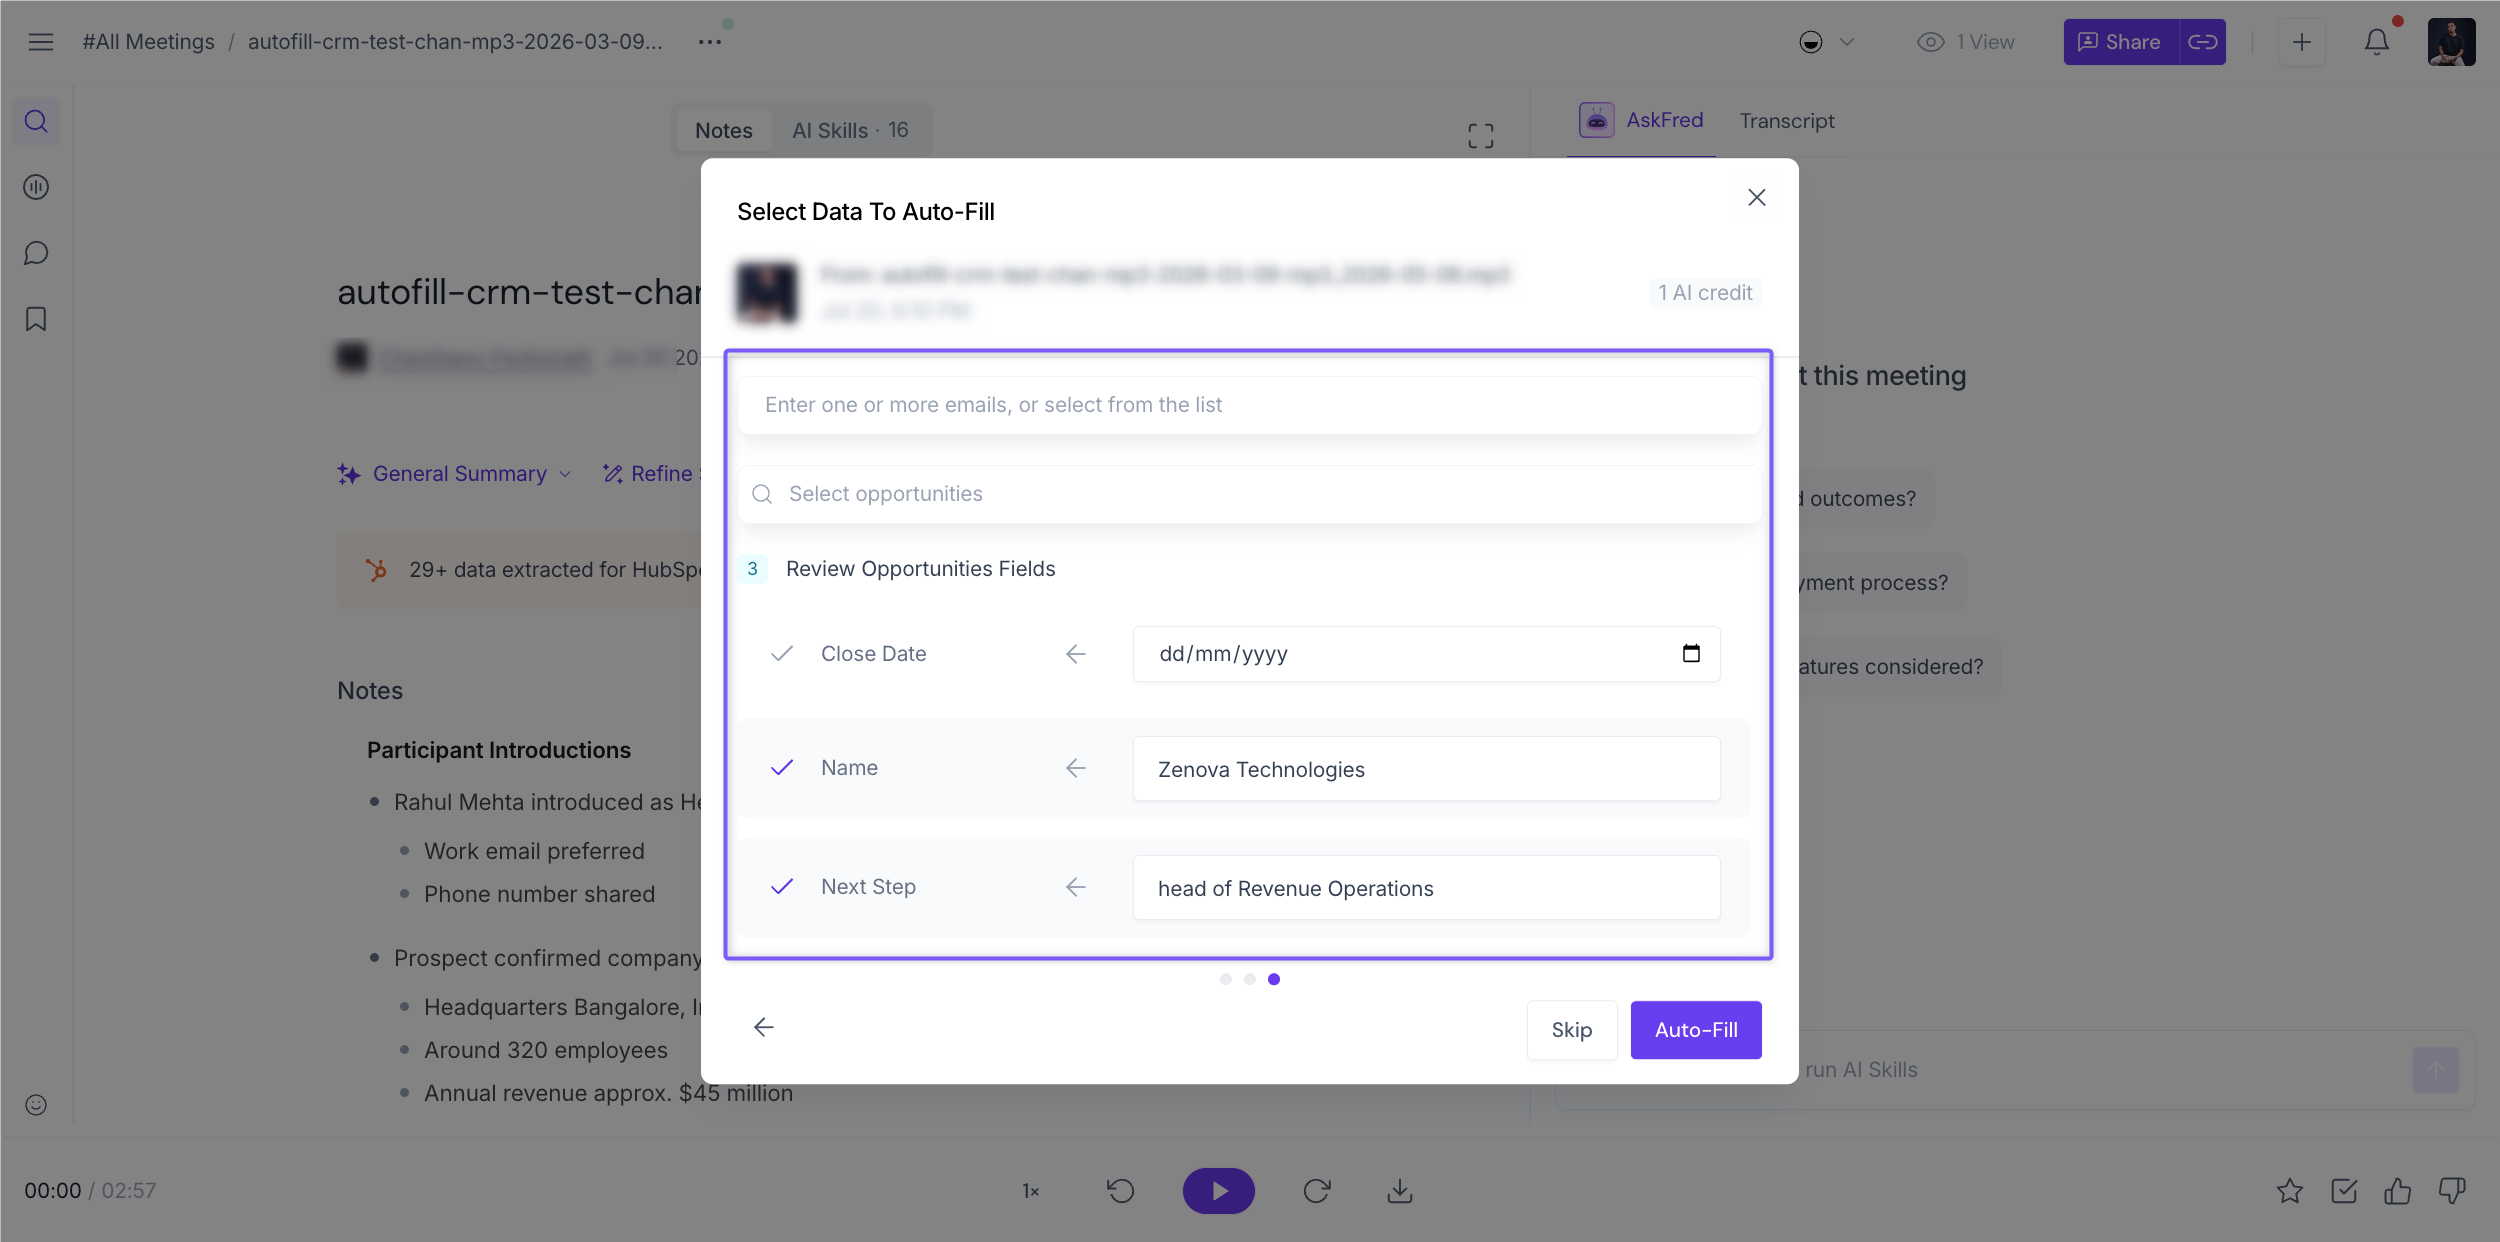
Opportunities – Select one or more Opportunities to update with the extracted meeting information. If the meeting includes multiple contacts, Fireflies displays the open Opportunities associated with those contacts. Review the extracted Opportunity fields, make any changes if needed, then click Autofill to send the updates to Salesforce.
📤 How Autofill CRM Data Appears in Salesforce
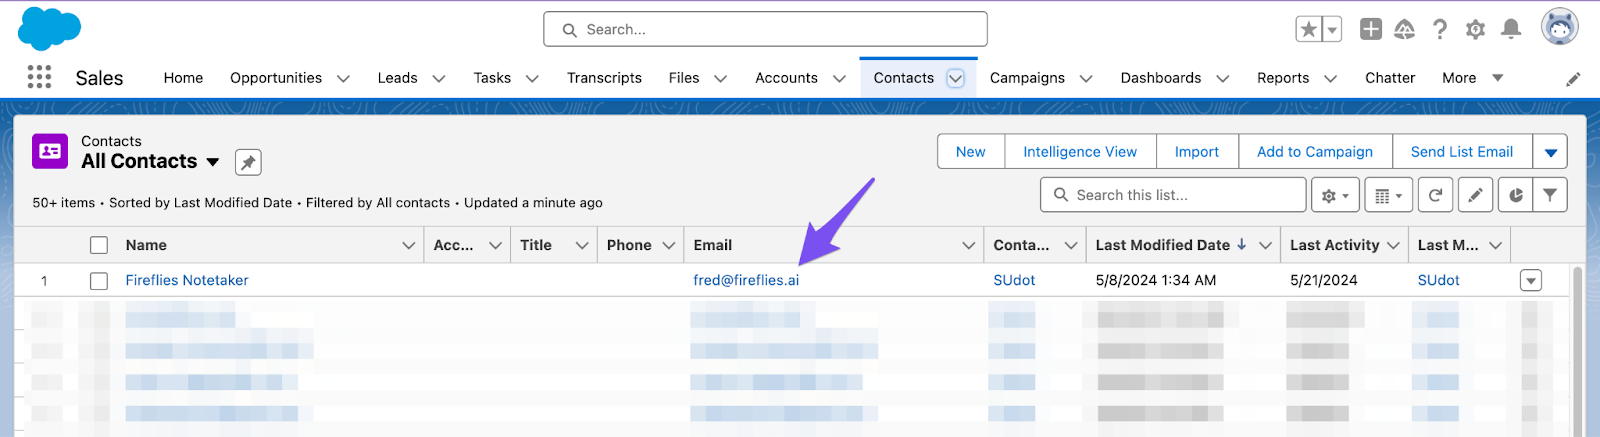
Once you click Autofill, Fireflies updates the selected Salesforce records with the information extracted from your meeting.
Contacts → Updates the configured Contact fields.
Accounts → Updates the configured Account fields.
Opportunities → Updates the configured Opportunity fields.
Custom Fields → Updates any custom Salesforce fields included in your Autofill CRM configuration.
Field Updates → Applies the configured Append or Overwrite behavior for each field.
This helps keep your Salesforce records accurate and up to date while reducing manual data entry.
⚡ Run Autofill CRM On Demand
Autofill CRM can also be run on demand for past meetings. Instead of waiting for future meetings that match your configured rules, you can manually trigger Autofill CRM from any supported meeting at any time.
Supported meeting types include:
Scheduled meetings
Web-recorded meetings
Uploaded meetings
Step 1: From your Fireflies dashboard. Click the Meetings tab in the left sidebar.
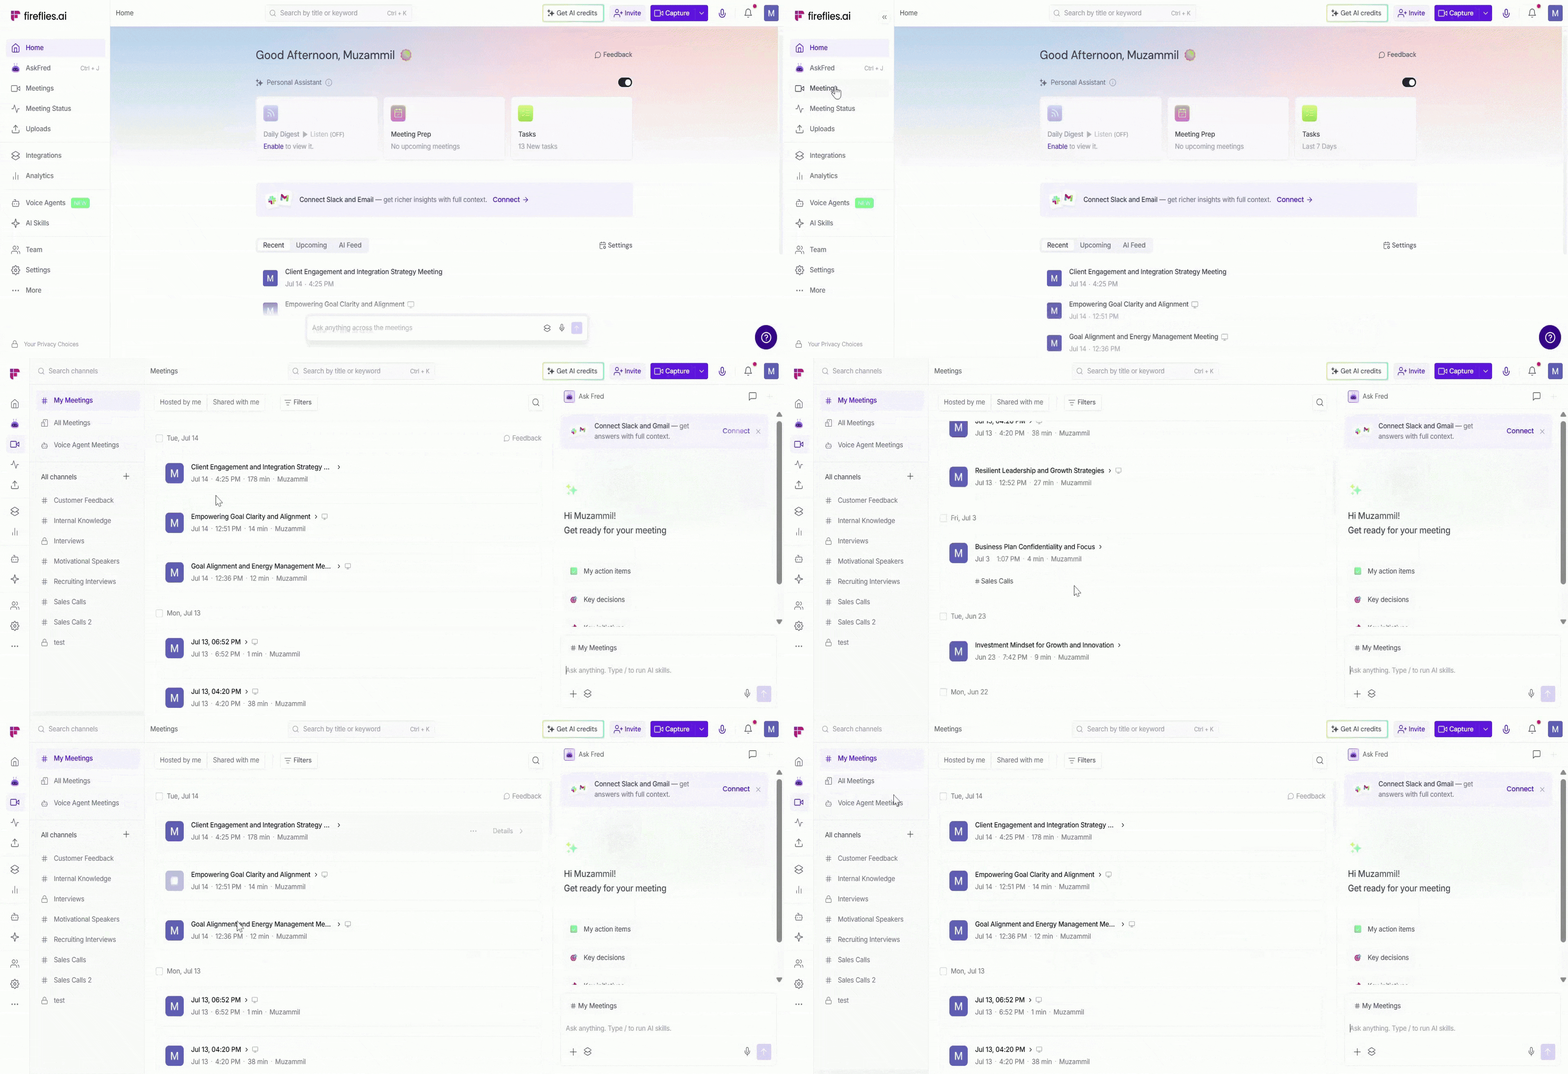
Step 2: Open the meeting you want to push data for.
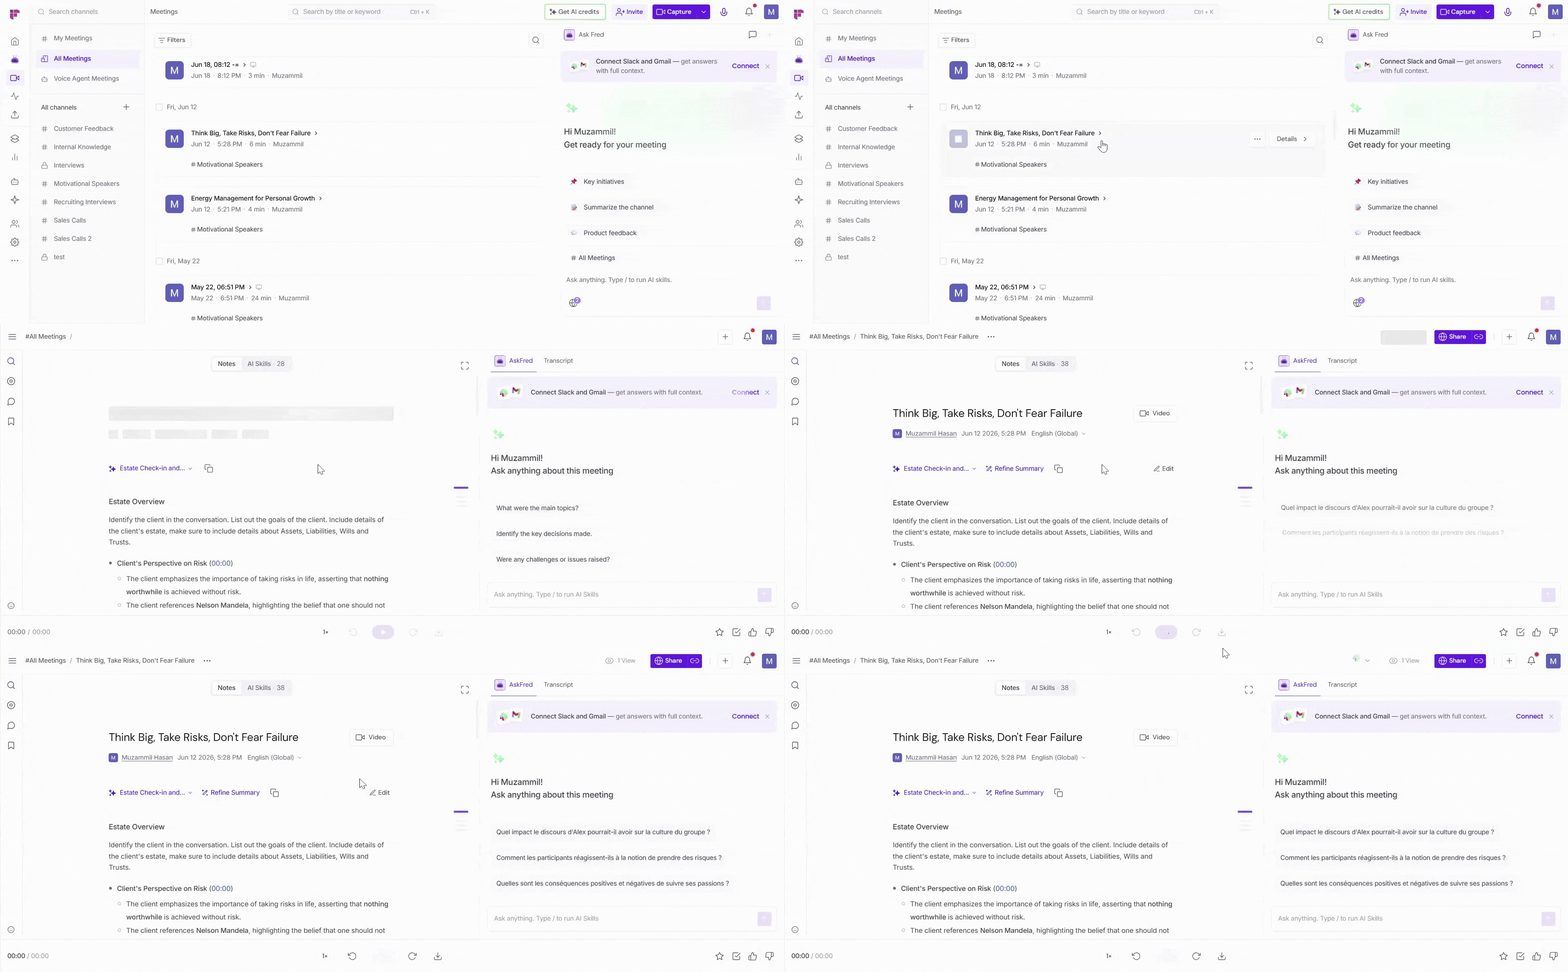
Step 3: Click the Integrations dropdown menu icon in the top-right corner of the Notepad.
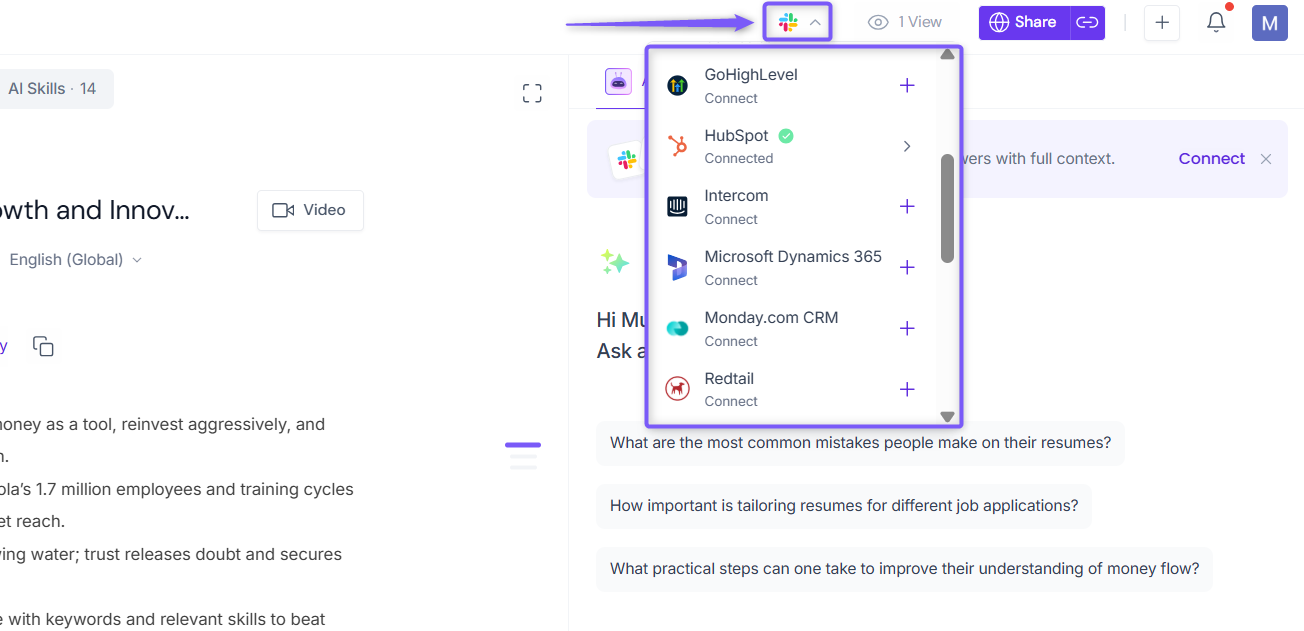
Step 4: Select Salesforce from the list.
🟢 Green checkmark - Salesforce is already connected and ready to use.
➕ Plus sign - Salesforce is not connected yet. Click the icon to connect your Salesforce account before continuing.
Once connected, hover over the Salesforce integration and select Autofill to run Autofill CRM for the selected meeting.
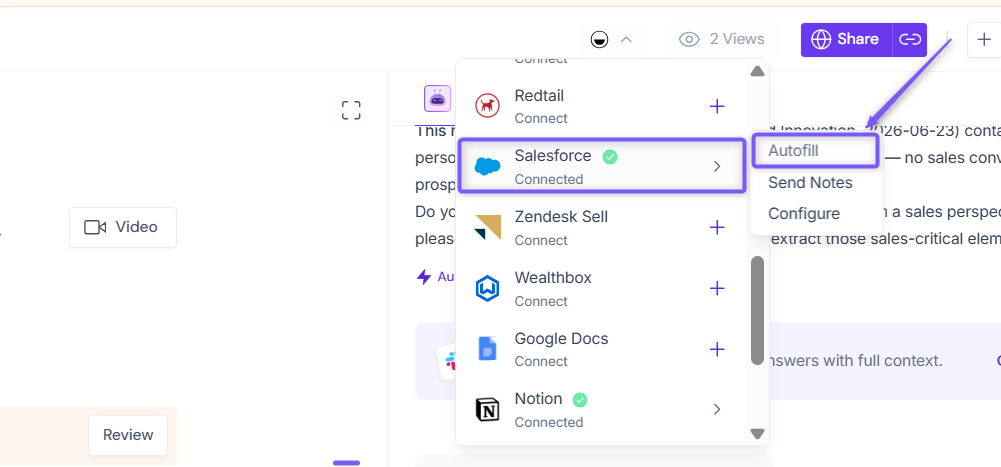
Autofill CRM must be configured before it can be run on demand. If you haven't set up Autofill CRM yet, follow the steps in the Set Up Autofill CRM section above.
Step 5: Review the extracted Autofill CRM data
Fireflies prepares the extracted Autofill CRM data for the selected meeting.
Review the extracted values for each selected record type.
Edit any fields if needed.
Exclude any fields that you don't want to send to Salesforce.
Switch between the selected record type tabs to review each set of data.
Click Save and Next to continue through each selected record type until you're ready to send the updates.
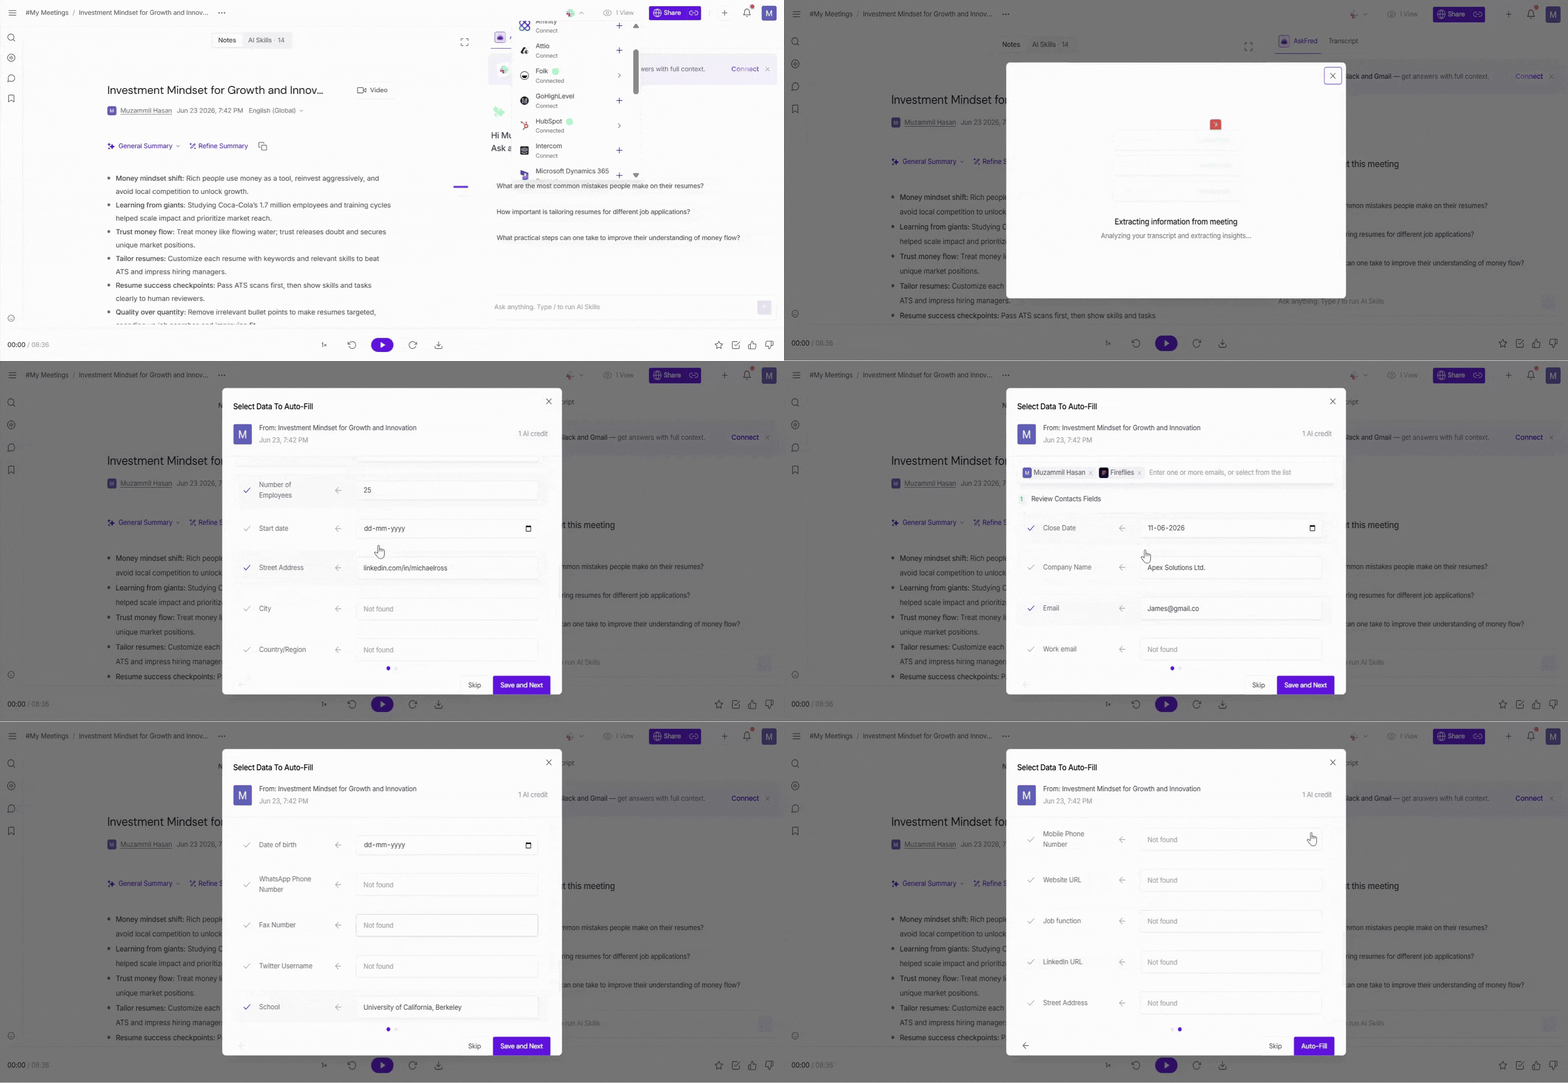
Step 6: Once you've reviewed all selected record types, click Autofill to send the selected updates to Salesforce.
✅ A confirmation message appears once the selected updates have been successfully sent to Salesforce.
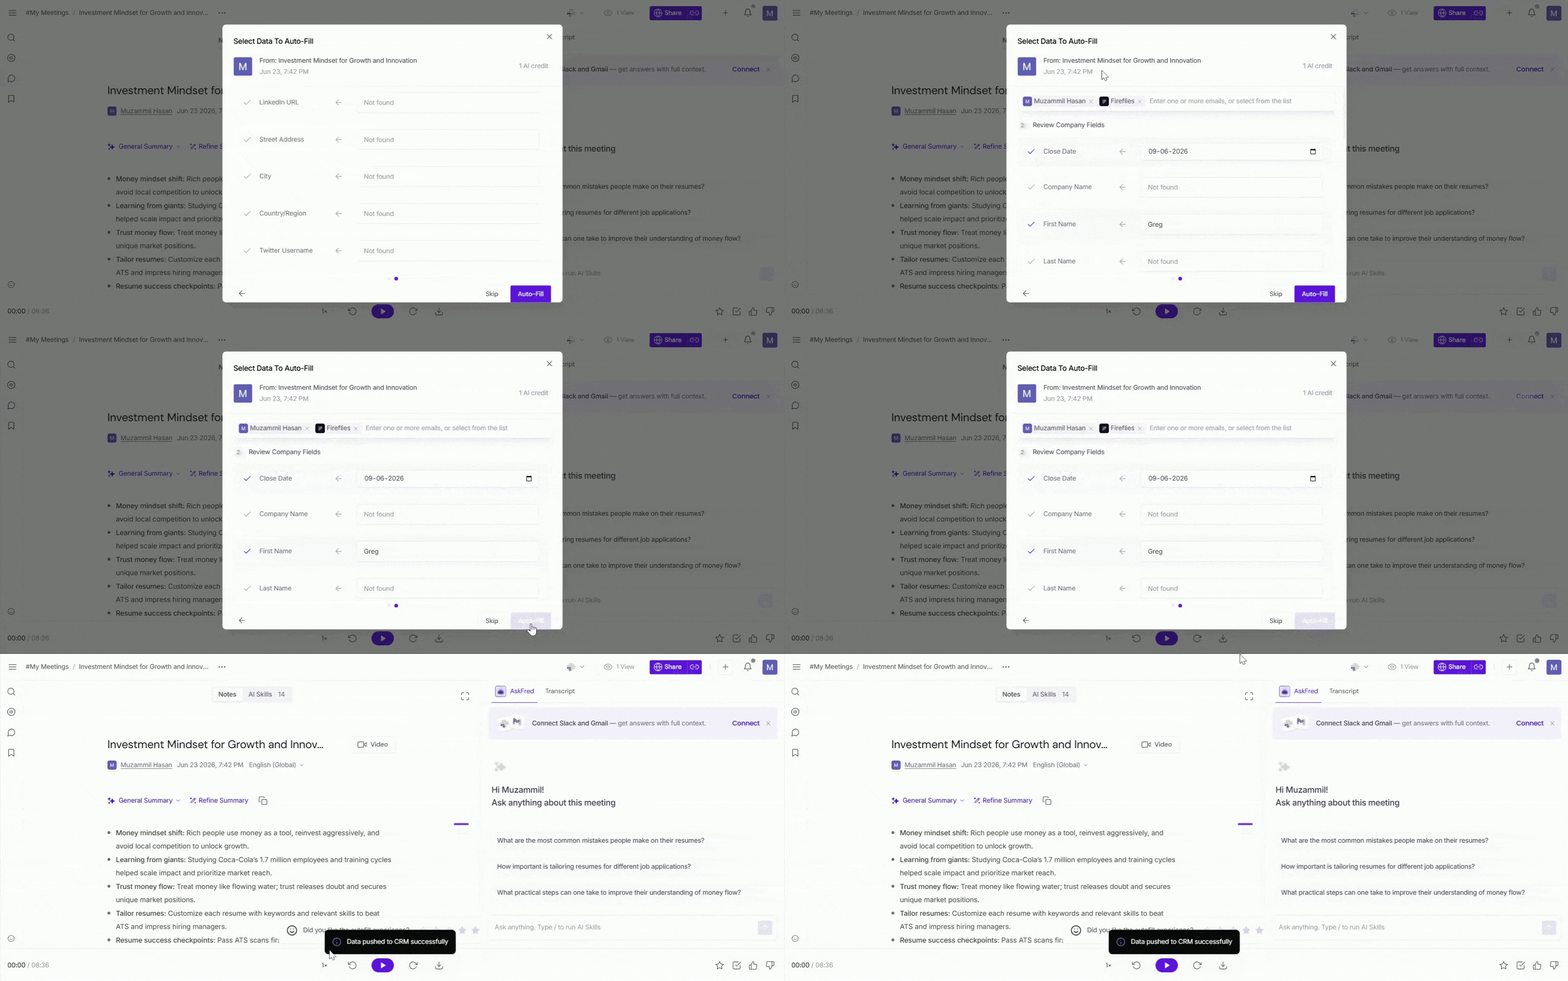
Step 7: Verify the data in Salesforce . Open the corresponding Contact, Accounts, or Opportunity record in Salesforce to confirm that the extracted information was successfully updated.
💳 Autofill CRM AI Credits Usage
Each Autofill CRM extraction uses 1 AI credit per meeting.
The number of configured fields does not affect credit usage. AI credits are consumed only when Fireflies extracts information from a meeting.
Admins can monitor AI credit usage by navigating to Settings → AI Credits, where they can view a detailed breakdown of AI credit usage by teammates and AI features.
📖 Learn more: See Monitor AI Credits Usage for Your Team for detailed information about tracking AI credit usage.
🛠 Manage Autofill CRM Configuration
As your CRM processes evolve, you may need to update, pause, or remove your Autofill CRM configuration. Fireflies provides a few simple options to help you manage your setup.
From your Fireflies dashboard, go to Integrations and open the Salesforce integration page.
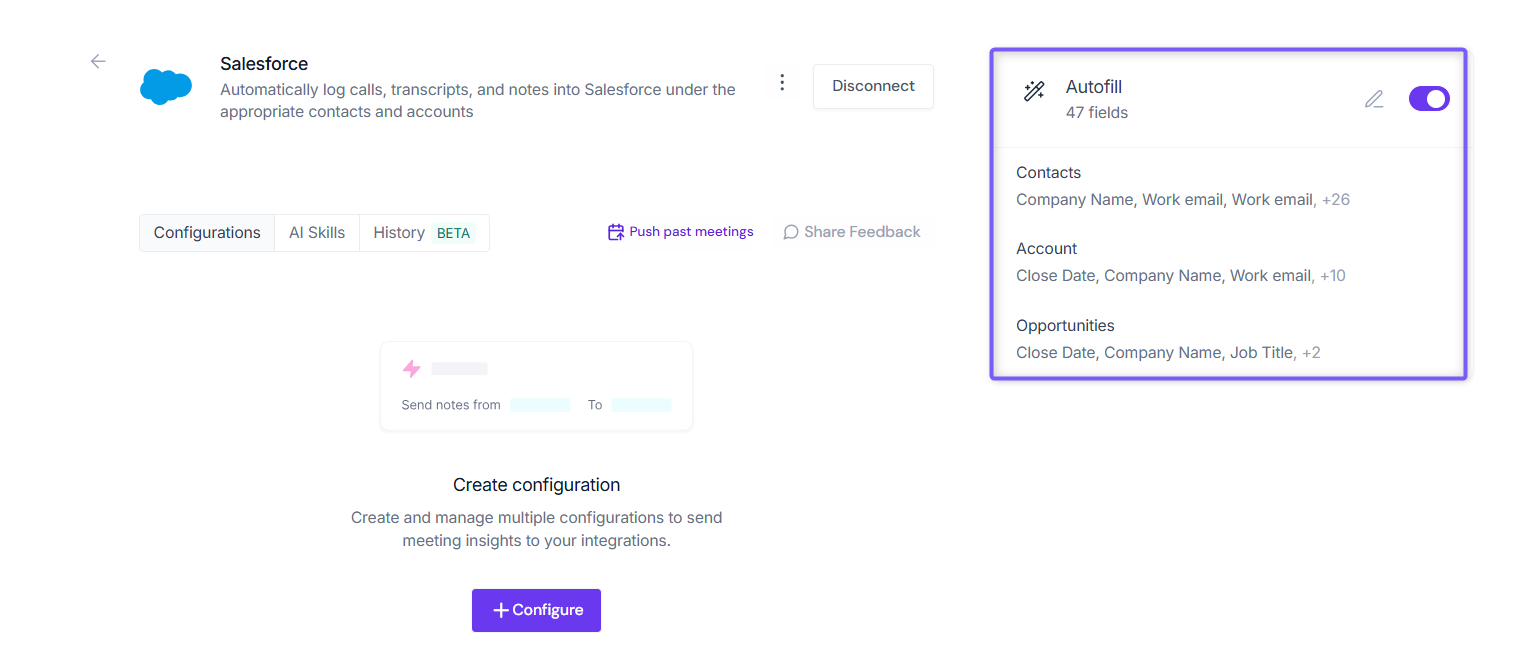
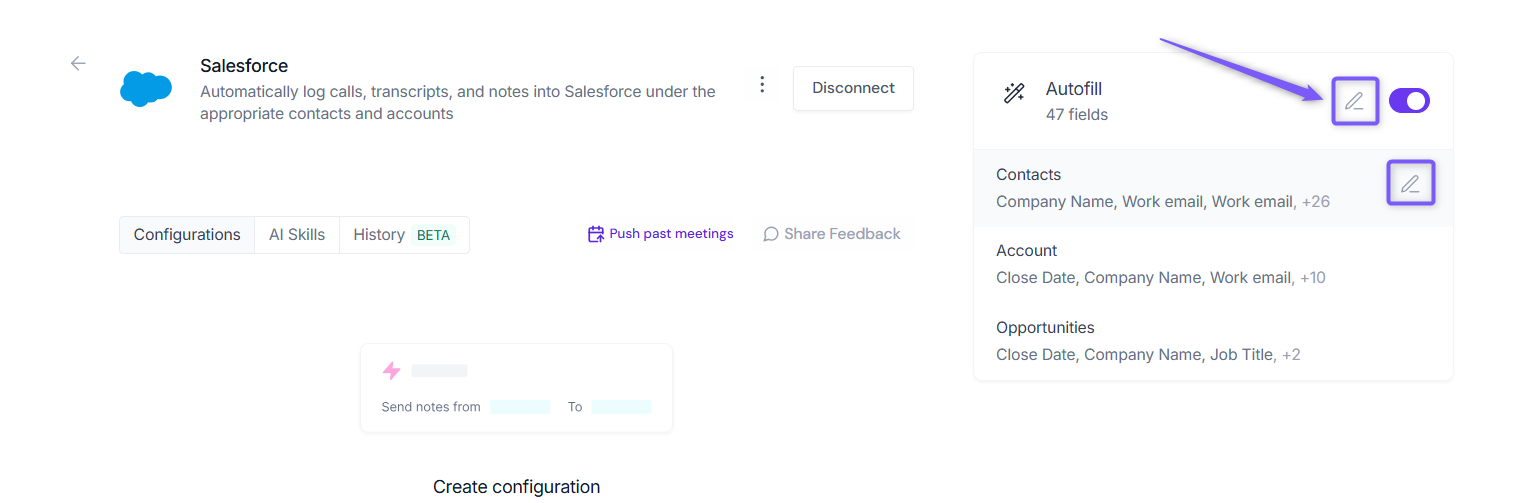
✏ Edit Configuration → Need to update field mappings, extraction prompts, custom fields, or rules? Click the Edit pencil icon (✏) next to your Autofill CRM configuration, make the required changes, and click Save to apply them.
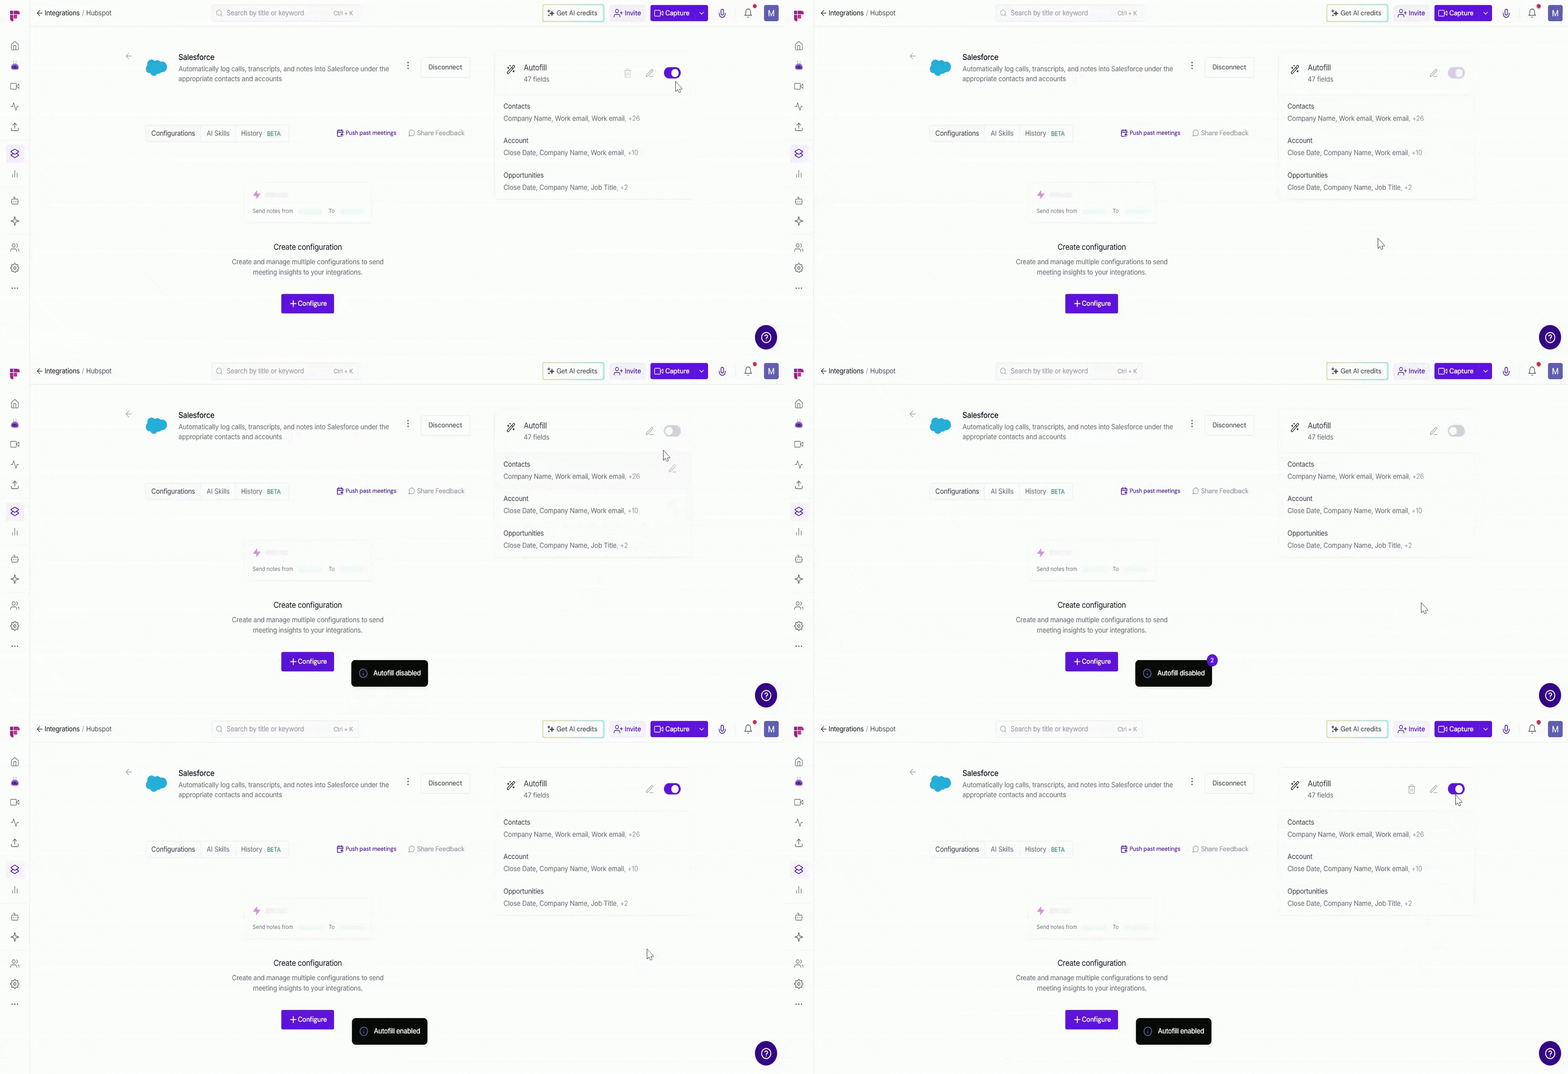
🔘 Enable or Disable Autofill CRM → Use the toggle switch next to the Autofill CRM configuration to control whether it runs for eligible meetings. Toggle ON to enable Autofill CRM or OFF to temporarily pause it without deleting the configuration.
🗑 Delete Configuration → No longer need the Autofill CRM? Hover over the configuration, then click the Delete (🗑) icon. Click the Delete icon (🗑) to permanently remove the Autofill CRM configuration.
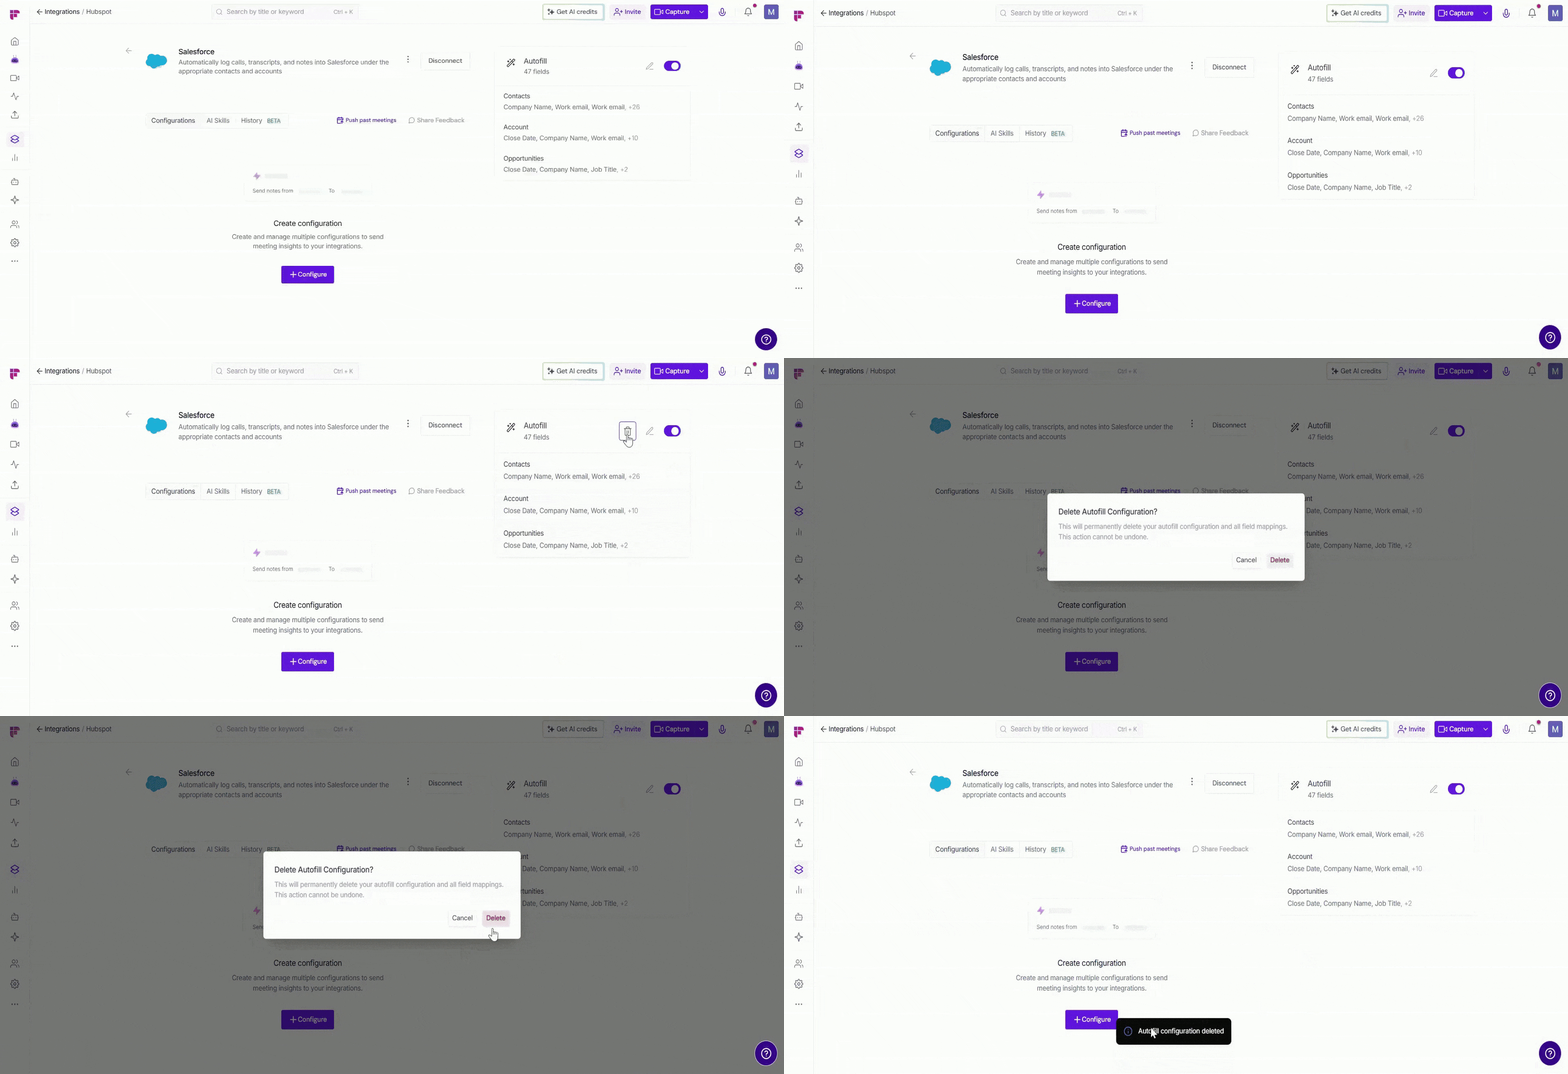
Deleting an Autofill CRM configuration permanently removes all configured field mappings, extraction prompts, custom fields, and rules. This action cannot be undone.
❓ Frequently Asked Questions
1. Does Fireflies automatically send extracted data to Salesforce?
No. Fireflies extracts the data automatically, but you must review and manually send it to Salesforce.
2. Can I edit extracted data before sending it to Salesforce?
Yes. You can review, edit, or exclude individual fields before sending the data.
3. Can I run Autofill CRM on past meetings?
Yes. Use Autofill CRM On Demand from the meeting Notepad to process previously recorded meetings.
4. What meeting types are supported?
Autofill CRM works with:
Scheduled meetings
Web-recorded meetings
Uploaded meetings
Mobile-recorded meetings
5. Can I create custom extraction fields?
Yes. You can create custom extraction prompts and map them to existing Salesforce custom fields.
6. What is the difference between Append and Overwrite?
Append adds new information to an existing Salesforce field value.
Overwrite replaces the existing Salesforce field value with the newly extracted information.
7. Do Autofill CRM Rules apply to all selected record types?
Yes. The same Autofill CRM Rules apply to all selected record types, including Contacts, Accounts, and Opportunities.
8. How many AI credits does Autofill CRM use?
Autofill CRM uses 1 AI credit per meeting extraction, regardless of the number of fields configured.
9. Why don't I see the Autofill CRM banner on my meeting?
The Autofill CRM banner appears only after a meeting has been processed for Autofill CRM. Check the following:
Autofill CRM is configured and saved.
The meeting matches your configured Autofill CRM Rules.
The meeting was recorded after Autofill CRM was set up. For earlier meetings, use Autofill CRM On Demand to process them manually.
10. How does Fireflies decide which meetings to process with Autofill CRM?
Fireflies uses your configured Autofill CRM Rules to determine which meetings are processed.
By default, Autofill CRM is configured to process External meetings. If you don't modify the default Rules, Fireflies continues using this behavior automatically.
You can update the Rules at any time to control which meetings Autofill CRM processes, such as All meetings, or meetings that match specific criteria like the title, host, participants, or duration.
11. How does Fireflies know which Contact, Account, or Opportunity to update?
Fireflies matches records using the meeting participants' email addresses.
For calendar meetings, participant email addresses are added automatically. For uploaded meetings or meetings without participant information, enter one or more email addresses manually.
After matching the Contact, Fireflies displays the associated Account and any open Opportunities. Review the extracted information, then select the Opportunity or Opportunities you want to update before sending the data to Salesforce.
After matching the Contact, Fireflies displays the associated Company and any open Deals. Review the extracted information, then select the Deal(s) you want to update before sending the data to HubSpot.
💡Still stuck? Contact support via this link for more help.
Looking to learn more about Fireflies for Sales? See Fireflies for Sales: Your AI Platform for Everything After the Call for an overview of Fireflies' post-meeting sales workflows and AI features.