How to Integrate Microsoft OneNote and Fireflies
Last updated: July 8, 2026
If you use OneNote to capture ideas and updates, this integration keeps everything organized effortlessly. Fireflies automatically saves your AI-powered meeting notes, transcripts, and summaries to OneNote — making every discussion easy to find and revisit.
It’s perfect for teams who want to keep all meeting insights in one place without copy-pasting or switching between tools.
Let’s get started 🚀
🔍 What Does the OneNote Integration Do?
Once connected, Fireflies sends your meeting notes directly to your chosen OneNote notebook and section.
It helps you:
Auto-save notes → Each meeting becomes a new OneNote page.
Stay organized → Choose where your notes are stored.
Access easily → Includes meeting details and a link back to Fireflies.
🔑 Prerequisites
Before connecting Fireflies with OneNote, make sure you have everything ready:
Microsoft Account: An active Microsoft account with access to OneNote.
Fireflies Account: Log in to your Fireflies workspace with integration permissions enabled.
Notebook Access: Ensure you have permission to create or edit pages in your chosen OneNote notebook.
Admin Rights: If setting up for your team, confirm you have admin access in Fireflies.
🔗 Connect Microsoft OneNote to Fireflies
Step 1: Log in to your Fireflies account, go to the Integrations page, and search for Microsoft OneNote. Click on it to get started.

Step 2: Click the Connect button, and you’ll be redirected to the Microsoft OneNote login page. After signing in with your Microsoft account, you’ll automatically move to the authorization screen.

Step 3: Click the Accept button to authorize Fireflies to create and manage pages in your Microsoft OneNote notebooks.
.png")
Step 4: Once approved, you’ll be redirected back to Fireflies to configure your integration setup.
.png")
⚙ Setting Up Your Configuration
Step 1: Select Your Notebook
Choose the OneNote notebook that contains the section where your meeting notes will be saved. This is where Fireflies will automatically send your transcripts and summaries — so everything stays organized in one place.
If you don’t see any notebooks listed, create one first in Microsoft OneNote. The default name might look like Note_20251013_120641 — you can rename it in OneDrive to something like Fireflies Weekly for easier tracking.
.gif")
Step 2: Select Your Section
Choose the OneNote section where Fireflies will create new meeting pages (for example, Fireflies Meeting Notes or Data Science Notes). This is where your transcripts and summaries will stay organized.
You’ll also see a Section ID field — just leave it blank. Fireflies usually fills it automatically once you pick your section, but if it doesn’t, simply copy your section link from OneNote and paste it there manually.
Don’t see a section yet? Create one in your OneNote notebook before connecting. You can follow this Microsoft guide to add a new section.
.gif")
Step 3: Configure Meeting Output Preferences
Choose what meeting content you want Fireflies to save in Microsoft OneNote.
Save meeting summaries → When enabled, Fireflies automatically saves a meeting summary to your selected OneNote notebook after each meeting.
Save meeting transcripts → When enabled, Fireflies also saves the full meeting transcript to your selected OneNote notebook after each meeting.
Once you've selected your preferences, click Continue to proceed.

Step 4: Test Your OneNote Connection
Before you go live, make sure everything is working correctly.
Click “Click to create sample meeting” → Fireflies will instantly create a sample meeting note in your selected OneNote notebook and section.
Open OneNote to confirm that the sample note appears in the right place.
Once verified, click Continue to finish setup.
This test won’t affect your real meetings — it just confirms that Fireflies can successfully send notes to your OneNote.
.gif")
🧩Additional Options - Integration Rules
By default, Fireflies sends meeting notes and summaries to OneNote for every meeting. While this keeps everything recorded, it can sometimes crowd your notebook with notes you don’t always need. Integration Rules let you choose which meetings get saved to OneNote, so only the important ones are captured.
Integration Rules are available on Business or higher plans.
💡 Learn more about our different pricing plans and how to get started.
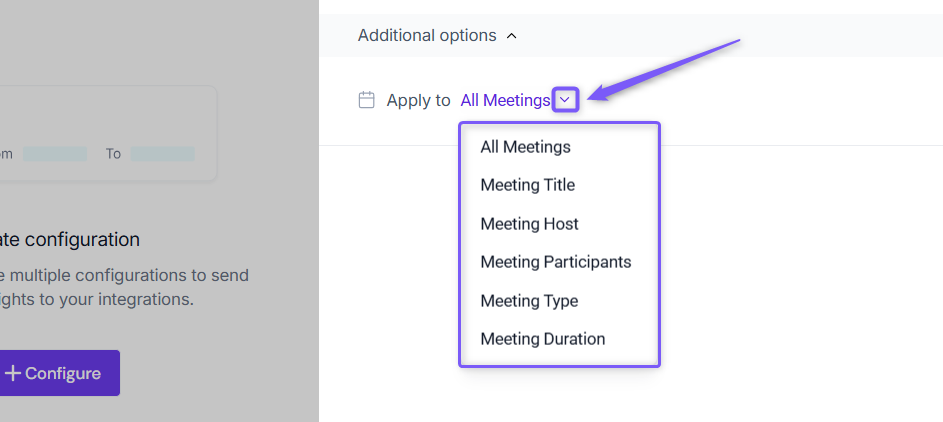
🗂 All Meetings
Automatically send notes from every meeting — client calls, team syncs, or check-ins — straight to OneNote with no filters applied.
📝 Meeting Title
Only send notes to OneNote if the meeting title matches the rules you set (Contains, Starts with, Equals, Doesn’t Contain). Example: Only save notes for meetings titled “Client Review” or “Interview.”
Add multiple keywords separated by commas (e.g., Interview, Client Review, Demo).
👤 Meeting Host
Filter notes based on who hosted the meeting.
Equals → Only save notes for meetings hosted by john@example.com.
Not Equal → Save notes for all meetings except those hosted by John.
👥 Meeting Participants
Filter notes based on who attended.
Contains → Only save notes if sara@example.com attended.
Doesn’t Contain → Exclude meetings that included alex@example.com.
🎦 Meeting Type
Filter by meeting type.
Example: Equals External → Only external meetings will have notes saved to OneNote.
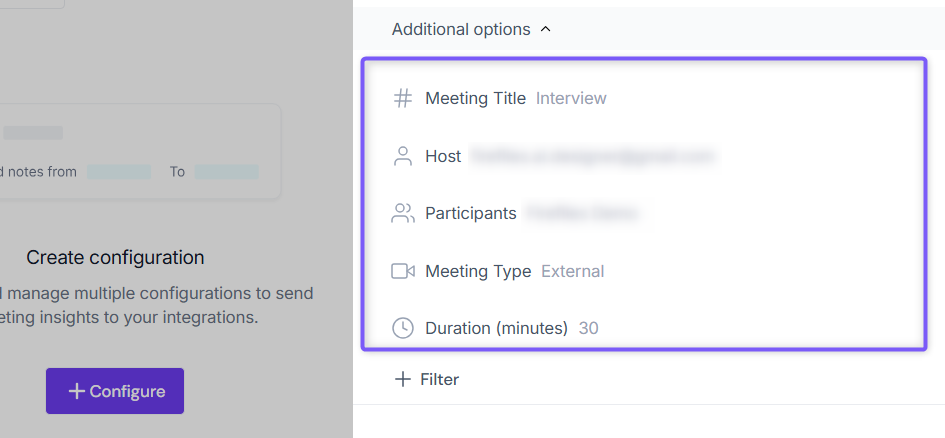
🔀 Apply Multiple Filters
Combine filters for more precise note saving.
Example: Title contains “Interview” AND host is john@example.com.
Rules can use AND (all conditions must match) or OR (any condition matches).

You can view all the filters currently applied to your configuration. In this example, notes will only be saved to OneNote for meetings that match all of these criteria:
✅ Example applied: Title contains "Client Review", host = "John", participant = "Mary", type = "External".
💾 Save Your Configuration
Click Save to activate the integration — a flash message will confirm that your configuration has been successfully added.
.gif")
You can set up multiple configurations — for example, one for internal meetings and another for client calls.
👥 Team Options
Sometimes, you may not want every teammate creating their own configurations for OneNote — especially if you want consistent organization or need to manage where meeting notes are saved. Integration Scope lets workspace admins decide whether the integration applies just to them or across the entire team.
Click the vertical ellipsis (⋮) next to your OneNote integration and select Team Options from the dropdown list.
A modal window will appear with these options:
Apply to entire workspace → Toggle this ON to apply the integration across your Fireflies workspace. All the team meetings accessible by the team admin will have notes sent to OneNote, keeping everything centralized.
📌 Meetings that are set to private in a teammate’s Privacy Settings won’t be pushed to OneNote unless you’re a Super Admin who can access meetings irrespective of team privacy settings.
Restrict non-admin usage → Toggle this ON to prevent non-admin members from creating their own OneNote configurations. This helps maintain consistent organization and compliance.
After adjusting the toggles to fit your team’s workflow, click Save to apply the changes.
Use workspace-level settings for confidential or company-wide meetings, and personal configurations when team members want to organize their own notes individually.

🛠 Manage Configuration
Over time, you may need to update your OneNote integration — whether it’s to rename a configuration, change where notes are saved, or remove ones you no longer use. Fireflies makes this simple with a few quick options:
✏ Edit Configuration Name → Give each OneNote configuration a clear, descriptive name so it’s easy to recognize (especially useful if you’ve connected multiple notebooks or sections). Just click the configuration name (e.g., Default Configuration), type the new name (e.g., Project Meeting Notes), and click outside the field to save.
Clear names help when managing multiple notebooks or sections within your workspace.

⚙ Edit Configuration Settings → Need to update where Fireflies sends your notes in OneNote? Click the vertical ellipsis (⋮) next to a configuration, select Edit, choose a different notebook or section, and click Update to save.

🔘 Enable or Disable a Configuration → Use the toggle switch next to a configuration to quickly control it. Toggle ON to automatically send meeting notes and summaries to OneNote; toggle OFF to pause the connection without deleting it.
This is helpful if you’ve connected multiple OneNote configurations (e.g., Team Notes and Client Projects) and only want one active at a time. Fireflies remembers your settings when you turn configurations back on.

🗑 Delete Configuration → If a configuration is no longer needed (for example, a project ends or your team no longer stores notes in that notebook), you can safely delete it. Click the vertical ellipsis (⋮) next to the configuration, select Delete, and confirm.
Deleting a configuration stops Fireflies from sending notes to that OneNote notebook, so ensure it’s no longer needed before removing.

📤 How Meeting Notes Appear in OneNote
Once connected, Fireflies automatically creates a new page in your chosen OneNote notebook and section after every meeting — complete with the meeting title, date, participants, summary, action items, and links to the full transcript and recording.
Everything stays neatly organized and easy to find, so your team can revisit key discussions anytime without digging through folders.

⏪ Push Past Meetings to Microsoft OneNote
Sometimes, the meetings you want in Microsoft OneNote happened before you connected the integration. Whether you enabled the integration later or want to add older meeting notes to Microsoft OneNote, Push Past Meetings lets you choose a date range and meeting type, then send those meetings in just a few clicks.
Note: Make sure you've connected Microsoft OneNote and created at least one push configuration before using Push Past Meetings. If you haven't, complete the Setting Up Your Configuration section above first.
Follow the steps below to push past meetings to Microsoft OneNote.
From the Microsoft OneNote integration page, click Push past meetings.

A dialog box will appear. Choose the following:
Date range → Select the meetings you want to send by choosing Last 7, 14, 30, 60, or 90 days, or specify a custom date range.

Meetings to push → Choose whether to push Meetings I attended, Meetings I organized or joined, or All my meetings.

Click Push. Fireflies will send the matching meeting notes to Salesforce using your existing configuration settings.

Meetings recorded after you connect Microsoft OneNote are sent automatically. Push Past Meetings is only needed for meetings that happened before the integration was connected.
❌ Disconnect Integration
If you no longer need Fireflies connected to OneNote — for example, when reorganizing notebooks or switching to a different note-taking tool — you can disconnect it anytime with a single click.
Click the Disconnect button to remove the OneNote integration. This immediately ends the connection, and Fireflies will no longer send meeting notes or summaries to your notebooks.
Once disconnected, Fireflies will stop creating pages in OneNote. You can always reconnect later if you decide to resume syncing your meeting notes.

🛠 Troubleshooting
Issue | What to Check / Do |
Meeting notes not appearing in OneNote | Ensure the OneNote integration is active and correctly configured. Double-check the selected notebook and section, then click Test Connection to verify the link. |
Section ID field is empty | This field fills automatically once you select a section. If it stays blank, copy your section link from OneNote and paste it into the field manually. |
Duplicate or missing meeting pages | Review your Integration Rules — if filters are too specific, some meetings might not sync. Try enabling All Meetings to capture everything. |
Authorization or login issues | Reconnect your Microsoft account to refresh access. Make sure you have permission to create and edit pages in the chosen notebook or section. |
Still stuck? Contact support via this link for more help.
❓ Frequently Asked Questions
Q1. Can I choose which OneNote notebook Fireflies sends meeting notes to?
Yes — during setup, you can select any notebook and section you have access to, and Fireflies will automatically publish new pages there.
Q2. Can I edit my meeting notes once they’re in OneNote?
Absolutely. After Fireflies sends your notes, you can open them directly in OneNote and make any edits, highlights, or comments as usual.
Q3. Do Fireflies overwrite existing notes in OneNote?
No — Fireflies creates a new page for each meeting, so your existing notes remain unchanged.
Q4. Why am I seeing notes created by fred@fireflies.ai or sample@fireflies.ai?
These are sample notes created for testing purposes. If you see entries from these addresses in OneNote, it means the integration setup was tested using sample data.
🔄 Recap
The OneNote + Fireflies integration keeps your meeting notes organized and accessible automatically:
Centralized → All transcripts, summaries, and action items are stored neatly in your chosen OneNote notebook and section.
Effortless → Fireflies automatically creates and updates notes after every meeting—no manual uploads needed.
Collaborative → Your team can view, edit, and comment on meeting notes directly in OneNote anytime.
📚 Related Guides
Fireflies Note-Taking Integrations → Explore other note-taking tools like Notion, Google Docs, and Google Sheets that work seamlessly with Fireflies.
Real-Time Notes Feature → Capture notes live as the meeting happens.
Download Transcripts, Summaries & Recordings → Export your meeting data in formats you need.