How to integrate Ashby with Fireflies
Last updated: August 27, 2026
Fireflies now integrates with Ashby, the AI-first recruiting platform trusted by modern, fast-growing teams. With this integration, every candidate conversation captured with Fireflies can be auto-logged in Ashby — helping recruiters stay focused, not buried in manual tasks.
This setup is intended for use at an organization level, and not for individual users.
Click here to set up your Ashby Admin Account
Click here to set up for your Fireflies team.
How to Set It Up
🔑 Step 1: Generate your Ashby API Key
Only Ashby Admins can connect the integration. This ensures secure access and is required because Ashby does not support user-level API keys. This Setup is intended for use at the organisation level, not for individual recruiters.
Follow these steps:
Go to Ashby Admin Settings → API Keys
From your Ashby dashboard, click Admin in the top nav bar and scroll to the API Keys section under Integrations.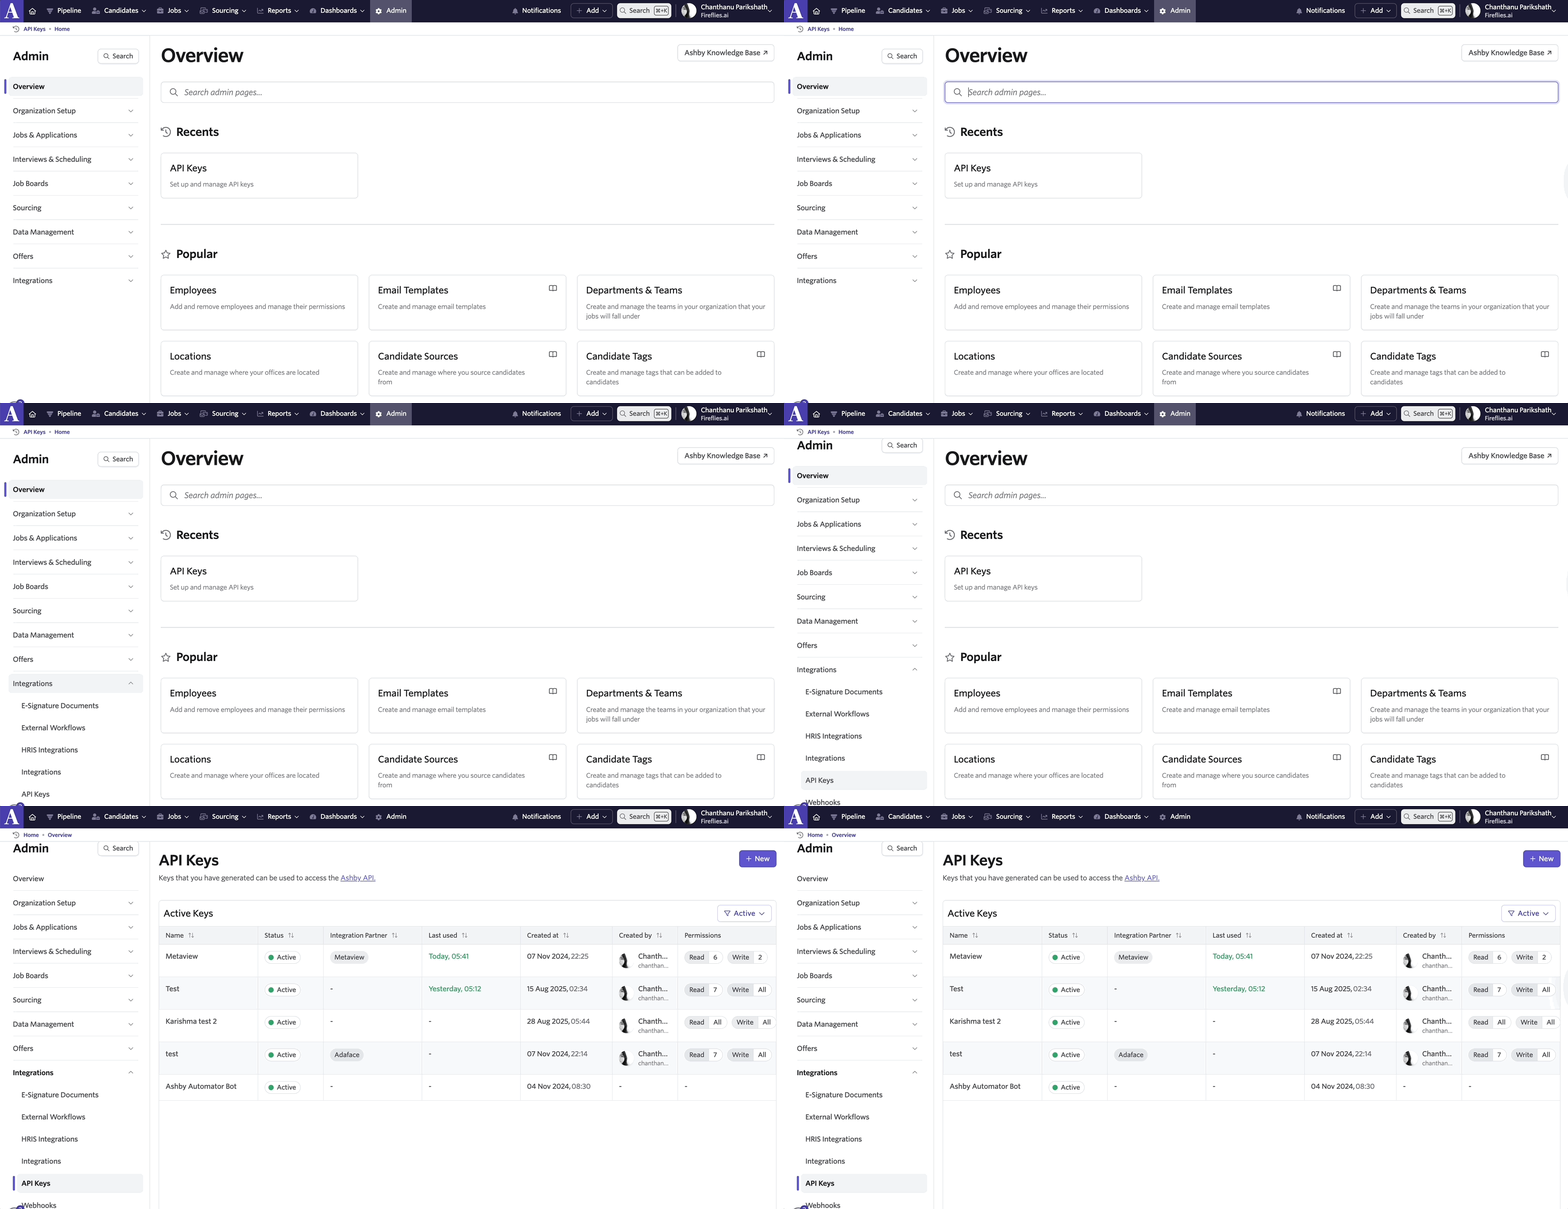
Create a new API key
Click + New, give it a name (like Fireflies Integration), and choose access scopes (e.g. Candidate Read/Write).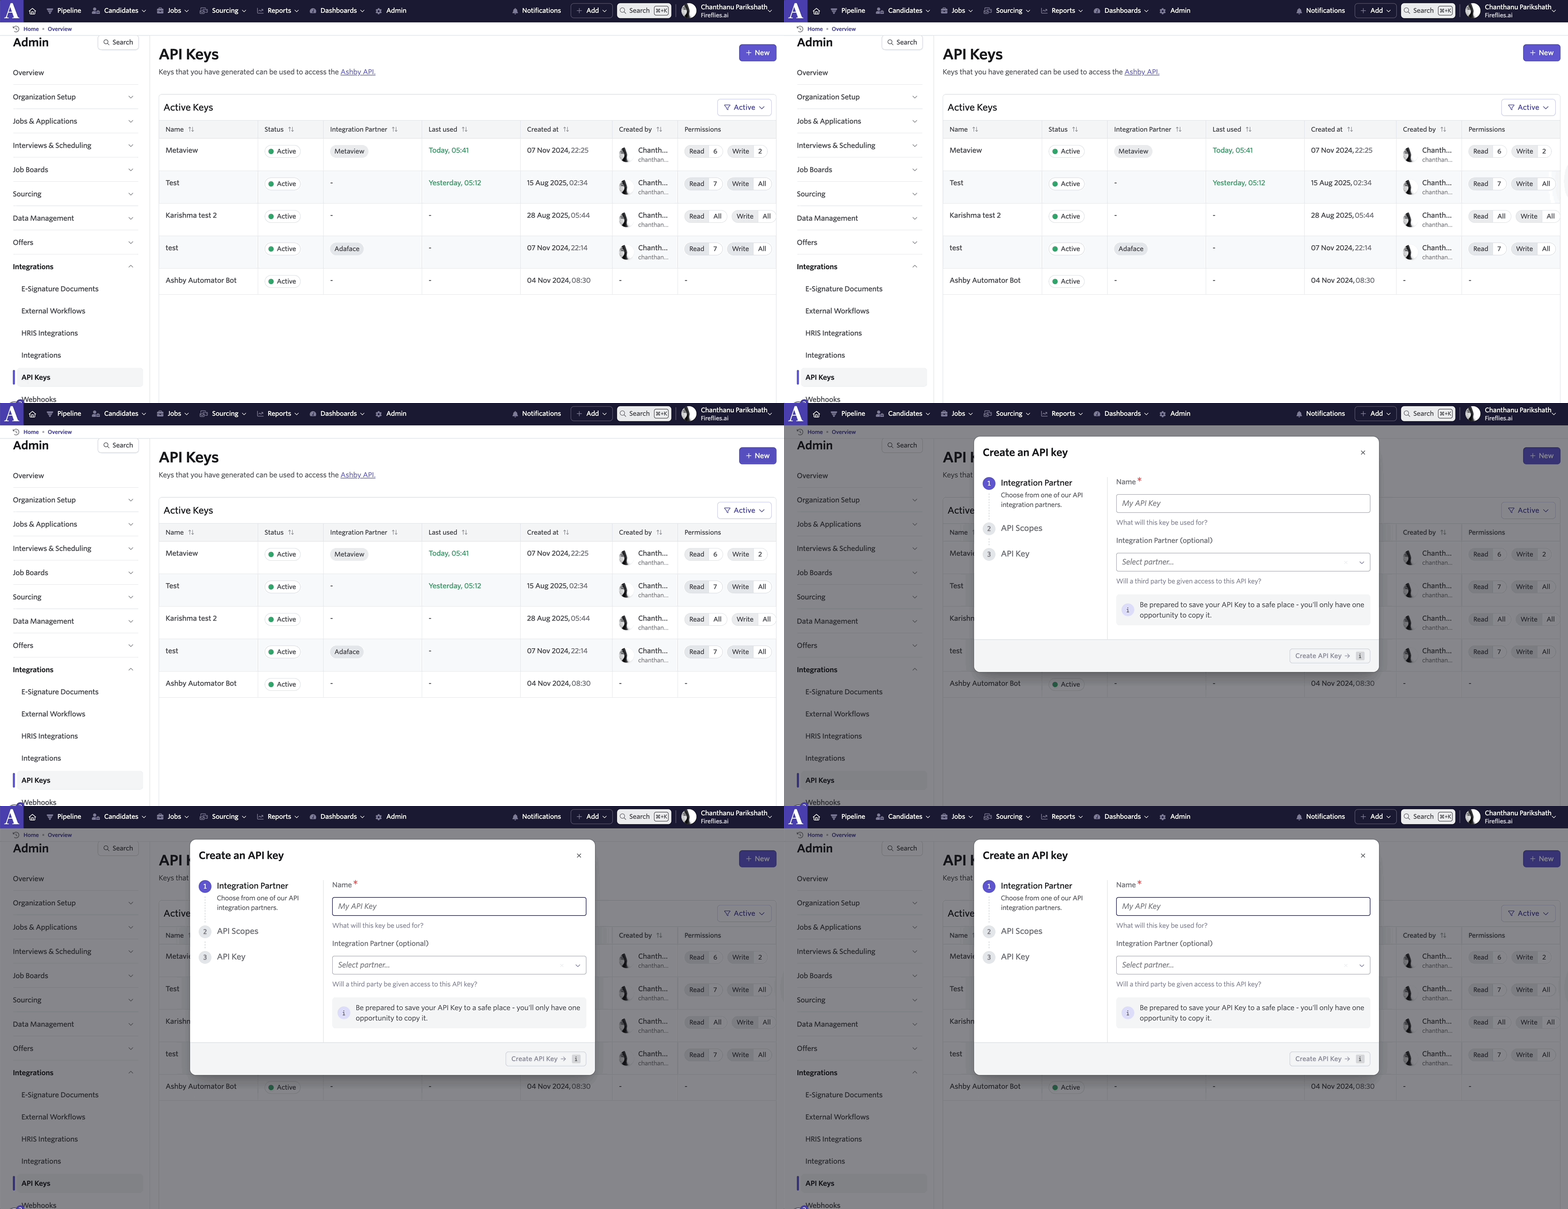
Copy your API key
You'll only get one chance to copy it. Save it securely — you’ll need this in Fireflies.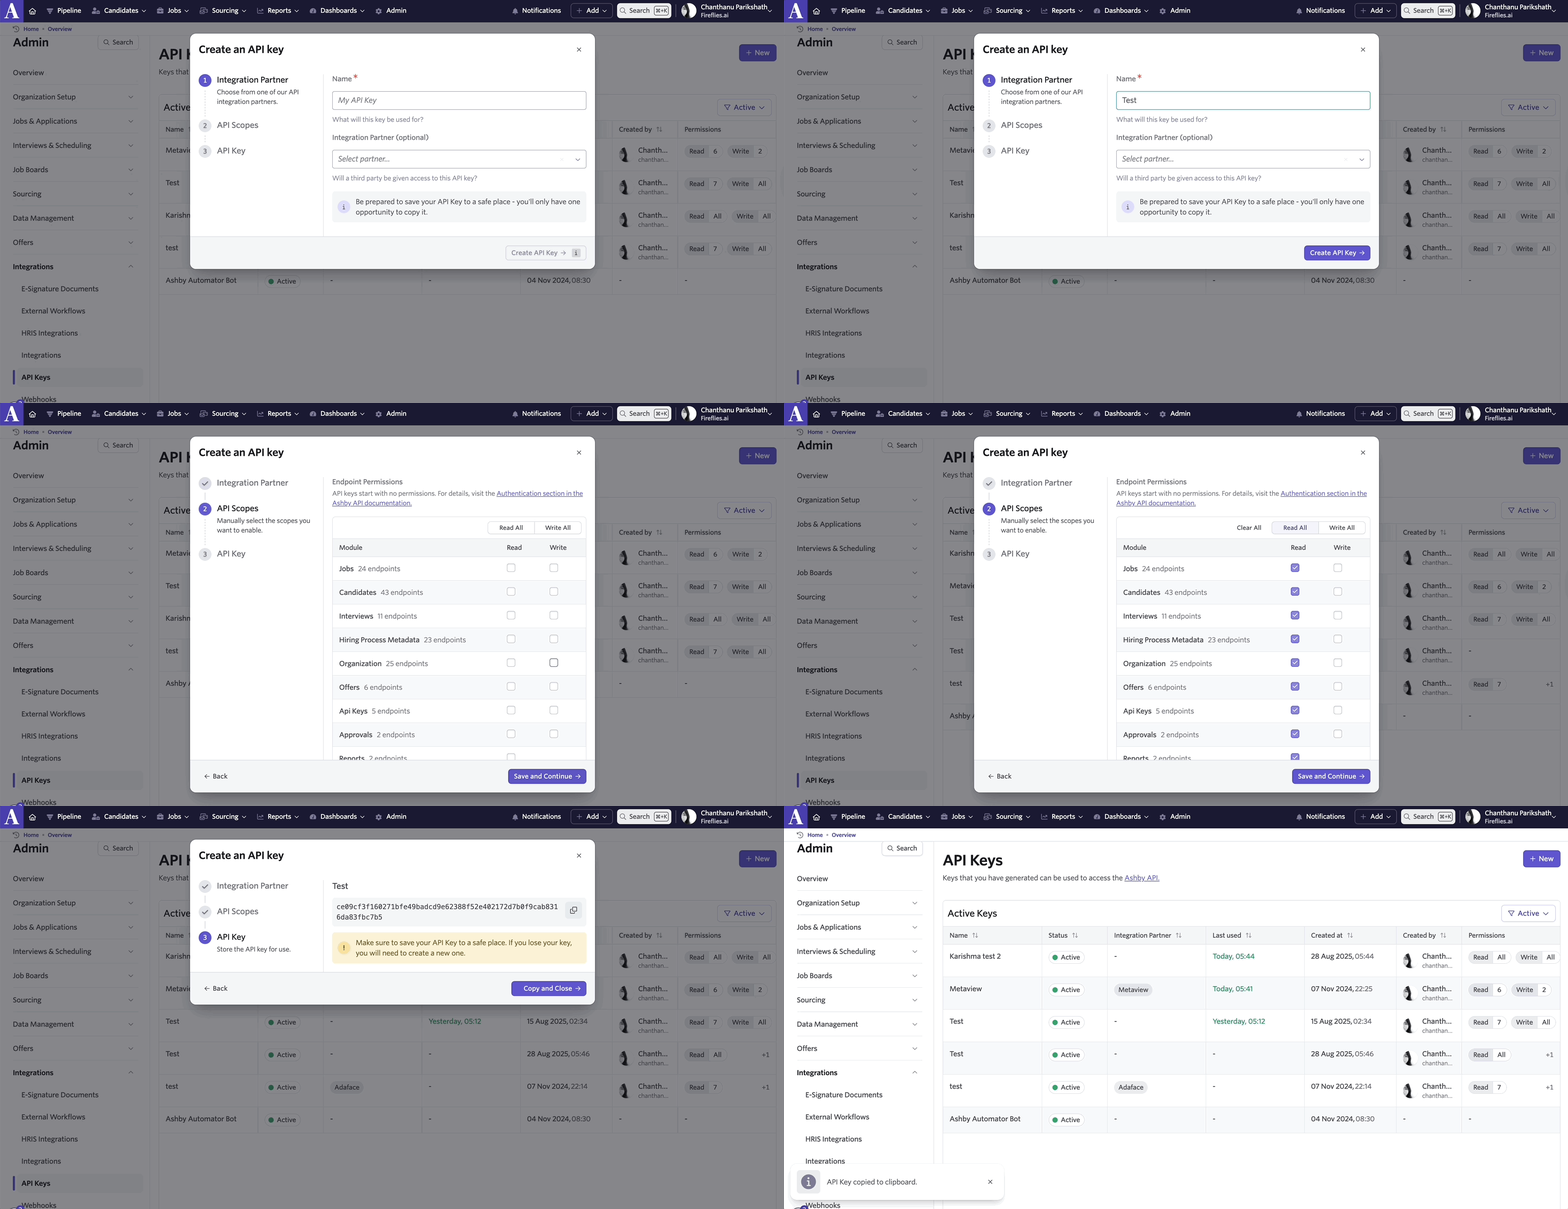
Step 2: Connect Ashby to Fireflies
Log in to your Fireflies account, go to the Integrations page, and search for Ashby. Click on it to get started.
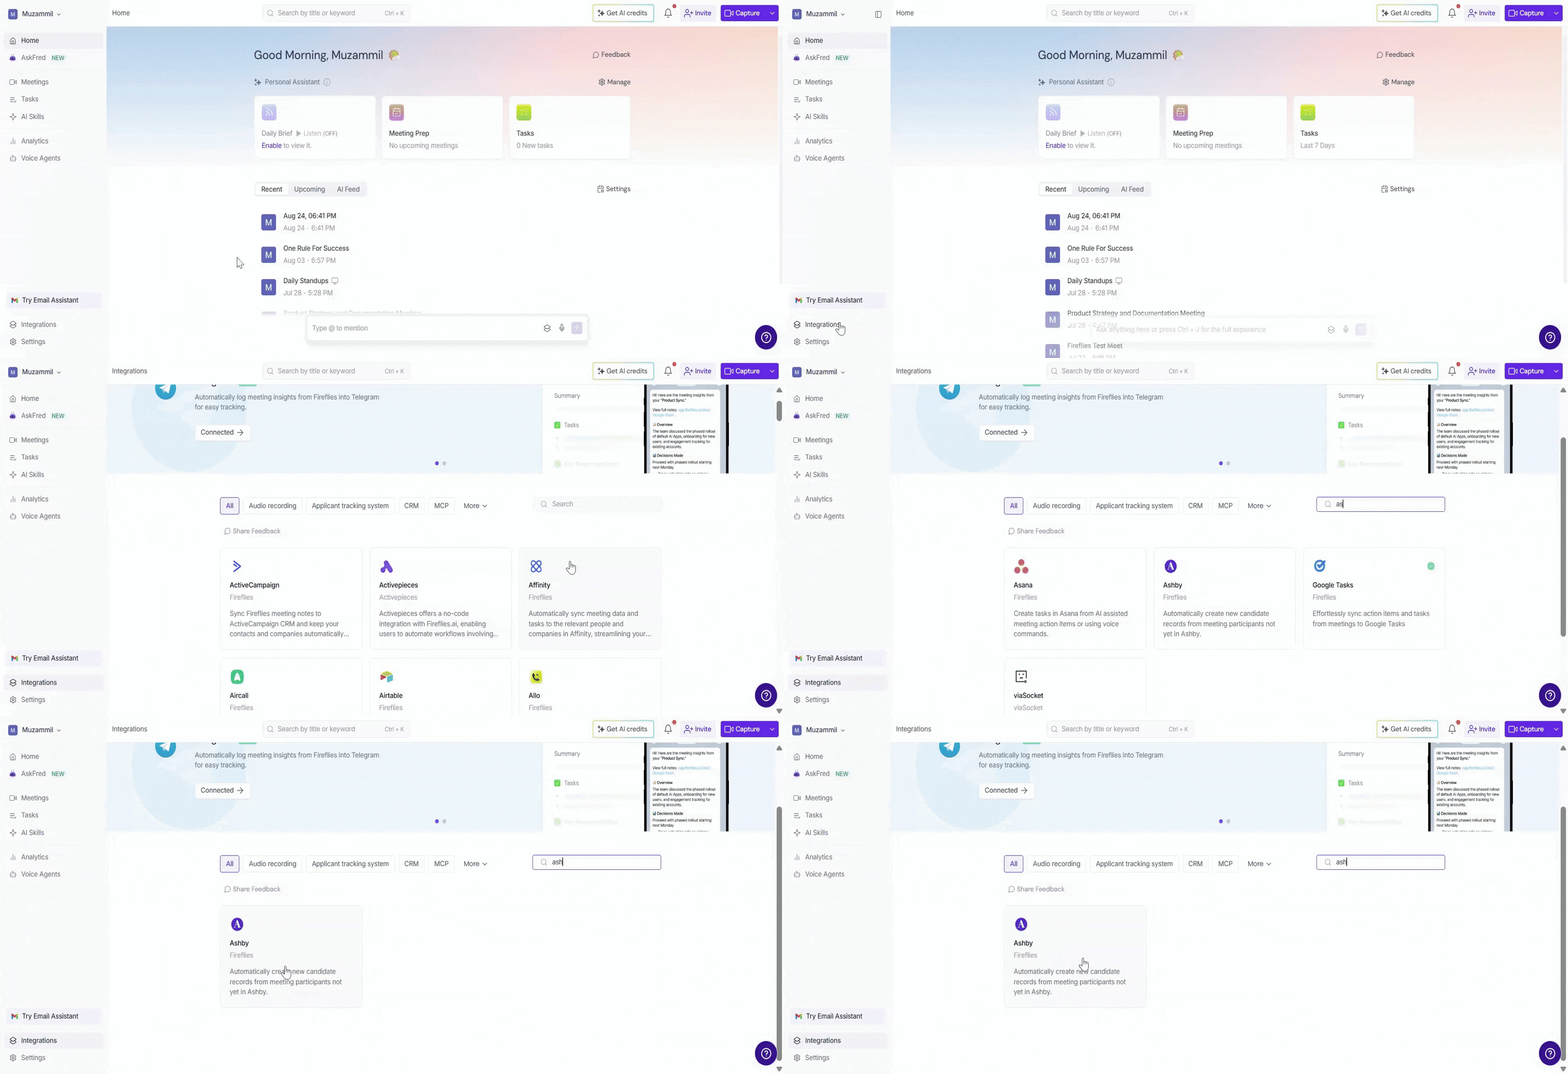
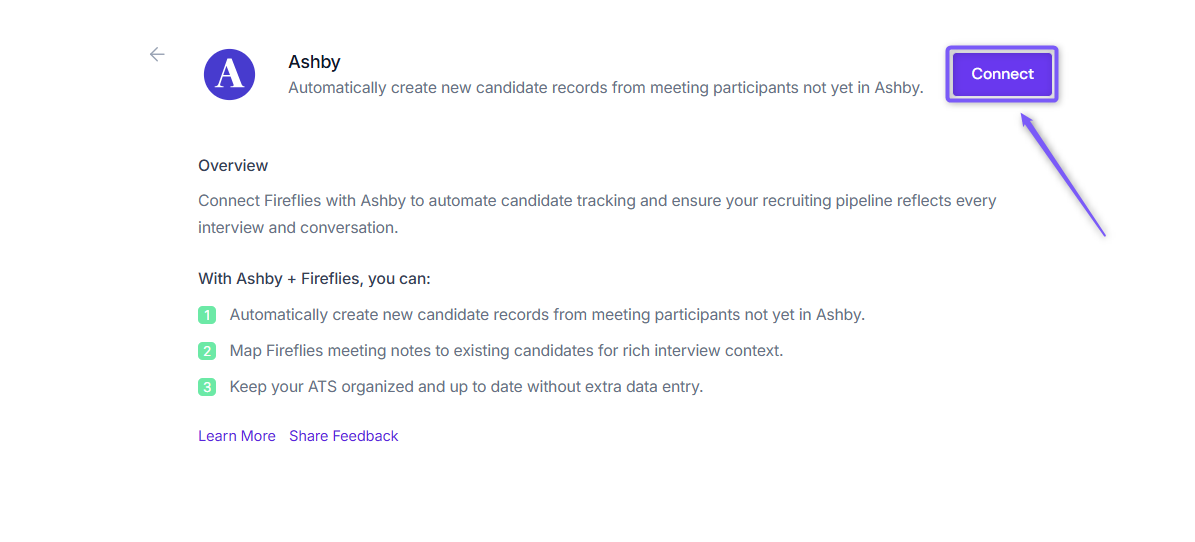
Click Connect.
Paste your Ashby API Key (you’ll find this in your Ashby admin dashboard). Lastly, click Authorize
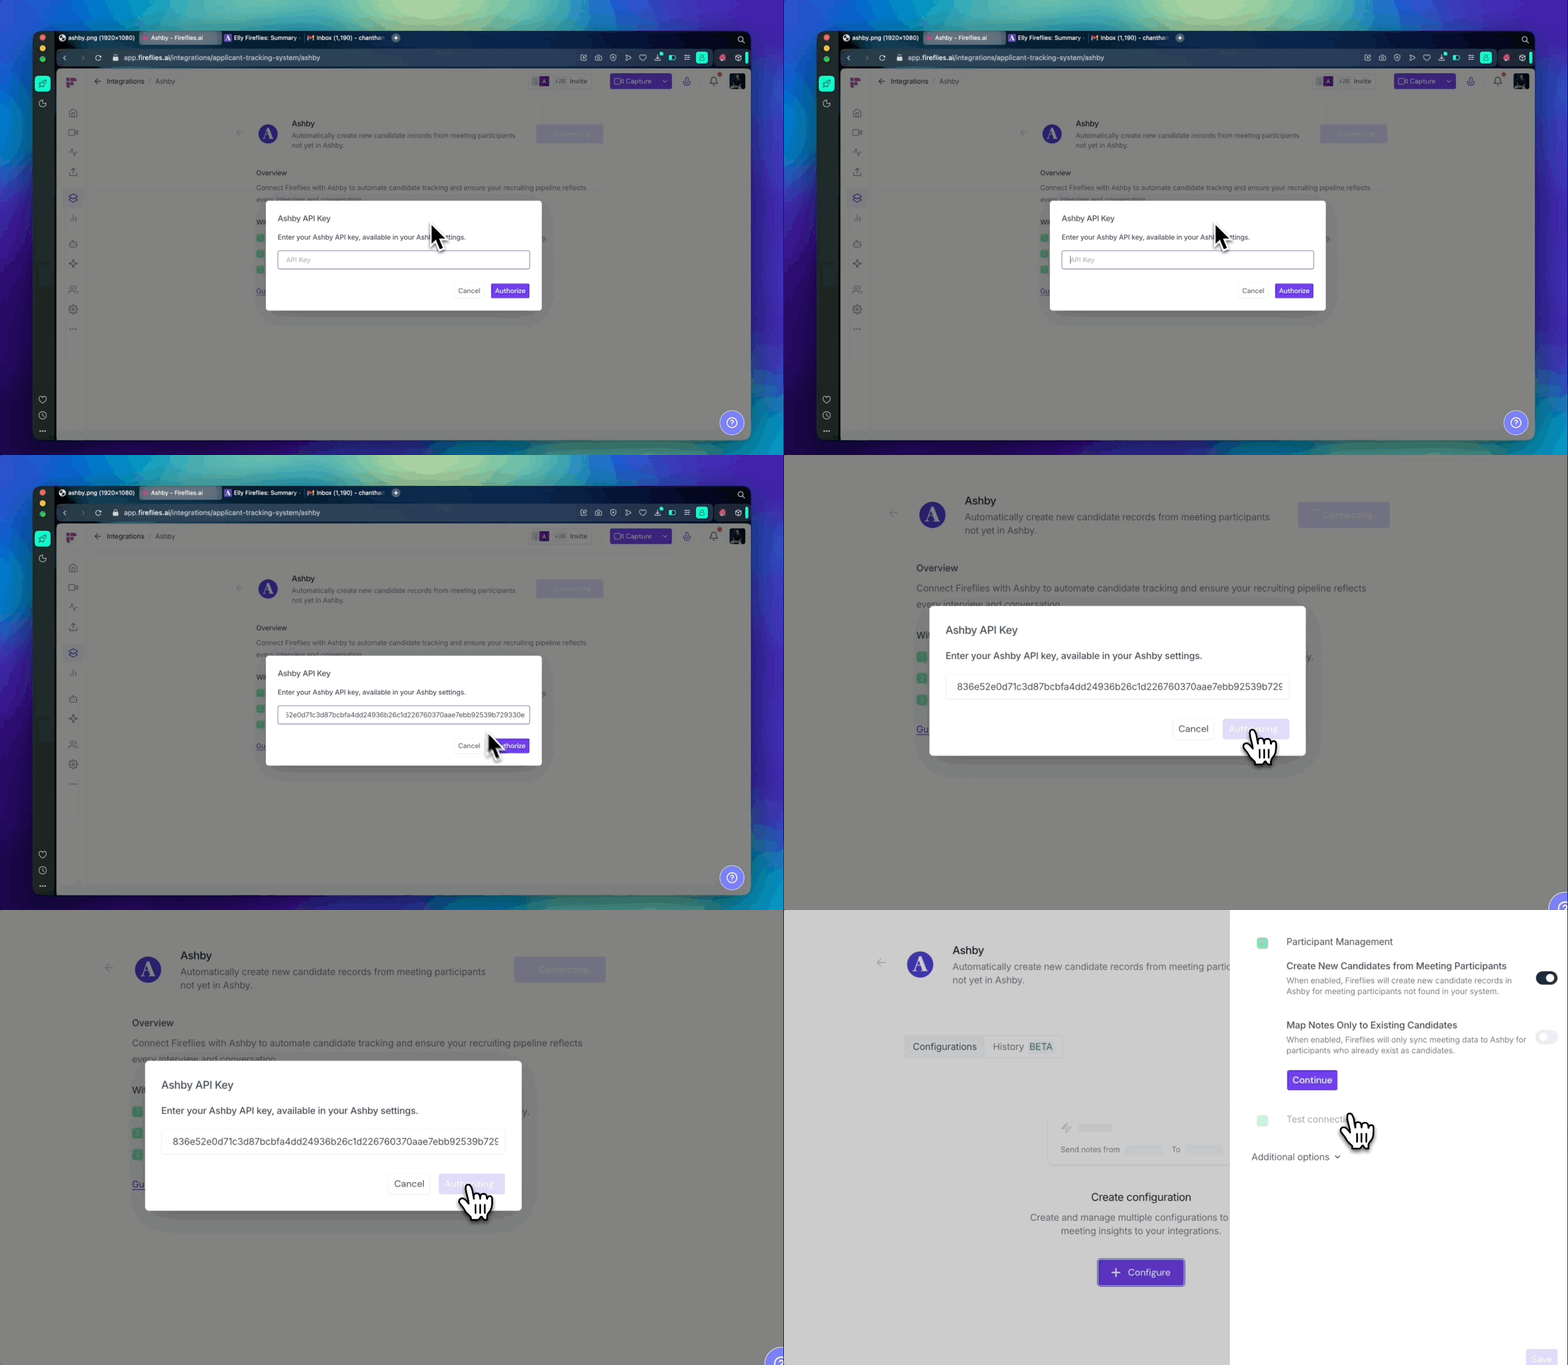
Once authorized, the Fireflies configuration panel will open.
⚙ Configure Integration Settings
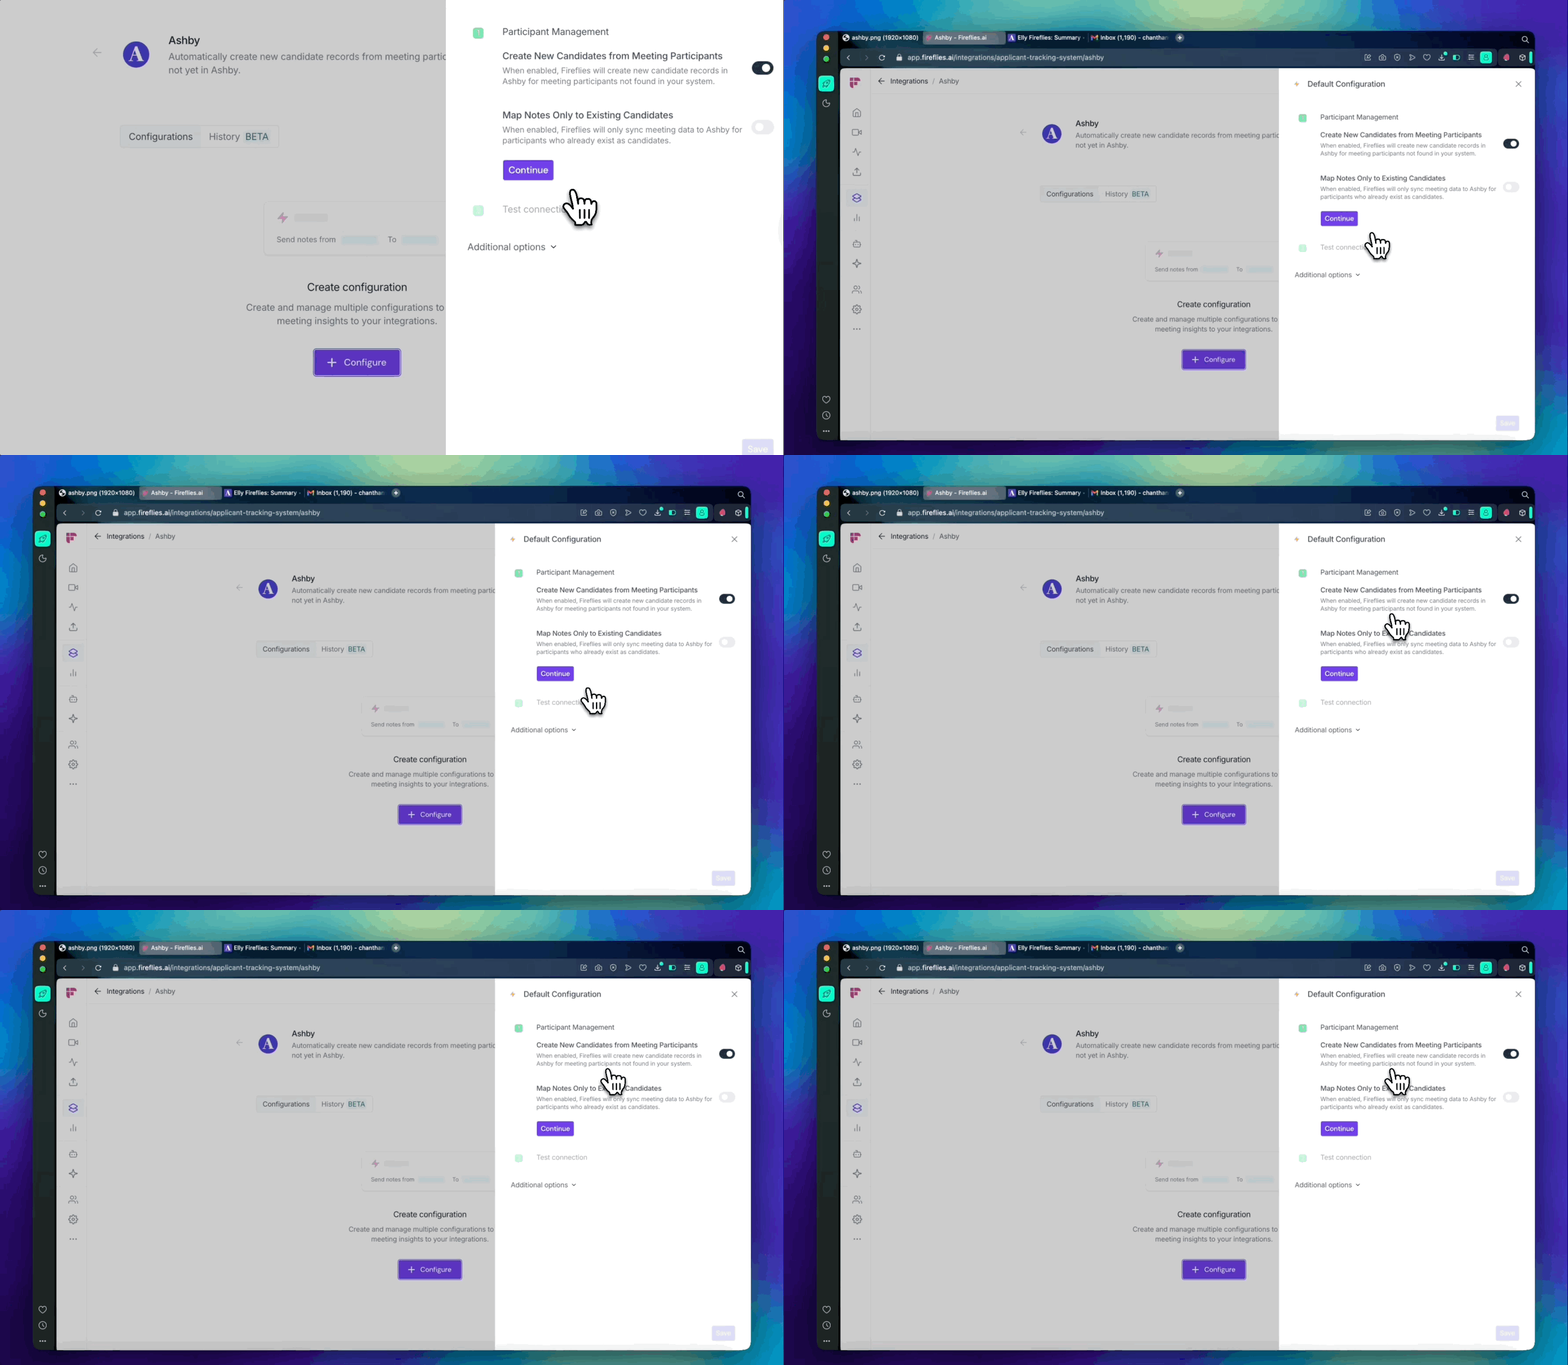
Step 3: Configure Participant Management to decide how Fireflies handles candidate mapping
You'll see two toggle options:
🆕 Option 1: Create new candidates from meeting participants
When ON, Fireflies will auto-create a candidate record in Ashby if the participant isn't already in the system.
Ashby distinguishes between candidates and interviewers using the participant’s email domain.
Caution: Enabling automatic candidate profile creation means Fireflies will also create candidates for interviewers using non-domain emails — like external recruiters or agencies.
This can result in interviewers being mistakenly added as candidates.
🔁 Option 2: Map notes only to existing candidates
When ON, Fireflies will only sync notes to candidates already present in Ashby — no new profiles created.
✅ Best for later-stage interviews or structured pipelines where all candidates are pre-entered.
You can toggle these based on how much control you want over candidate data creation. You also have an option to test the connection with the sample data
Step 4 (Optional but Recommended) Apply Integration Rules (Business & Enterprise Only)
Available to all Business & Enterprise plan users, integration rules let you control which meetings trigger a sync.
To access:
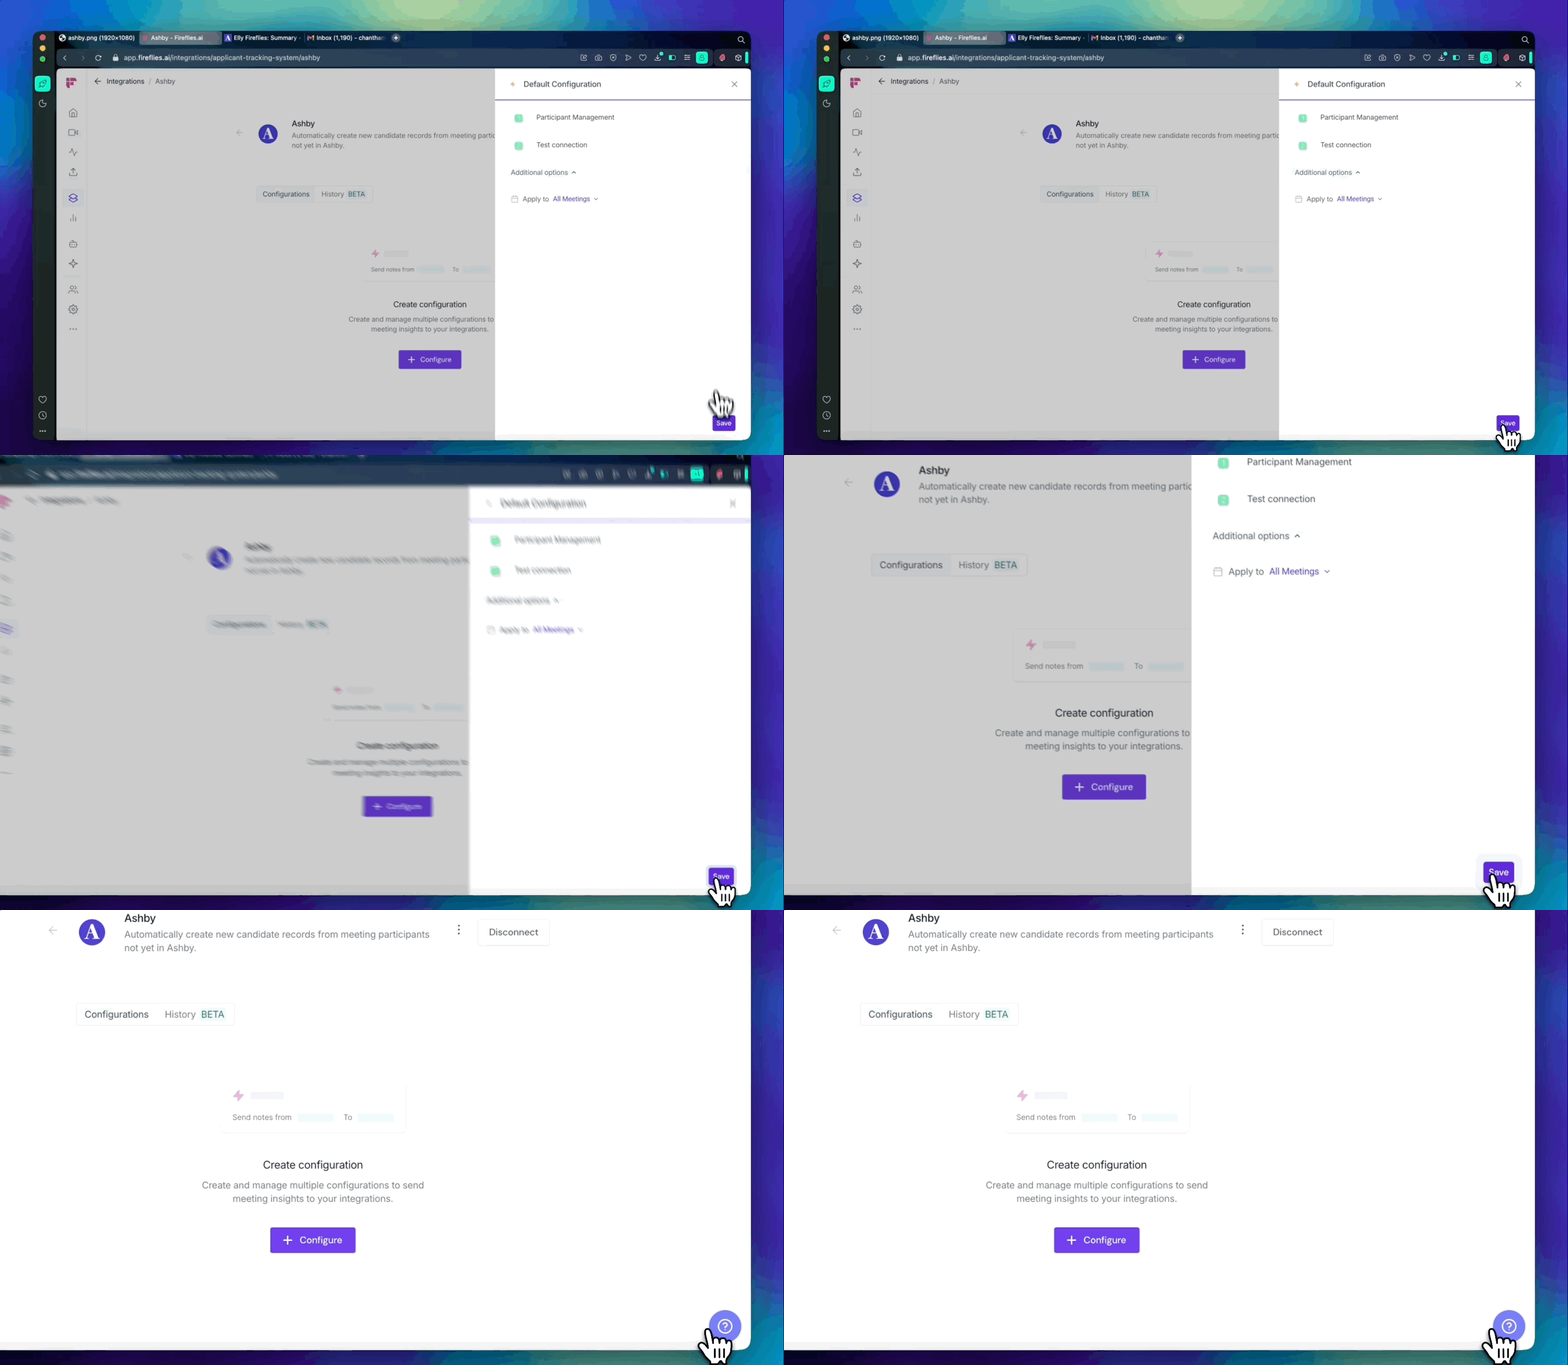
Under your config, click Additional Options
Keep the default: All Meetings Or apply filters:
By Meeting Title (e.g. “Interview”, “Screening Call”)
By Meeting Host
By Participants
By Meeting Type (internal vs external)

Example: Only sync interviews hosted by Jane that include “Interview” in the title.
You can stack multiple filters with AND/OR logic.
Example: Only sync meetings hosted by Alex that include “Client Sync” in the title.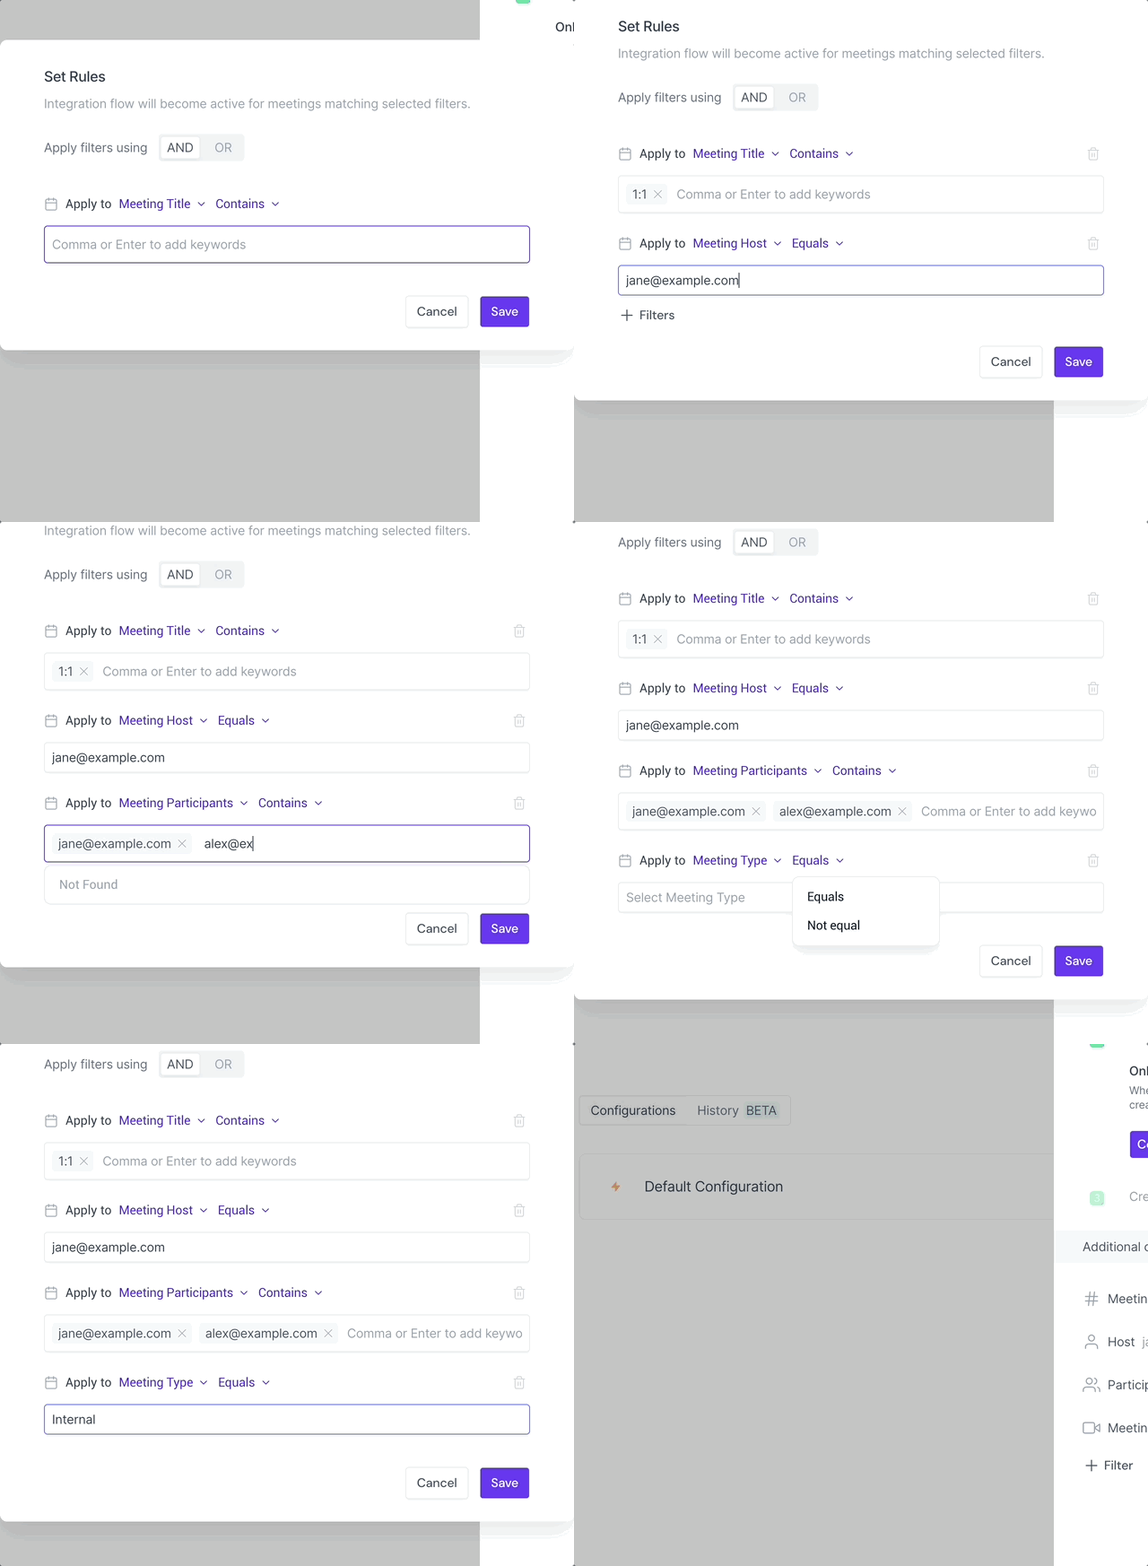
Step 5: Save & (optional) Rename Your Configuration
Once done, click Save.
You’ll see a success message that your configuration is active.
We recommend:
✏ Renaming your configuration for clarity
➕ Adding more configs later if you have multiple use cases
👥 Team Integration Settings
Workspace admins can control how the Ashby integration is used across their team. The available options depend on your plan and workspace role.
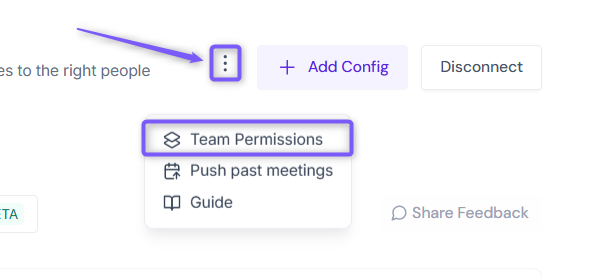
Click the vertical ellipsis (⋮) next to your Ashby and select Team Permissions from the dropdown list.
Business and Enterprise
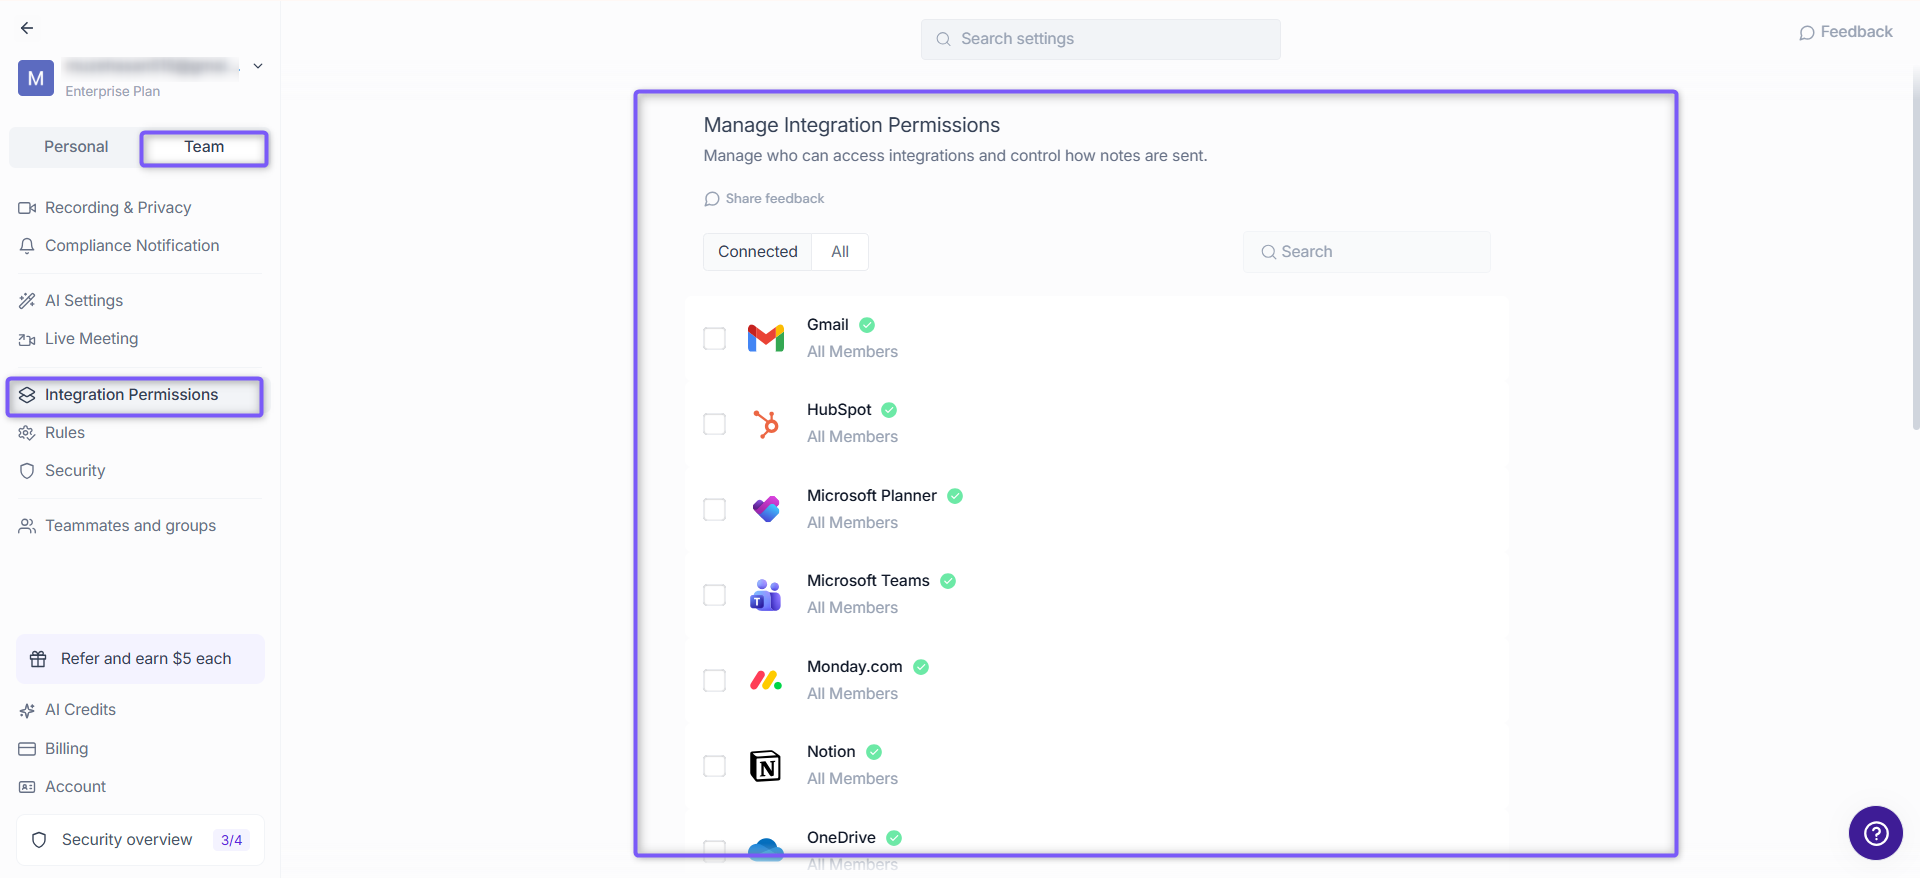
If you are a Workspace Admin on a Business or Enterprise plan, you can manage granular Integration Permissions for the integration, including who can access and connect it.
📖 See Integration Permissions: Control Who Can Access and Connect Integrations for detailed instructions on managing integration permissions.
Free and Pro
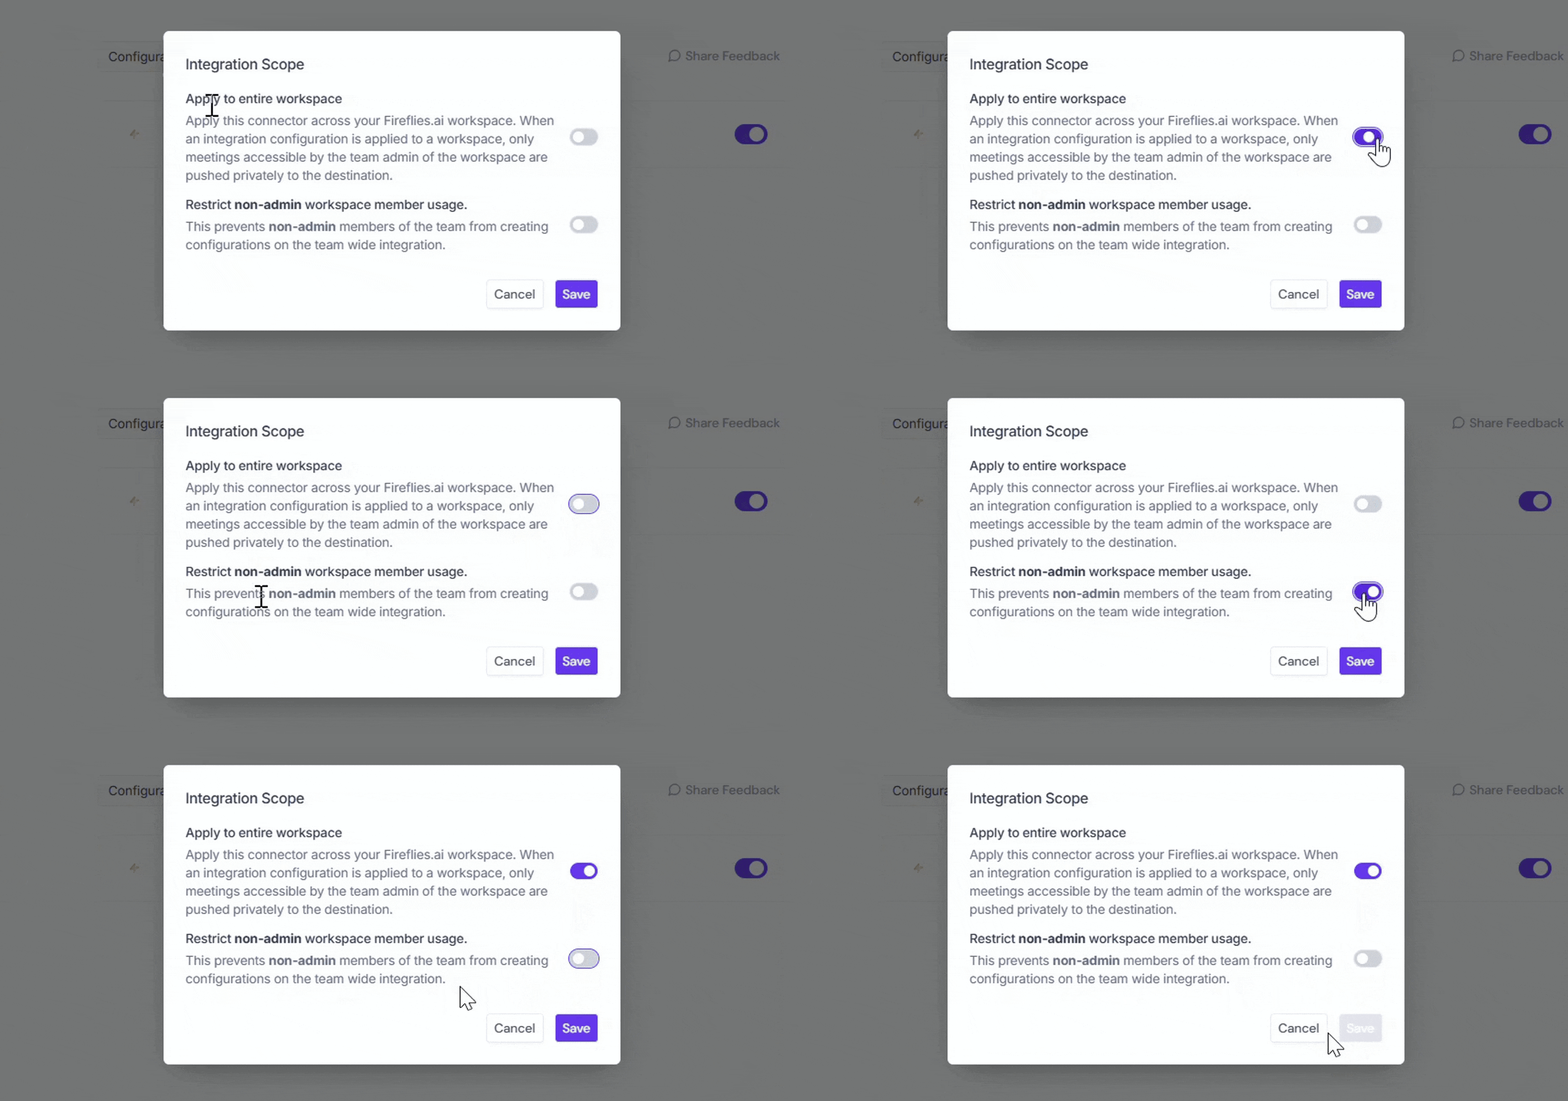
Free and Pro users do not have access to the full Integration Permissions dashboard. Instead, Team Permissions opens a modal with the available workspace-level settings.
Apply to entire workspace → Toggle this ON to apply the Ashby integration across your Fireflies workspace. All team meetings accessible by the team admin will have notes sent to Ashby, keeping everything centralized.
📌Meetings that are set to private in a teammate’s Privacy Settings won’t be pushed to Ashby unless you’re a Super Admin who can access meetings regardless of privacy settings.
Restrict non-admin usage → Toggle this ON to prevent non-admin members from creating their own Ashby configurations. This helps maintain consistent settings and avoid unintended changes.
After adjusting the toggles to fit your team’s workflow, click Save to apply the changes.
Note: Business and Enterprise Workspace Admins have access to granular integration permissions, while Free and Pro workspaces have more limited workspace-level controls.
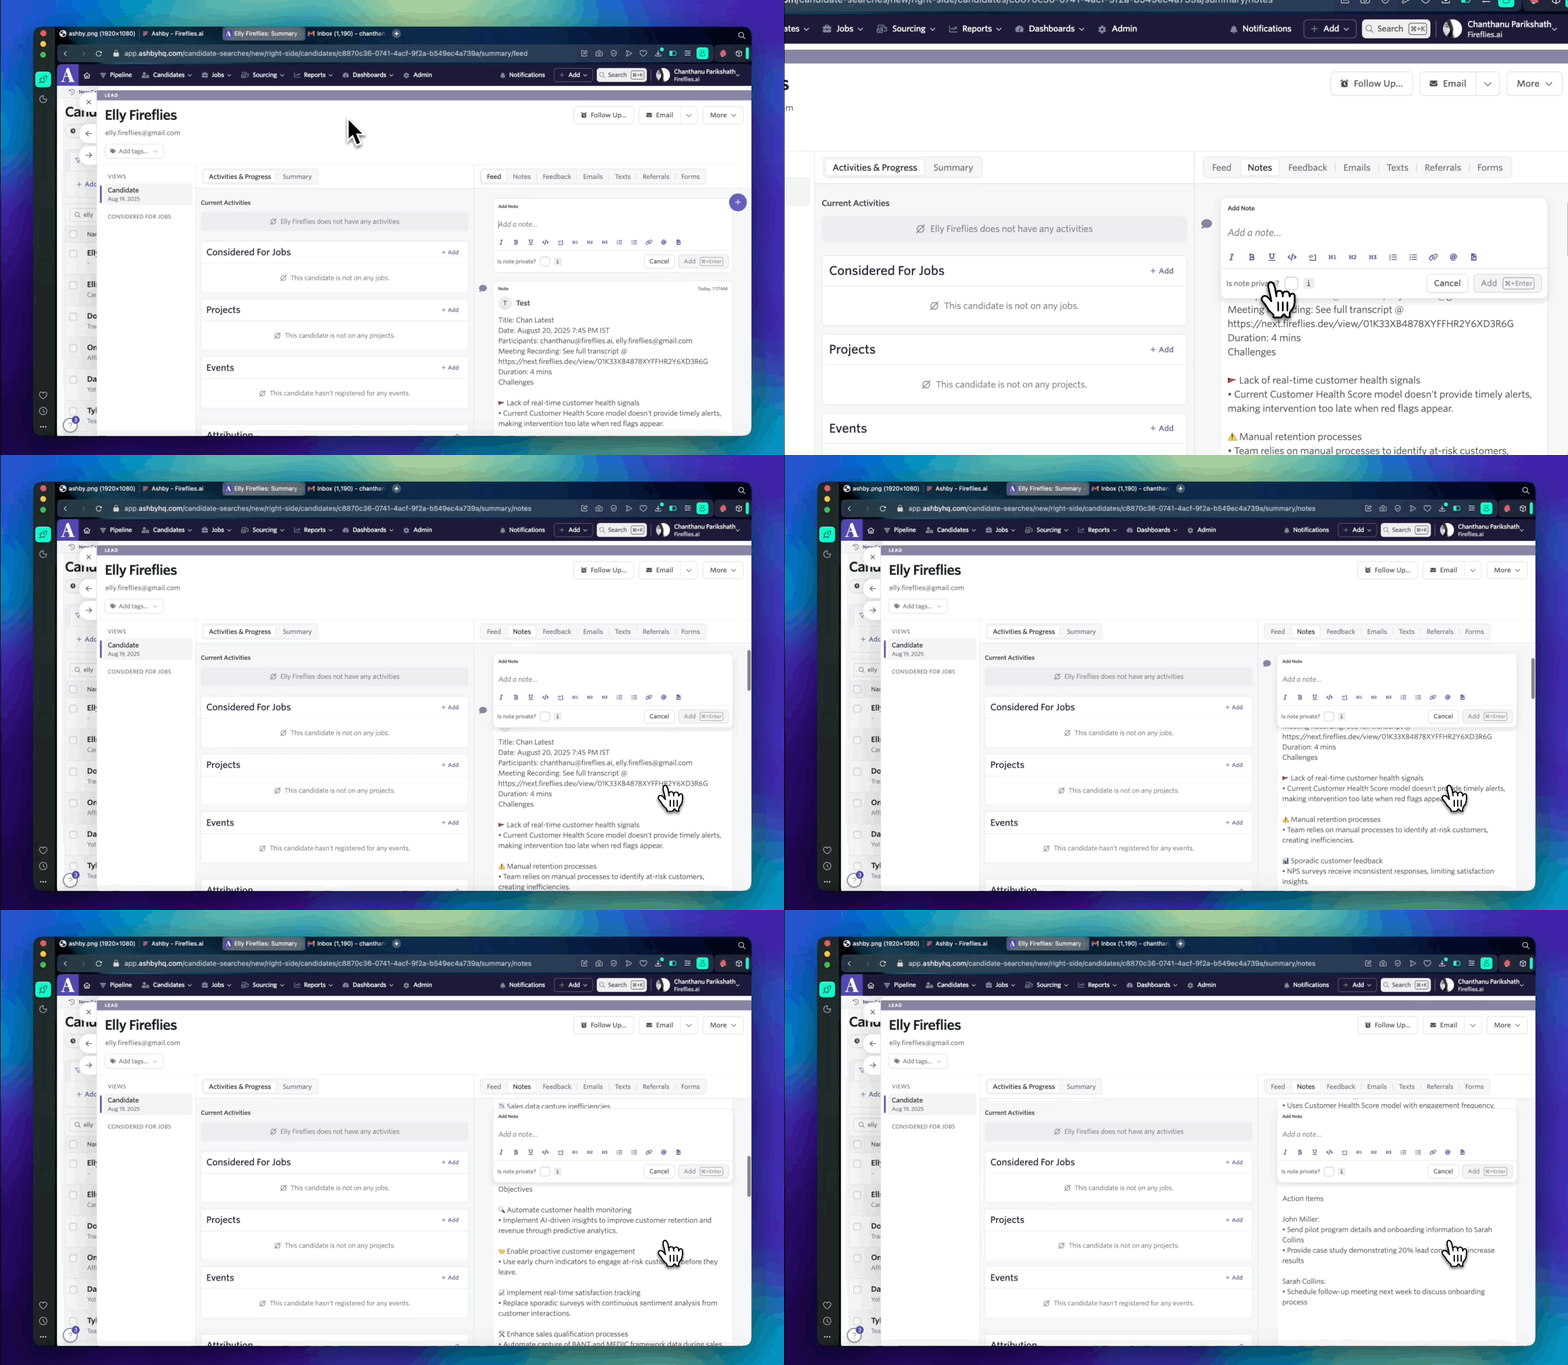
📤 How Notes Appear in Workable Ashby
Notes appear directly inside the candidate’s profile under the Notes section.
Here’s what Fireflies logs:
📝 Meeting Title
📅 Date & Time
👥 Participants (including employees and candidates)
🔗 Hyperlinked meeting recording & Notepad
📖 Full AI-generated Summary (with clear sections)
✅ Action Items at the end
⏪ Push Past Meetings to Ashby
Sometimes, the meetings you want in Ashby happened before you connected the integration. Whether you enabled the integration later or want to add older meeting notes to Ashby, Push Past Meetings lets you choose a date range and meeting type, then send those meetings in just a few clicks.
Note: Make sure you've connected Ashby and created at least one push configuration before using Push Past Meetings. If you haven't, complete the Setting Up Your Configuration section above first.
Follow the steps below to push past meetings to Ashby.
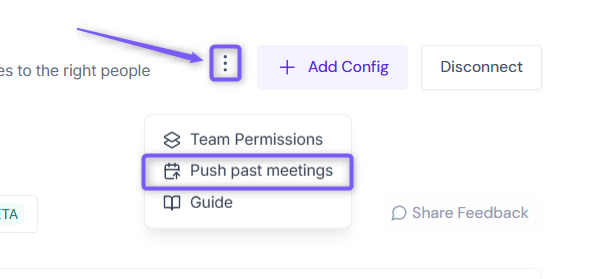
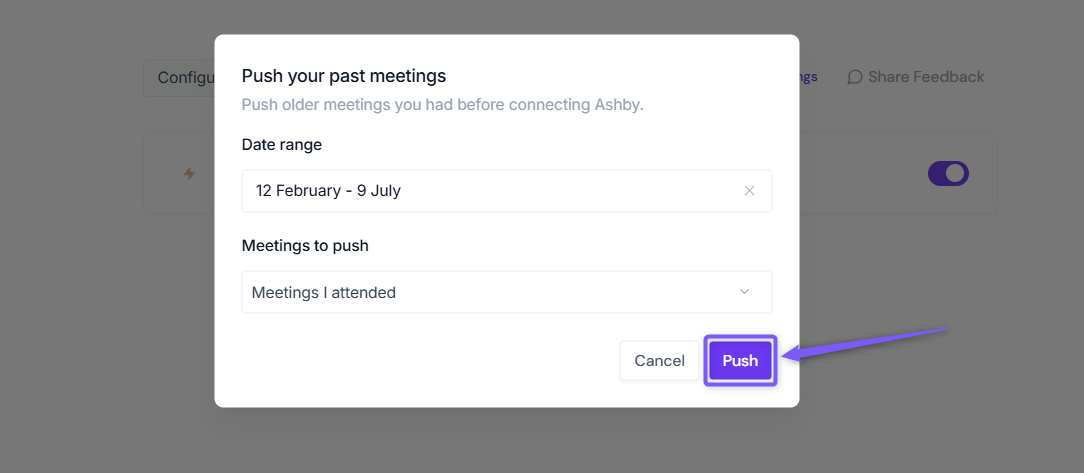
From the Ashby integration page, click Push past meetings.
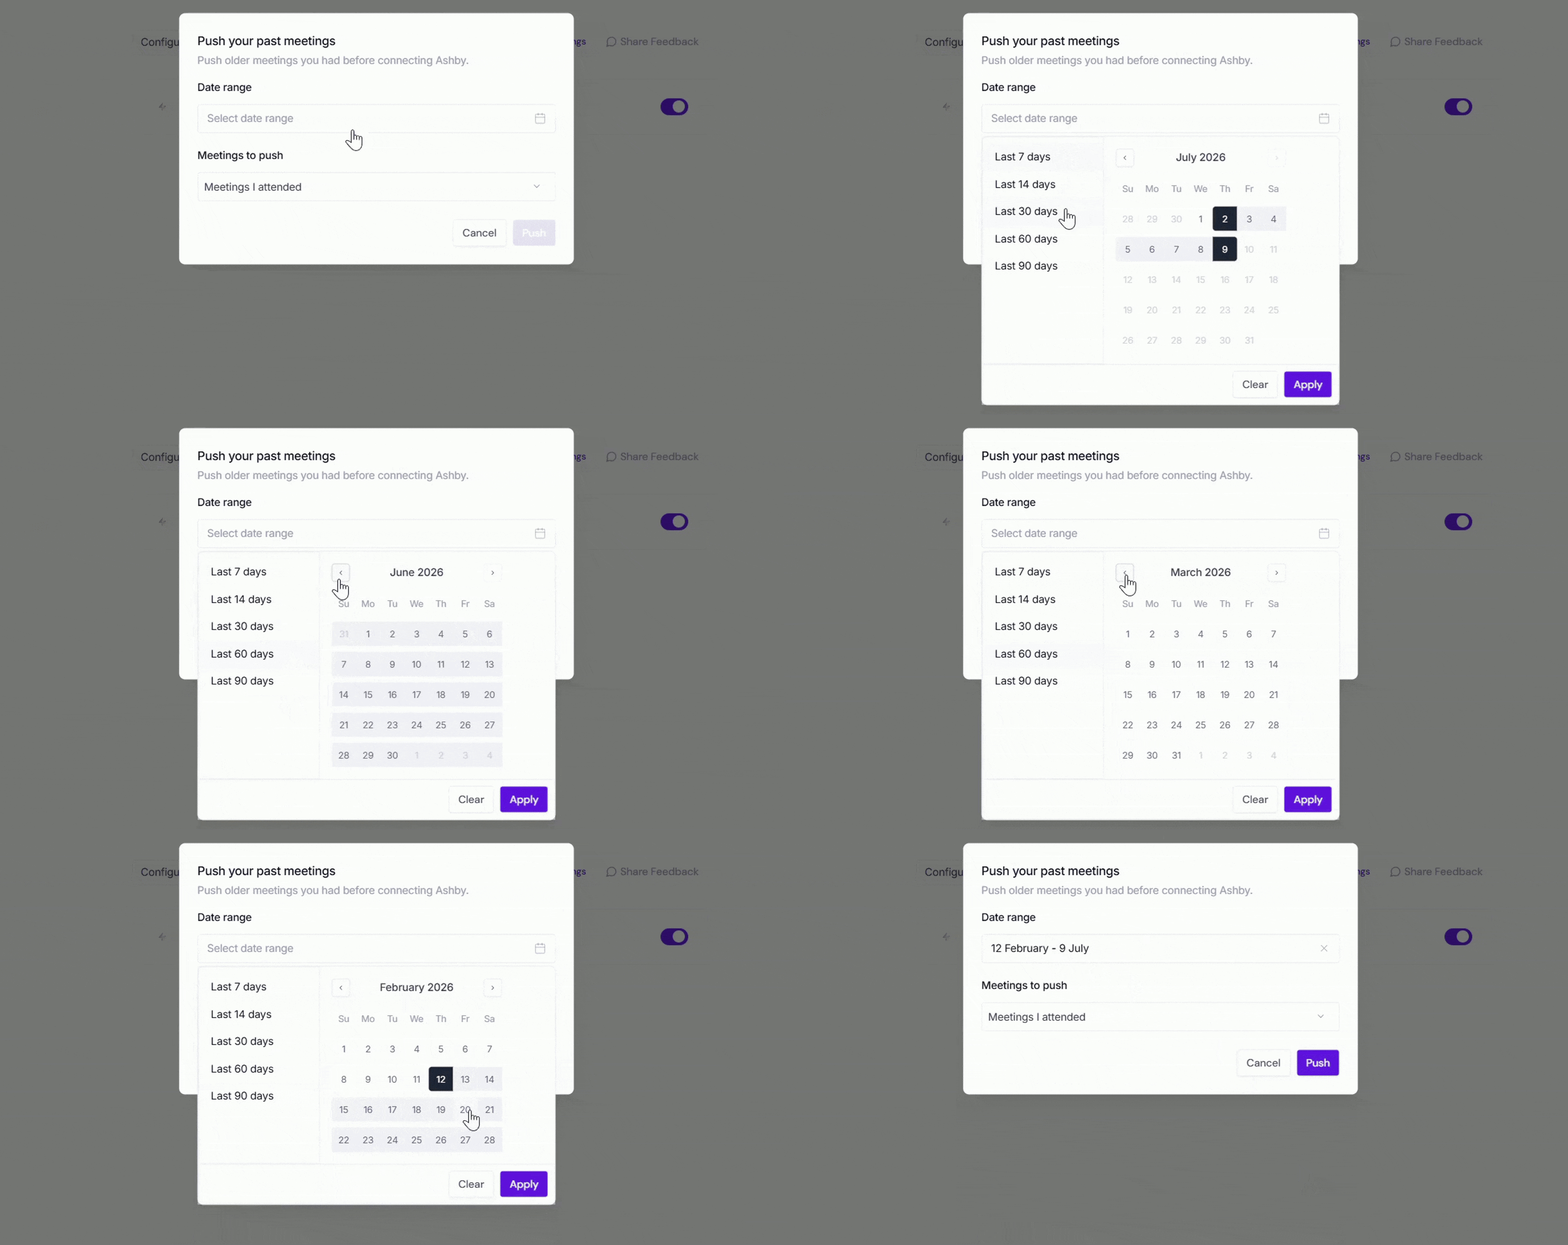
A dialog box will appear. Choose the following:
Date range → Select the meetings you want to send by choosing Last 7, 14, 30, 60, or 90 days, or specify a custom date range.
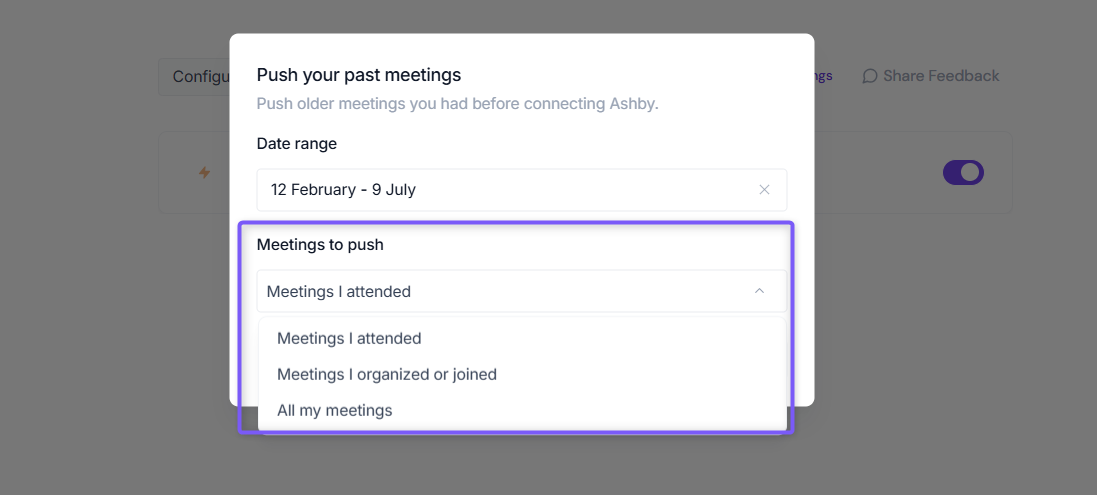
Meetings to push → Choose whether to push Meetings I attended, Meetings I organized or joined, or All my meetings.
Click Push. Fireflies will send the matching meeting notes to Ashby using your existing configuration settings.
Meetings recorded after you connect Ashby are sent automatically. Push Past Meetings is only needed for meetings that happened before the integration was connected.
🧠 Recap
Once connected, Fireflies can automatically:
✍ Log structured meeting summaries under the relevant Ashby candidate
👥 Create new candidate profiles (optional — you control this!)
🔁 Map notes to existing profiles if the candidate is already in your ATS
🧠 Apply meeting rules to decide which calls are synced
🔗 Hyperlink full meeting records for easier context retrieval
Each note is neatly formatted inside Ashby, with title, date, participants, full summary, and action items — fully searchable and accessible.